Showing posts with label Tutorial. Show all posts

21 April 2012

T-Slider Birthday Card Tutorial

Hellooo Crafty Friends!!!


As mentioned in my previous post, I would drop by with some pictures of my progress making the T-SLIDER CARD.   But I also should direct you to the original tutorial where I was directed so YOU TOO can make this fantastic card!   


link =  http://www.splitcoaststampers.com/resources/tutorials/tslidecard


YOU SHOULD READ THE TUTORIAL ABOVE and then REVIEW MY PICTURES FOR ADDED HELP.   Best of both worlds :)


OK - I stamped this image from our SWEET SHOP SUITE of products [Occasions Mini Catalogue] and my CLEAR MOUNT stamp set is called SWEET CAKE.   


I used my CALYPSO CORAL CLASSIC INK PAD and then swooped around the outside border with my PACIFIC POINT MARKER.  Stamped it and cut it out. 


 I stamped my sentiment into the provided box area.  Because 'HAPPY BIRTHDAY' pops up when they pull on the tab, I chose to use the 'Sweet Love' sentiment as its my girl and she's a sweetie! 

Then I attached it to a mat of our lovely, lovely blue paper - POOL PARTY cardstock. This is such a pretty colour, reminds me of so many things and I love its softness!  

To 'fancy it up' - I added GLITTER of course!   Read on for my tip!!!!!


TAYLOR's TECHNIQUE TIP 

"mix-it-up glitter 3D style! "

CLICK on the above photo and you will see that my cupcake glitter is quite thick!  And it is a mixture of small to large glitter flakes as well as multi-coloured!!   GUESS WHAT -  IT STARTS OFF WITH CLEAR GLITTER!!!   How did I do this? 

Well we often have more than one colour of glitter, right?  I also have Stampin' Up!'s Clear-ish DAZZLING DETAILS glitter bottle.  With the bottle's nozzle, I can accurately apply glitter glue following any outline.

 I apply a good thickness and while its wet, I drop other colours of glitter { flakes or glue style} into my clear glitter, and mix them gently with a toothpick.  If you look, I have clear, blue and our larger Champagne Glass Glitter mixed together.  
I also applied a thick mound of the Clear Dazzling Details to the CHERRY and then piled pink flakes of glitter overtop. I pushed it into a pile with the toothpick, so its very 3D! 
Finally, I added our Real Red Dazzling Details to the heart, and did so in 3 thin layers with a small drying period inbetween. The reason is because glitter glue can spread the glitter particles a bit too far apart, so adding at least a second layer is useful. 

So in the end, the CUPCAKE GLITTERS with more panache than it would in just clear - in my humble opinion.  Otherwise it would of appeared like the glitter I applied around the text box - pretty, but I felt my cupcake needed to appear as colourful as the area surrounding it. 

Next time you glitter - try this technique !!! 


CREATING THE FRONT FOLD-UP PANEL


Here is my 4 inch square using a sheet of colourful SWEET CAKE Designer Series Paper cut and folded according to the SCS Tutorial.  {the blue with white hearts in the background is the pattern on the opposite side of this double-sided cardstock} 

 Please note the little cut-out section to the left of my pencil.  That section is closest and parallel to the fold which is nearest the cut edge {which itself is perpendicular to the 1rst, 3rd cut edges}.  I just wanted to point that out - because I had trouble at first following the twists and turns of the video. 

I put my pencil there to show the cuts and folds of the interior flap. 


Here you can see the whole flap folded upwards!  

The following pictures show the next pieces you'll work with......
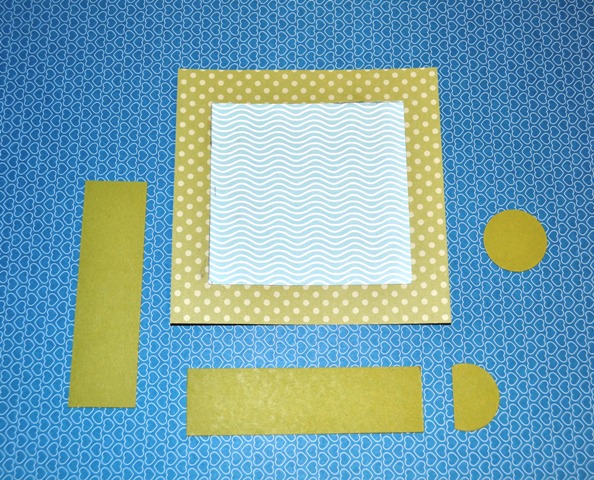

The large square has a section of cardstock which is only visible underneath the folding flap. The small rectangles are the T-SLIDE mechanisms and to create the Pull-Tab.  The circle and half circle help to re-inforce the end of the Pull-Tab itself.  More on those later. 


These parts are the POP-UP GREETING TAB.


Pictured from the back, you will insert the POP-UP GREETING TAB


Back side of folding flap, greeting tab. 


The greeting tab is inserted so that its top edge peeks out the front through
the slot, and is attached ontly with its back end  - which you can see is aligned to the fold of the flap. 


I double-check to see where and how the POP-UP GREETING TAB will be 
'BEFORE' I glue it in place!!!!   I had to do this several times to make sure it was
correct because we are using the impossible-to-remove 'Sticky-Tape' to attach it as we need its
strength, but its a do it right the first time maneuver!  


Yes - its working!  

Now return to the back side!   The 1rst rectangle portion of the T-SLIDE mechanism!  In the tutorial you
are shown where to attach each piece!  


Then the 2nd rectangle to complete the T-SLIDE mechanism. 


Edges are taped {minus the pull-tab section - see where green circles were added?}
I'm ready to attach the T-SLIDE/FOLDING FLAP/FRAME!!!! 

HERE IT IS ATTACHED TO THE GREEN BACKING FRAME!


I found it slide in and out better when I smoothed back part of the slot opening - I made a wee
'lip' {tiny blue strip by slot edge}.

Here it is from the back - all nice and tidy - and READY TO MOUNT TO THE CARD BASE!


Final step - I mount this to a CARD BASE of Pool Party Cardstock. 
I added a bit more decoration to the pull-tab, and added a satin BOW. 
THIS CARD IS READY TO IMPRESS!!!


It goes well with all the sweet things a young woman loves!  


Like I said - this card hangs between easy-to-difficult depending on your own experience!
For the few minutes it takes to pass through any difficulties pales to how this card will impress 
its intended!   Take the time to visit the TUTORIAL LINK {see at beginning and previous post} and TRY THIS CARD FOR YOURSELF - ITS CHALLENGING AND FUN! 

Cheers!  

TAYLOR :)

Have a great week-end!  

PLEASE NOTE - If you'd like to have a workshop where I demonstrate this card.....or you'd like to skip the tutorial and want to PURCHASE this card......please contact me.  I'll be happy to help! 

craftroomafternoons@gmail.com

****


18 July 2010

Playing with FLoWers and RiBBon


Having a fantastic afternoon - listening to music and making ribbon and flowers come together!

Needed a 'special' birthday card....
 HAPPY BIRTHDAY

MARGARET!


And so I wanted to make one flower/ribbon combo, but I really got into it - must of been the music, and so I made more......I can always do more to these cards, but we're just focusing on the flowers, right?

HOW TO MAKE A PRETTY FLOWER
 with RIBBON ACCENT

YOU WILL NEED:  fabric flower + ribbon + needle/thread + pattern cardstock + (1 " Circle Punch, optional) + adhesive {strong}

{CLICK on pictures for a closer view!} 

TO START:   cut some lengthes of ribbon.    Next take your fabric flower, and ....'Fold' both the ribbon and the flower - stitch the ribbon folds onto the front of the flower, spanning them out - as many as you like. I am using 3 ribbon pieces.

*TIP - you can always trim ribbon to create a 'new' ribbon - I trimmed my ribbon off of the wider striped blue/brown/white ribbon because I did not want the brown and I need a narrower strip.


It doesn't look like much now but.......


...it will on the card....

Make your card 
...layer cardstock of choice onto your blank cardstock card base......


Add a Decorative Border

Above, I've made a strip (turquoise) and trimmed both sides with
 Stampin' Up!'s Scalloped Trim Border Punch; and layered
it with a colourful patterned cardstock.


Create a Center for the Ribbon-Flower
....I cut a  small circle from the patterned 
designer paper [see above], and layered it onto pink, then turquoise 
cardstock - cutting it out in a "wonky" style!  [look at the small circle, lower right]
No need to be neat! 


Assembling the Card
I added my flower-ribbon, and topped it with a 1 inch circle 
using STICKY STRIP tape...
... now it's lookin' better, right?


Finito! 

Here is the card! 
Along with the flower to the right, where I basically did the same
treatment to the fabric flower - only difference is I 
made the whole flower; and added a real button. 


Whole Flower with Ribbon and Button Close-up 

And that birthday card?  

Ta Da!   In glorious tropical colours! 


This girl is going on a cruise soon....so I think we are feeling that here, lol! 


So go ahead - experiment,  try different versions of 
this project yourself - that's the best way!

Well, back to my music! 

24 May 2010

Flower Punch Art - WT272 Album Cover


WT272 Album Cover

Yay - I finally finished my cover for my mini- album this morning!

Here it is!

Update - This is now my entry for SPLICOASTSTAMPERS May 27th's 'Ways to Use It' Challenge under "Paint " Technique! So I am required to post it as a 'WT272' project to help others find my entry! Hope they like it and you too!


I will post the basic steps in my process on how to make a cover such as this, so read below!

Hope everyone is having a wonderful week-end.  

Beverly


HOW I MADE MY COVER
HEART PUNCH FLOWER
1) Make a flower with 2 sizes of  HEART PUNCHES.  Bottom layer is attached with glue to a back support (paper circle)  -  use 4 large punched Hearts for bottom layer .....next, attach 6 small punched Hearts to create top layer (attach by applying glue to the tip area only).  Embellish center as you please - I used a small pink flower brad (shown in finished project).

Extra - I glossed over the large punched hearts with a thin layer of gloss medium - just to protect the paper more. I also 'crimped' the large hearts to add texture. 


Next, I created the cover by taking a 6x6 thick chipboard, and applying a layer of gesso and then 3 different colours of paint: purple, red and gold.  I applied them in large swatches covering the entire piece.   Then I began to cover up those bold colours with some light green, light blue, a bit of yellow, and then I mottled everything with white paint - using some packing plastic as my 'brush' - just dip into the paint and smudge or tap the paint "smooshing" some parts together and other areas left more "blobby".  LOL - hope you understand me!  Just go at it - there is no 'right way' - what-ever LOOKS GOOD TO YOU! 


I stamped a couple of images onto my finished paint job, dried them with my heat gun, then applied a layer of  Gloss Medium as a protection.  Now it can be handled and have a better measure of protection from fingerprints - and what-ever else I attach to it!!

Next I made a small cardstock layer with Whisper White cardstock which I decorated using the RUBBERBAND BRAYERING and EMBOSSING TECHNIQUE. (described in an earlier post) and I created and attached 4 photocorners.   


The embossing powder is Iridescent Ice - looks great white on white, but I chose to ink it up with colours! 


Now I want to title my cover - but for now I am beginning with an initial - F - for flowers of course!   I punched out an f letter in Only Orange cardstock, inked it with Razzleberry (IN COLOR) and coated it with CLEAR Embossing Powder. Now its more sturdy and ready to go!


I used the large heart to punch out some green cardstock, and cut those in half, rounded the edges to create a leaf or two......here's how to punch them out and cut: 


And now its all put together with brads, extra glitter, and just those little touches we add at the end - its all very personal - you can add as little or as much as you want!  


la la lah!!!!   Isn't it fun to go from bare to something wild!! Its like being back in grade school art class, lol. 


I will come back and add more ribbon to the binder rings holding the album together, but for now, this is all. 

 I am making the various pages, and then adding my rings at the end because I do not like the process of taking things on and off - too hard! 

Bye for now!

Talk to me to take a class on making your own album! 

Supplies: Stampin' Up! 
Embossing Powder, Ink, Versamark Pad & Marker, Cardstock, Glue, HEART PUNCHES


15 March 2010

Preparing for Spring - Create an Easter Wreath using Stampin Up! Flowers.

Hello to all you out there!

How great it is to have beautiful weather again!   Thursday my umbrella was wrecked by a strong gust of wind, and so on our walk to church Sunday, there was me with no umbrella,  steady rain = me being a bit wet! But today - it was glorious outside! Crazy!

Saturday we also had our annual spring Rummage Sale.. And this is a signal to me to  create a new wreath for our door! I keep a supply of seasonal floral stems, and what-ever else strikes my fancy in storage. I drag it out and re-create a new wreath every year.  What I like about it is  it never gets boring - and I try to come up with new ideas.  A couple of weeks ago, I bought some glittery, inexpensive ribbon in a Robin's Egg Blue, and  dollar store Morning Glory flowers. So I knew my theme would start with blues and purples!

But of course, a 'punch of yellow' as my daughter likes to say - is truly a nod to Easter . And so I had the bright idea of using my handy-dandy BIG SHOT - again - to create some flowers!  I have the DAISIES #2  Bigz Die which provides you with a triple layer of successive sized daisies - it creates a real dimensional feel to the final flower creation.

And a few years back, I'd created some paper mache Easter Eggs embellished with crystal beads and cut-out alphabet letters to create HAPPY EASTER, so I was pretty much ready to go.

For anyone who'd like to try their first home-made wreath, I've posted a tutorial on how to create this wreath.

Actually, hope you all create a wreath - whatever size, shape or colour - to brighten your days!  Cheers!


TUTORIAL:
 CREATING A  PRETTY WREATH 
with STAMPIN' UP! DAISY #2 ACCENTS.

click on pictures for close-ups

Here I am with my supplies laid out - all within easy reach.  This helps you to be focused on designing your wreath if everything is handy :)  


This nice organza  ribbon is easily  tied to the wreath. Twisting the ribbon, and puffing it out nicely helps create fullness if you work with 'wire-edged' ribbon.  


I've finished tying the ribbon ....and cut the ends nicely. 


To give my wreath some sparkle and more Easter accent, I pulled some of the pretty purple easter floss away from its package and carefully wrapped it tight with cotton floss - these will be tucked around the wreath just like a flower pick! I will attach them with a short length of grosgrain ribbon. 


Here is the final bundle with some vintage lilac ribbon I own!


Here we are - Daisy #2 for Sizzix's Big Shot or compatible machines. You can use smaller squares of cardstock to cut the flower in different colours.


I put the layers together by using a 1 inch circle behind the largest flower layer, then the rest are stacked on top by nesting the petals between one another.  You can layer the petals so they are perfectly aligned one on top of the other - then you'd have a different look!  You can switch each flower layer's colour - or - keep them all one colour......lots of creative decisions! 


and here are my 4 completed flowers - although I made 1 more after because an uneven amount of an design element works better.


place a good dollop of white glue onto center, and sprinkle  metallic flakes over top, gently push the flakes into the sides of the glue glop whie still trying to retain some dimension! Tap off excess flakes.

attach the finished flowers to ribbon or a leaf using a Stampin' Up! Dimensional glue dot - the dot is strong, so after a week and my door opening/closing - its still there! Doesn't it make the wreath pop?


tuck in my papermache eggs with die-cut alphabet greeting


25 August 2009

Colouring with Stampin' Up! Markers


Ok - here I am! Another day - another post!


I was up late (as usual) in my craft studio and watching Youtube while I put together some new arrivals when I found a whole slew of colouring techniques regarding SU markers.


Things to know:

Like a good marker, it has deep colour which you can apply directly to paper for colouring stamped images -the effect is altered somewhat by your choice of paper.

Use STAZON INK to stamp your image if you need to insure no bleeding of the stamped image if it gets wet from the moisture of the markers.

You can achieve many different techniques using our markers - and here I will show you one. AND I will compare this technique to direct-to-paper marker colouring.

What I am using:
AQUA PAINTER BRUSH
4 Stampin' Write Markers - Regal Rose/Certainly Celery/Green Galore/So Saffron
STAZON BLACK INK
Whisper White and no-name non-glossy white paper

1.Direct-to-Paper Colouring (Fairy on the right)
On the glossy Whisper White paper - I stamped my first image and coloured it directly - marker to paper to get the full effect of the colours. I used yellow first, painted the edges of her wings with one green, and blended over top with the brighter second green (green galore) - and finally painted her skin with the pink, Regal Rose.

You can see she is very colourful - which is perfectly fine - it all depends on your final decisions for your project.

2. Using the Aqua Painter Brush (Fairy on the left with the dots above her wings)
a) prepare the tip of the wet aqua brush by sqeezing some water from its handle into the brush and just skim the brush onto your paper or cloth just so its wet (not dripping wet please!)
b) then touching the aqua brush to the tip of the marker brush, I applied the colour to her skin first - which came on very pale. I repeated this until I had the shading of her skin the way I wanted AND I repeated it over the circular areas to give her blushing cheeks.
c) next, I applied the yellow to the wings area, her dress, shoes and leaf headdress. Where I wanted it deeper in colour, I would just apply more.
d) I immediately applied the darker shade of green - Certainly Celery to the outside of the wings AND followed by the second green, Green Galore to blend the two.

So you can see yourself - the difference. I did the second fairy, with the aqua painter on the non-glossy paper but you can still tell that she is more subtly coloured with better blending than the more deeper shades of the direct-to-paper fairy.

Note - in real life, they appear brighter - sorry but my camera and reducing the size of the pics always grays them out somewhat.

I posted a pic showing the aqua-painted fairy on her own.

I also show how the marker works in pink - on the far right, is the marker itself - coloured over & over itself. Then over to the left is the marker with the aqua painter again - going from lighter to darker (by applying colour over itself) to get a range of shades.

Well - hope that helps you with your colouring projects!

If you want to learn more about this and other techniques - check out my Stampin' Up! website or the blog here or contact me for classes.

Template by: