Showing posts with label DIE-CUTTING BIG SHOT. Show all posts

25 November 2012

Maria's Annual Holiday Craft Event Nov 17


 Just one of the many cards we created. 
This features SU!'s new Snow Flurry Bigz Die


*Hellooooo!

Boy am I tired - but happy!!!   I now have several really nice HOLIDAY CARDS ready to go and I didn't even have to think them up!  Thanks to Maria's 2nd Annual Holiday Craft Event in Peterborough!  Yessiree...I attended as a guest and had a fab time - THANKS MARIA!!!

Keep your eye out for Maria's event next year if you're in her area [Kawartha Lakes] and you'll have a lovely time and come away with great cards!  And maybe win some prizes!

We also had a pot-luck lunch since it was an all-day event and I enjoyed all the nice dishes the women brought, and I enjoyed meeting them as well - very nice ladies who all made the event feel cozy and friendly!   

Maria and her friend Jane keep well-organized and help you when you need it, and Maria brings along some nice items to purchase {bring along a little spending money! its worth it :) }.....Jane has a little funny streak and made me laugh a few times!!!  We especially had a little fun at Maria's expense because Maria has the most worn-out stamp scrubber we've ever seen!  Maria - it's time to pony up, lol!  Maria's a good sport - she has to be to put up with us...."Maria?".... every few minutes, ha ha.  
 **
VISIT Maria's blog  " CRAFTY MARIA'S STAMPING WORLD" for more great ideas. 

All the supplies can be found in Stampin' Up!'s Holiday Catalogue :)  

 Here are more of the very lovely selection of cards we made....lots of layers, fun punches and accents to add....and the day just swam by we were so absorbed by the process!  

Looking forward to next year Maria!
** 

29 June 2012

A Rosette by any other name....is still a rosette!


PATIO PARTY ROSETTES -  12" WALL ART  by Taylor B! 


HERE IS A GREAT HOME DECOR PROJECT FEATURING ROSETTES AND STAMPIN' UP'S PATIO PARTY DESIGNER SERIES PAPER!


Entering this project is FUSSY FRIDAY'S 'FANCY FOLD CHALLENGE 66 " HERE


PART I 


 I have a few choice words about rosettes which range from "Awesome" to 'arrgh!' on the occasion when I am all thumbs trying to put one together!!!


Luckily the Gods were good to us when they gave us steel dies!


We can now punch out rosette embossed 'blankets' and then construct those into the final, nifty, folded rosette of old!  And Stamping Up! has a great rosette die because it can make very large rosettes as you can see in my wall art project - just as it makes smaller ones too!


 So its way better .....but there are those days, when I can not put glue to paper and paper to paper without something slipping and going crooked!!!!  However, I put my thinking cap on and came up with a solution!


 I made 'rings' to the size I needed and placed my creased and nearly finished rosette into this ring to attach the stablizing 'backing' - the smaller sized paper 'core' we glue at center to the squished folds to keep them in their correct position.


  In the past, this is exactly where I goofed up!  I'd have my usual paper circle sitting and push my rosette coil down to glue it onto the circle core only to have the rosette coil shift - and then its less than perfect, and maybe even less than stable!  But my new found method works! Here in pictures is how......


I find a variety of rings to create different sizes of rosettes....here I have used a coffee cup which I cut witha a hobby blade and scissors, but try other 'rings' like biscuit cutters, hoop frames, maybe you have your own ideas. The ring's purpose is to "contain" the rosette coil.  The rosette coil is what I call the strip of accordian-folded paper that is joined at its ends to form a coil!  Now you can focus on securing the rosette's many folds at its center by attaching a paper backing!


Here's my backing.....

First, you need to establish a center - so I created a center guide! 
I made a square chipboard coaster into my ' base ' and marked 
the 'center' with pencil guide lines.  
Here is my rosettes "backing" circle core I 
spoke of just waiting for my rosette coil! I pinned the backing circle to the 
chipboard base AND the pin will act as my "centering guide" when I add
the rosette - you'll see!

Here I have positioned my ring and secured it with push pins.  You won't get a proper centered rosette if the ring shifts around! The glue has been added to the paper backing and everything is peachy! 

I added my rosette coil over the center pin which tells me that the rosette is centered. And pushed the loose rosette coil down and the glue will work its magic!  AND THIS IS WHY IT WORKS FOR ME...the ring helped me place the rosette into position and kept it there while I set it up - no shifting, sliding and I get the backing on dead center!!!  No more lop-sided results.  Instead I can focus on making the next one :) 

When it is safe to remove the rosette when the backing circle has dried in place, I can flip the rosette over and add a decorative center front!  I will be able to do this step easily since the folds are secured in place underneath to the backing. By decorating the rosette's front, you will also be doubling the strength of the rosette - you could almost set a drink on it by the time you're done!  

OK - I will be doing more on this project next time as you can see how I put the project together! 
Just one more picture and a final point.  

DIAMETER SIZE AND DEPTH OF ROSETTE
When you create ' rosettes ' the size and thickness of the rosette depends on the following:
a) the length and width of your folded strip of paper will determine the rosette's size overall 
b) the depth and number of your folds will determine how thick your rosette turns out.

See the pictures below and notice what I mean.....


The deeper, smaller rosette has folds at every half inch on a shorter length of cardstock whereas the more shallow but larger NAVY rosette on the right has a longer 'strip' of paper which was folded at every 1/4 inch. 

You can take this concept to every extreme - from the tiniest rosette with teeny-tiny folds to gigantic rosettes which make wonderful banners!  So please return to see my next set of tips and tricks to make fun and easy projects featuring the "ROSETTE"! 

My GIANT rosette fits beautifully into a 12x12 inch frame! 

To make life easier you will need a scoring tool - preferably one such as Stampin' Up!'s Scoring Tray! 


Designer Paper = Patio Party by Stampin' Up! 
Rosette XL Die by Stampin' Up! 
Project designed by Taylor B! June 2012. 

END OF PART I

28 November 2011

MERRY CHRISTMAS BOUQUET - Beautiful !

One of our perks as Demos is to receive inspiration from a monthly magazine Stampin' Success which contains awesome projects like this gorgeous PAPER FLORAL BOUQUET in a BOX!!!  

YOU CAN MAKE THIS TOO!

Yes, seriously, you can!  I can!  We all can!
Purchase the list of products and you could make this in time to present to so many awesome people in your life - and ...
it's never gonna fade away! 
ok only if they leave it in a window forever, lol! ...but this is a beautiful reminder of your affection and its a real conversation piece, so your intended will enjoy relating to others how you made it which will bring more joy to them...
so it keeps on giving! 

GET STARTED! Hopefully you have some items in your possession or can borrow some BUT order supplies today and you will have many projects waiting for you to create! Let's Go!
Stamps
Christmas Greetings Set, Gifts of Christmas SetPaper - Cardstock
Garden Green, Old Olive, Real Red, Soft  Suede and Whisper White

Ink
Classic Stampin' Pads: Old Olive, Real Red;  and Early Espresso Stampin' Write Marker; and Stampin' Pastels

Accessories & Tools
Real Red 1/4" Grosgrain Ribbon, Linen Thread, Rhinestone Basic Jewels
Stampin' Dimensionals, Color Spritzer Tool, 

PUNCHES: Boho Blossoms, Dotted Scallop Ribbon, Extra-Large Tag and
Lace Ribbon, 1-1/4" Circle, Itty Bitty Shapes Punch Pack
BIG SHOT and DIES: Flower, Daisies #2 Bigz Die, Island Floral Bigz Die
Sponge Daubers
Floral wire
Hot glue gun
Pinecones
Silver ornaments

Instructions
To decorate box: 
  1. Punch border from Whisper White Card Stock using Lace Ribbon Punch and adhere to box. Wrap Real Red 1/4" Grosgrain Ribbon around box and adhere. Wrap Linen Thread around box and adhere.
  2. Stamp flower image in Old Olive ink on Whisper White Card Stock. Stamp sentiment over flower in Real Red ink. Punch tag from stamped card stock using Extra-Large Tag Punch.
  3. Adhere tag to Old Olive Card Stock and cut out.
  4. Punch border from Real Red Card Stock using Dotted Scallop Ribbon Punch. Trim scallop border and adhere to tag. Adhere Rhinestone Basic Jewels to tag.
  5. Tie Linen Thread in a bow and adhere to tag.
  6. Punch flower from Real Red Card Stock using Itty Bitty Shapes Punch Pack. Adhere rhinestone to flower and adhere to tag. Adhere tag to box using Stampin' Dimensionals.
To create Whisper White flowers
  1. Cut flower petals from Whisper White Card Stock using Big Shot and Island Floral Bigz Die. Layer two sets of petals. Sponge Stampin' Pastels on flower center using Sponge Daubers.
  2. Spritz flower using Color Spritzer Tool and Early Espresso Stampin' Write Marker.
  3. Cut strip of Whisper White Card Stock. Snip card stock every 1/16" and roll into a cylinder. Sponge Stampin' Pastels on snipped card stock. Adhere to center of flower, standing straight up.
  4. Attach flower to floral wire.
To create Real Red/Soft Suede flowers
  1. Cut several layers of flowers from Real Red Card Stock using Big Shot and Flower, Daisies #2 Bigz Die.
  2. Punch a circle from Real Red Card Stock using 1-1/4" Circle Punch. Adhere circle over hole in one flower. Lay flower flat.
  3. Curl petals on remaining flowers and fold in half. Adhere folded flowers around center of flat flower, slightly overlapping. 
  4. Snip Soft Suede Card Stock every 1/16" and roll into a cylinder. Adhere to center of Real Red flower.
  5. Attach flower to floral wire.
To create Old Olive/Whisper White flowers
  1. Cut flowers from Old Olive Card Stock using Big Shot and Island Floral Bigz Die. Cut one petal from smallest flower and fold the rest of the flower to three petals.
  2. Punch flower from Whisper White Card Stock using Boho Blossoms Punch. Scrunch flower and adhere to center of Old Olive flower.
  3. Attach flower to floral wire.
To create Real Red flowers
  1. Cut flowers from Real Red Card Stock using Big Shot and Island Floral Bigz Die. Layer flowers, removing petals from some layers. Curl petals downward.
  2. Fold and distress small piece of card stock and adhere to center of flower.
  3. Attach flower to floral wire.
Additional pieces
  1. Cut thin strips of Garden Green Card Stock and attach to floral wire.
  2. Attach ornaments to floral wire.
  3. Attach pinecones to floral wire.
  4. Arrange flowers and additional pieces in floral arrangement.
IF YOU REQUIRE ANY HELP - ANY AT ALL - PLEASE CONTACT ME!
NOT EVERYTHING IS EASY TO UNDERSTAND ESPECIALLY IF YOU ARE NEW TO THIS HOBBY - AND WE LOVE TO SHARE, SO PLEASE ASK ANYTHING!!!

IF YOU NEED TO PURCHASE SUPPLIES - PLEASE CONTACT ME AS i AM ONLY TOO HAPPY TO HELP!  

THANKS EVERYONE!!!!

20 October 2011

I CAN'T BELIEVE IT - GET A BIG SHOT Machine - FREE!!!!


WOW - I am a little ashamed to say that I haven't posted anything yet about this great offer  - so without wasting further time.......let me just say:


HOW AWESOME IS THAT!!!

IT'S REALLY AMAZING TO THINK that " INCLUDED IN
THE STAMPIN' UP! STARTER KIT " is a real, honest-to-goodness
BIG SHOT MACHINE- FREE!!!

So, for a total cost of  $215 [no tax /free shipping ]  gives you the value of $425 in products in the Starter Kit  plus the benefits .....
AND then a BIG SHOT MACHINE FREE 
 - a $130 machine... ($169 incl taxes+shipping) ......
... well, that really is like paying $ 45 dollars for everything!!!!!!
That's astonishing!


To put it into perspective, here is why its so awesome....

  1. 1)the Canadian SU! Starter Kit is already priced well below its 'real' cost!    
  2. 2)  substitute many of the items in the kit for other comparable items in the SU! product line. 
  3. 3) everything is all there - so its a great way to get begin if you are new to this fabulous hobby and/or home business!
  4. 4) automatically includes you for the privileges a SU! Demonstrator receives...i)monthly, glossy, professional magazine loaded with ideas , success stories, helpful advice
  5. 5)  your professional discount on orders!!  
  6. 6) start receiving income on orders
  7. 7) become part of the SU! family - team get-togethers (more fun) and so much more!

And the last time Stampin' Up! offered the Big Shot with the Starter Kit was 3 years ago - so its not everyday this comes along. 
I know many, many people will be taking this offer up....
...and why? 
Because you do not owe any obligation to SU!   The Starter Kit is meant to allow you to start, but "if" you decide it is not for you - you may turn in your Demo Badge at the end of the free trial period - three months - and its all very agreeable!!!!    

I must add that many Hobby Demonstrator who join to receive the benefits and social life associated with SU!, continue because its a lifestyle choice for them and they enjoy it, but many others join and go onto building a successful home business with the flexibility they need because of family commitments, or their primary job - some of us stop and rejoin - there is no one 'particular' fashion or pressure to this - its all up to you, and I hope if you DO decide to take ADVANTAGE OF THIS OFFER - Please allow me to be your guide, your support leader and friend - so sign up today!  

Contact me: craftroomafternoons@gmail.com

Don't forget - we have till Halloween to be part of this terrific sale! 

13 June 2011

Stampin' Up! Retiring Products Project

I feel sort of bad :(

Because now Stampin' Up! decision makers have put some  of the BIGZ XL DIES for The BIG SHOT on  chopping block !  I can only surmise its due to their lower sales value and to follow that line of logic then, we 'demos' didn't do enough to show the   ' p o t e n t i a l '  of these dies, so we share some of the blame.

So - here I am last minute trying to make up for some of that with this project!  

In my last post, I pointed out the fab talent of the designer behind the pop-up dies manufactured by Sizzix, and so I pulled out the POP-UP BIGZ XL DIE - O CHRISTMAS TREE!  and co-ordinating SIZZLIT DIE ' MERRY DETAILS ' which has several tiny decorations for the tree including a bird!

And I also pulled out the BIGZ XL ' PERFECT SETTING ' - which includes the CUPCAKE HOLDER/WRAPPER!

As for cardstock - I've chosen the retiring HOSTESS LEVEL - PATTERNS PAPER STACK which showcases the new IN COLORS of the retiring 2010-2011 IBC.

OK - I'm all set!!!!

Christmas isn't always Christmas Project
I wanted to specifically show how the CHRISTMAS TREE does not have to be limited to the holiday season of December - tho fabulous as that time is!  NAY - this baby can be used in a V-E-R-Y  whimsical way - so YAY !!

1. Chose the Tree's Cardstock - be daring!
To start I decided to have my cardstock in a  fun FOLKSY fashion by combining:
        a) different patterns from the same colour family,
  and b) by combination of a variety of prints according to their size!  

In our Pattern Packs, we have this all ready for us!  Its just a matter of choosing your colour!  The result will sort of look like a quilt project!

2. Decorate the Tree
For the smaller decorations for the tree I'm using the Sizzlit die for the bird, but I also chose to use another retired SU! punch for a small flower.
I put some willingness to throw caution to the wind and choose cardstock that by mere repetition would work on the tree - BUT - you help matters when you are a bit choosy about placement - try to strike a balance because if you rotate the tree you can see all the different angles involved.  I think I did a zig-zag placement of the first couple of flower colours - then I used the " Hearts " to ' FILL IN THE GAPS ' and help the balance overall.   It sounds more complicated than it is - besides I suspect that you can't do much to go wrong, it sort of has a way of working out its own problems if you know what I mean!   HAPPY comes in many forms - and by decorating the tree with whimsical flowers, a pair of love birds - why all that is missing is a rainbow - and I am working on that!!!

3.  Stand your Tree
This is a pop-up die, right?  RIght!  But I decided to let it sit on its own stand made of the CUPCAKE HOLDER!   Its so easy too - just cut and paste the cupcake wrapper/holder so that it can be large enough for the tree's base to plop inside the BOTTOM of the cupcake holder - yep, turn it upside down - and its a base - flower pot or circus stand, you decide~  you can decorate the cardstock before gluing, and you can use all sorts of 3D embellishments when its done - such as brads, butterflies!  What-ever tickles you!

Close-up of the 5 different 'patterns' cardstock - all in the colour ' PEAR '  and the variety of flowers and hearts I used to decorate it!  


Tree in full, with 1 bird on top center. This tree is meant to collapse, but it has a 'stand' as well.


Now lets put it on a stand made from the 'Perfect Setting' Cupcake Holder/Wrapper which is turned upside down and stamped with a subtle pattern.


Or try it in a garden green matching the tiny hearts scattered through-out!  Add a butterfly embellishment!

See the pair of love-birds - they are from the retiring Sizzlit die, Merry Details. They are so cute - I added tiny red glittery hearts cut with our 2-Step Owl Punch.  You might recall our Red Glitter Cardstock from the Christmas season?  Its been on our available list of carry-over products from the Mini Catalogues. 

Now here is how it looks in real life on your shelf - or your friend's shelf - or grandma's shelf.....cute huh?
Who wouldn't like a special tree at this time of the year?  Maybe a young girl would think fairies come and dance around it at night!!!


....or with Cupcake {Perfect Setting Bigz XL Die} stand!


SO THERE YOU GO!!!

DON'T WAIT TILL ITS TOO LATE - THESE ARE AVAILABLE TILL THE END OF JUNE!!!

 CONSIDER THESE TWO AWESOME and RETIRING DIES FOR A MANUAL DIE-CUTTING MACHINE such as THE BIG SHOT or similar product!   

THEY ARE ON THE LAST CHANCE LIST! 
 THEY ARE VERSATILE!
THEY ARE INTERESTING !
.....the CHRISTMAS TREE is really a fun project - think of the challenge you can give yourself, it doesn't get boring!  
And, the PERFECT SETTING - CUPCAKE BIGZ DIE is the perfect die to make cupcakes look dressed up, jazzy and co-ordinating with your theme, OR as a little cup to put candy in for birthday parties...plus it also has a matching strip to wrap around candy bars, or other items. You can explore many uses for both these dies not to mention their first intended purposes - CREATE!!!!

CALL ME TO HELP YOU PLACE YOUR ORDER


10 June 2011

Catch some 'Last Chance' Inspiration from Karen Burniston and Pop-Up SU! Projects


I hope you have seen or heard of Stampin' Up!'s Pop-Up Dies which make wonderful projects - from cute and adorable - to just plain awesome!

And the reason they are - is really due to some awesome-ness from KAREN BURNISTON - the designer behind the POP-UP DIES from Sizzix!

Karen has a wicked mind in my humble opinion - and she has developed project after project that just makes you speechless - can you tell I'm a FAN!!!   Honestly, I am not the only one who thinks so - she has lots of fans!


So here is a link to some of the projects she has designed for the POP-UP CHRISTMAS TREE and CAKE!  Click on her thumbnail pictures to see the project close-up.


*************


Now - a word to the wise - SU! is discontinuing these 2 particular dies - don't know why, but they are ON SALE - really great price too, I believe as I write this - its 40 percent off!  


I would be happy to help you order one or both!  Please email me - bstampingbeehive@gmail.com

Stampin' Up! Supplies:
1) O Christmas Tree  Stampin' Up! Bigz XL Pop-Up Die   Item no  116822
2) Three Tier Cake Pop-Up Bigz XL Die             Item no   116760


Three Tier Cake Pop-Up Bigz Xl - by Stampin' Up!O Christmas Tree Stampin' Up! Bigz Xl Popup Die - by Stampin' Up!


7 June 2011

Stampin' Up! Sneak Peek for NEW CATALOGUE!

Hello girls'n'guys!

Well I went and did it - I put my first order in using my Demo-ship to fast track some of the new pre-releases to my door !!!!!   Yippeee - this IS ALWAYS an exciting time for us!   And as per usual, I have to figure out which of the selected pre-release products I should grab - ALWAYS tough choice!

But, I narrowed it down today to a few things and although I do not have these here - yet - I found another Demo in Texas who has the items I want to share with you!    DONNA ROSS has been playing with.......our new, super-duper...

  PERFECT PENNANTS L DIE 
{ a SU! Exclusive Sizzix Bigz Die}  

WHY I LOVE IT

2 pennants - 2 sizes
2 doilies - 2 sizes
all on one steel blade die - not too long not too short!

...and...
DOILIES STAMP SET
very, very elegant-yet-sweet doily theme stamps


Here is a couple of photos I've borrowed from Donna Ross to showcase how she incorporated the  doilies off the Perfect Pennants L Die .....very pretty in our NEWEST " IN COLORS "!

[pic cased from Stamped Sophisticates by Donna Ross, Sr. SU! Supervisor, Texas]

OK - Donna has used the ' doilies ' {the largest scalloped circles} from the PERFECT PENNANTS L BIGZ DIE and layered over top of them with the DELICATE DOILIES stamp set - both of these products will be available JULY 1rst 2011

AND - you're looking at the LATEST ADDITIONS TO THE " IN COLORS " FOR THIS UPCOMING YEAR !!!!


COUPLE OF THINGS......STAMPIN' UP! made some changes as you recall during the RENOVATION period, and one change was that starting this upcoming NEW IDEA CATALOGUE - there will be  10   IN COLORS!   Yep - the period for the colours will be 2 years and so last years line-up is still in effect for one more year, and now this year's line-up is added and so we have 10 great IN COLORS to choose from!

5 NEW IN COLORS TO JOIN US = 
Calypso Coral, Island Indigo, Lucky Limeade, 
Pool Party, Wisteria Wonder.

Which is how Donna has last years IN COLORS mixed with the upcoming IN COLORS - such as the purp-ily Wisteria Wonder and Concord Crush combo!  

I like the way Mary Fish of Stampin Pretty has chosen to showcase the latest colours, by including it with similiar colours so  you will see its special benefit it has to offer!
Like look at her demonstration of " Island Indigo " as it compares to some of our other blues...


Therefore I will be awaitin' for my own delivery soon and MY COPY OF THE NEW 2011-2012 IDEA CATALOGUE - Whoooohoooooo - just dyin' I tell ya, just dyin'!

CONTACT ME FOR YOUR OWN COPY OF THE NEW RELEASE CATALOGUE 
AVAILABLE  JULY 1RST!!!!!

craftroomafternoons@gmail.com
luv
TAYLOR  B!

6 May 2011

Mother's Day or Spring Card

Have a wonderful Mother's Day to each and every Mom out there!


Recently I created a lovely card for someone special { hey Justin!} whose 'very special' Mother favoured purple - and I want to leave that card as an original piece created just for them, but I have borrowed the basic elements to re-create this card!

My favourite technique on this is - well, two things::
 one) I love duplicating accents in acetate as I have done with the butterfly!  It creates a "glossy" look that I love!
two)  using ribbon to wrap around two out of three panel sections - this leaves the third panel to help make one colour pop - or to add accents, etc.

If you take a closer look - you can see I textured the smaller butterfly - using the tips of a snowflake embossing folder!  Who knew, lol!

STAMPIN' UP! SUPPLIES:
Big Shot Die-Cutting & Embossing Machine
Beautiful Butterflies XL Die
Northern Frost Textured Embossing Folder
Perfect Polka Dots Textured Embossing Folder
Cardstock: Elegant Eggplant, Lavender Lace (retired), Crushed Curry (retired)
Clear Acetate Sheets
Organza WhisperWhite Ribbon {#114139}
Snail Adhesive

12 March 2011

My 'specially-created' SAKURA Flower using the Island Floral Bigz Die and Squash Card!

Yes helloooo to all out in craft-cyber world!

I feel really accomplished this week!  I have finished a set of gift bags for a baby shower AND a nice card in
SQUASH BOOK style - both are ready to fly out the door!!!

In order to decorate the squash booklet, I created my very own "Sakura Flower" using our Stampin' Up!'s FLORAL ISLAND BIGZ DIE.  Its one of a few select flower dies that I own, and its the same for my punches - so to create a flower, I had to borrow inspiration from my friend Maria Vanderform.  Maria specializes in many flower punch art creations, and seems to start by thinking of what she wants to create - then matching idea to tool!

So....I thought the same thing!  I looked up some flowers and chose the SAKURA Flower which is adored on a national level in Japan!  It can also be referred to as the Cherry Blossom Flower. The trees are stunning when in full bloom - and its hard for the eye to take in all the beauty of a grouping of trees, its awesome!

However, my flower is only a stylized ideal of the actual flower - meaning I took some liberties!  So here it is!


Sorry for the hint of pink through out the photo, but the camera read my flower as 'red' and its actually
 ROSE RED which goes nicely with the softer PINK accents and the GARDEN GREEN cardstock. 
The patterned paper is part of a 8x8" Cardstock Pad from Stampin' Up! - they come out with a new one every year featuring several colours cardstock. 

I will do a tutorial on the creation of the flower soon.

Meanwhile, I will show you the size of the SQUASH BOOK! 


Inside of the ' Front '


....beginning to ' OPEN ' !!!


Build-A-Brad  customize your brads!

  
The 1rst extended section ...


Look at its length!!!!  3 pages were joined together - lots of creative journalling or adding pictures! 
You could also use this for a card where many, many signatures are involved - right? 
I have to say - it's FUN to open these!!!   Brings out the kid in you!


And close 'er back up again! 

Well, I hope I've inspired you now! 
Have a great week-end! 

Don't forget SALE-A-BRATION is still ON !!!  Get in on the FREE products 
from STAMPIN' UP!


12 February 2011

My Valentine's Banner

Here is the reveal of my Sneek Peek!

I have to say the pictures do not really give the true colours very well, my camera "reads" the green background too much and so I did my best - just bear in mind, it looks prettier in person!

But here it is....my labour of LOVE literally this past few weeks!  I did it in bits and bobs because it was just one of those projects that require your thinking beyond the norm, I usually do cards, LO's - but this was more of a collaborative - evolving - process.  I may have over-embellished, but that tends to be my style - you could do this much more simplier!

Used the TOP NOTE DIE by Sizzix and sold by STAMPIN' UP! - as I am sure many of you recoginze.  The only other thing I can say perhaps, is that the middle piece (which serves to separate the two words, Love, You) has a heart shaped frame that is made of 2 SCALLOP FRAME die pieces - also SU! dies.


Here it is in full length on my living room wall - sorry, this is a dreadful pic in terms of colour, see how the camera  reads my green walls too much - and I had to tone it down. Sorry! Maybe I need a few lessons!

But hopefully, you can see how it takes up a certain amount of space, so it could be used for an anniversary, welcome back, congratulations, new baby, birthday...all sorts of occasions, and look substantial!

It could be draped across the front of a banquet table - over a door - fireplace, lots of places!


Here is the two sections...


...LOVE...


...YOU...


 ...Here is the TOP NOTE DIE CUT (red) I used for all the letters. 
Then I layered a background paper (striped pink/vanilla) and topped it with 
a LETTER DIE CUT from my ALPHABET DIES.  
The a few of them I added extra 'embellishments' like the embossed medallion and the accordian folded circle with a small glittery paper heart.  


IMPORTANT STEP !!!

TO STRING THE FRAMES SO THEY STAY IN PLACE....
you must "KNOT" them into place.  Otherwise, they slide on the string. 
I made holes in each frame, and strung the string once through the hole - then through a bead - then back through the hole, and tightened.  That creates a "stop" .  You could make a knot if you want to like I did on the heart piece, but I found it wasn't necessary. 
I also drew a small line on a scrap of paper, and used that to measure the spaces between each and every
piece, so there was some consistency.  It is a little tedious - do this on a good day, or have a few breaks like I did. Otherwise you might go "knotty"  :)

To add VISUAL INTEREST I added a metal HEART I found at the Dollar Store between each of 
the frames,  its a cool embellishment I thought - for a dollar! Yess-um!


....the middle section...the scallop frames (see white one is the scallop frame) and take 2 of them
to create a background to the  floating piece in front!  Who knew!


There was a lot of folding going on - lol - and I am not the best at it!  But I love the look the accordian folds give to an embellishment!   I used up lots of scrap papers too - another bonus ...and fun because its like 'pickin' through your stash boxes' to see what will work with what - and that, is what craftin' is like!

HAVE A HAPPY VALENTINES DAY!


1 June 2010

My Stampin' Up! Scallop Circle Punch Flower Imitates Art!

Good Morning!

I am back playing with Punch Flowers!  I was at a craft auction on Saturday - I had $113 dollars to bid with - which sounds like a lot until you discover the woman next to you has $800, lol, but it was "free money" I earned and so I wasn't spending real money and it was just for fun. But - I bid on some stuff and won a few nifty things, so I was a happy camper. I picked up this paper - and at first it was because I liked the kraft paper part - and the flowers were nice too.


This is from ScenicRoute's Sonoma Collection - the Kraft Pink Garland
however, for some reason, mine is the same design but with the Red Bouquet colours. Their collection is very nice. But like I said, I was mainly wanting this just for the 'kraft' section and planned to cut off the flower border.

It wasn't until I got home and googled the paper that I saw women had done amazing things with this paper!  So I perked up!

After musing for awhile, I knew I'd need some "depth" to this paper as a SCRAPBOOK PAGE PROJECT. So I turned my thoughts to PUNCH FLOWERS.

But I really did not know how well this was going to turn out until I made my first flower!


MY FLOWER......USING STAMPIN' UP!
Looking at the detail of the print flower on the paper, I think the designer had the ruffled scallop circle flower in mind - certainly seems that way once you punch out a scallop circle, cut it and make a few creases!

So I'm on 'motor drive' now!  And I off to make my flowers!!!!

1)  I grabbed my a scrap of left-over (but returning) RED RIDING HOOD CARDSTOCK and punched out some SCALLOP CIRCLES.  I cut the scallop circles with scissors and using my bone folder, made folds and creased each one for every section. I didn't even care if the fold was centered or not - this is very casual!  I used some co-ordinating ink to darken the edges - distress them if you wish.


2) Now I grab some SO SAFFRON CARDSTOCK and my BIG SHOT and the 'SPARKLE' Sizzlit Die.  Made my 'sandwich' using the Cutting Mats and the Multipurpose Platform set on Tab 2 ....and ran it through with 2 layers of cardstock. I am making at least 2 flowers, so that saves time. 
***The Sparkle die is a busy design with lots of edges - so I don't try to make a bunch in one go, I rather 'repeat' the process. Other plainer cuts are easier to stack a bunch of cardstock to run through the Big Shot in one pass. 

3) Now I grab some BRAVO BURGANDY CARDSTOCK and one of the four Sizzlit dies in the BIRDS and BLOOMS 4 Pack Die Sets. Its the SCALLOP BUTTON - which has 2 sizes - and I want 'both', so this is great!  I make a pair for each flower. 
Once I make them, I ALTER each one by creating a SLOPPY CIRCLE - just using my scissors, and cutting the edge off all around each one in just a haphard way - no real thought involved!  Like that, heh heh! .....and they end up looking like 'raisins' - one large and one small!

4) Last part - I repeat the 'small' Scallop Button in So Saffron - and inked its edges with some CRUSHED CURRY INK - and made one for each flower. 

Here is how my flower parts [ steps #2, 3 and 4] look like - the darker burgandy  'raisin' shapes are shown beneath the Scallop Button that I made them from, and so:  


PUT IT ALL TOGETHER - AND YOU HAVE ONE COOL FLOWER!  
1 Large Scallop Circle (red) + 1 Sparkle die cut (yellow) + 1 larger Scallop Button (burgandy) + I small Scallop Button (yellow) + 1 small Scallop Button (burgandy)

=


Can YOU TELL THE DIFFERENCE?   Isn't it so similar to the flowers printed on the paper - or what! I thought this worked out so cooool!  Really did!   

Here is a larger view and where I altered the photo:


Now, I've started my Scrapbook Page and it remains to be seen how it will turn out - so stay tuned!

UPDATE:

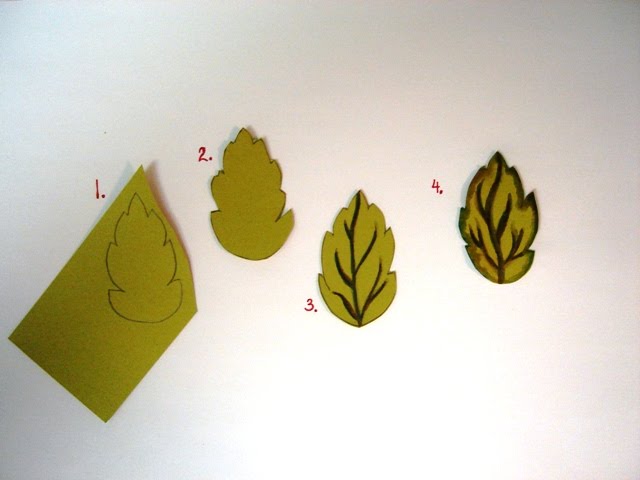
Here I am adding 3D LEAVES  I've created to my scrapbook page - and here's the process......CLICK to see a closer look


1. DRAW a leaf outline   2. Cut it out.  3. Apply Watercolour veins to leaf.  4. Aqua Painter brushstrokes to soften the watercolour veins, pulling some of the colour to the edges. 
These are made in the image of my project's paper, but you could do this in any colour or leaf shape.  


Alright - I have punched more flowers out using the BIRDS and BLOOMS 4 PC Sizzlits Pack - and made a BUTTERFLY using our BIGZ Die 'BEAUTIFUL BUTTERFLIES' .....and what else, oh yes, my TOP NOTE BIGZ Die which I will use to make my title on (later)......and here is how I've laid things out so far...


Getting busy - I know!  But I think this will be for a picture of myself and my dog in a nice garden somewhere, so I can afford to 'fluff' it up! :)
Besides - I may make more changes, ha ha! What you see is not all glued down yet, aha! 

To emphasize where I shall place a 5x7 photo, I  made a central background layer with some Kiwi Kiss paper and our SCALLOP BORDER TRIM PUNCH - it has a pattern, but its small compared to the larger pattern of the flowers - so it will work. 
I've also followed the principles of proportions by making some things large, small and in-between. 


I needed to have some highlights on the page - so I made my Birds and Bloom's flowers out of white cardstock - then toned them down a little with some pink and brown ink on the edges. Then I topped them with buttons. 

Anyways - that's it.  Won't be done till I find that perfect shot of my dog and I....thank goodness for digital cameras these days, can you imagine when we had to take photo after photo and wait till our photos got developed - and even then, cross our fingers that at least 'one' of them came out nice?

Oh, how we have changed! 


Template by: