Showing posts with label DIE-CUTTING Punch Art. Show all posts

10 June 2012

MAKE A WEDDING CARD FOR YOUNG BRIGHT NEWLYWEDS!

THRILLED AGAIN! 
  THIS CARD MADE  
at SPLITCOAST STAMPERS.


Always a happy feeling when you receive a nice surprise such as this – which is why I highly recommend you try creating a card and entering into an online community forum! You just never know –some lovely person may honor you with a lovely surprise too! 

WEDDING CARD

With more Owl  'love' from my Owl Builder Punch!   If you thought the TWINS Birthday Card post was cute as a bug - or 'bird', then feast your eyes on this one!

A custom-made card for my friend Ruth - Hi Ruth!   Ruth has two bright young things in her life who are hitching the knot and needed a card!  Hmmm, a fantastic opportunity for a wedding card  for two young people in love!  Why, its my chance to do the PUNCH ART OWL WEDDING COUPLE!

If you have perused the internet in search of custom cards for weddings, you already know
that the "dressed up owls" phenomenon is one section of the owl craze that has taken over
the western hemisphere - maybe the globe!
And Stampin' Up!'s OWL BUILDER PUNCH - is a huge part of this craziness!

Consider our popular Stampin' Up! punch - the BIRD Builder Punch too because it can add a 'wing' to your owl and a branch {besides you'll love the bird}. Both punches have matching stamp sets  :)

 Now, back to the wedding card.   Check it out........eh?!?   Isn't it so adorable !!!


Really I'd love it if I received this.


The greeting is part of Stampin' Up!'s versatile "WORD PLAY" Stamp Set. The pretty
embossed border is our  FRAMED TULIPS {Textured Impressions Embossing Folders}.
My ribbon is the luscious Organza Whisper White Ribbon.  

The Bride and Groom can be dressed up in a variety of ways. My decisions 
were influenced from the many other versions I have seen on the net!

See my previous post to understand about creating skirts with scallop edges using a plain Oval 
and a Scallop Oval punch.....and any questions you have, please comment or email me!

THANKS FOR COMING BY!

SUPPLIES FOR THIS PROJECT
Stampin' Up!
Punches = Owl Builder, Bird Builder, Large Oval and Scallop Oval;
Embossing - Framed Tulips Textured Impressions Embossing Folder;
Cardstock = Whisper White, Crumb Cake, Basic Black, Pumpkin Pie;
Embellishments = Whisper White Organza Ribbon, Rhinestone + Pearl Basic Jewels,  Dazzling Details 

TWINS 1rst BIRTHDAY CARDS

Good Morning!!!

I've something special to share today.....take a look at this handprinted greeting....and you will notice that it reads 'birday' and this is the funny part because when my daughter meant to write birthday and realized the goof up, she groaned because there was 10 mins. before she needed the card - of course!  But when I dashed to gather something to correct it, my brilliant daughter said "well, it does go with the card!"  And I stopped in my tracks because she was soooo right!  Yeah - a happy mistake!   Whooo-hooot!


...and here is why the greeting matches.....are they not adorable!!!!

TWINS!   And TWIN BIRTHDAYS no less!


CLICK ON PHOTOS FOR A CLOSE VIEW


How'd She Do That?  
  • Begin by punching a 1/2 oval section off the side of cardstock with the Large Oval punch. 
  • Follow w/ the Scallop Oval punch positioned above the mini-bite you made using the Large Oval, and punch creating a lightly curved 'scallop slice'.  Make this as deep and wide as you like! [Trim later]
  • Repeat to create as many scallop 'layers' - 2 or 3 for a tutu!  More for wedding dresses!  
  • Then, layer the slices and attach to the Owl's vest piece. 
  • Trim the scallop layers to meet the curves of the dress or owl. 
  •  Trim vest top to create a bib. [optional]
  • Embellish - have FUN!

* TECHNIQUE TIP - when you are working on plain cardstock - add interest by chalking the background 
as was done here with the pink-ish rectangle behind the owls.  This helps for your focal piece or accent
to 'pop' and is especially helpful when using minimal numbers of colours ! *

I too have been in an owly mood lately - you will see another project soon which features my OWL BUILDER PUNCH - the builder punches are awesome because you can do sooooo many "other" projects with them!  The stamping community always comes up with brilliant ideas, so if you can't think of one, chances are someone already has!  So invest in one!   And Stampin' Up!'s OWL BUILDER PUNCH is a great one to start with......ok, moving on!

Pink for little girls.....border punches, birthday stamps, and colouring done with inks and pastels!  A little bling....well, you can see from the pics how cute this card is - not to hoot our own horn too loudly, but hope this inspires YOU to acquire the punch and make some awesome fun!


include yourself inside the card...!!! 
I think the reason I LOVE LOVE LOVE this punch is because of the number or ways you can play "dress-up" with the owls!  I mean, c'mon - you have to love being able to customize your owl or owls like here today with little girl sundresses AND sunglasses!!   Yeah?  And its so fun!  That is the scary part - we could sit all day and create dressed up owls!


A happy set! 

And if you have TWINS in your family, this card is one of many you could make.......!


Cheers!
Taylor

SUPPLIES USED FOR THIS PROJECT
Stampin' Up!
Punches = Owl Builder 118074, Bird Builder (wings) 117191, 1" Circle 119868, Large Oval 119855, Scallop Oval 119856, 1-3/4" Scallop Circle 119854;
Stamps = Sock Monkey Accessories (retired) for balloons.  

25 March 2012

DON'T FORGET....!!

SALE-A-BRATION IS NEARLY OVER FOR ANOTHER YEAR!!!  I don't know about you, but I took advantage of it as much as I could!   


NEW CLASS POSTED - See Details in earlier post - TULIP PUNCH ART CLASS for APRIL !!!!  


Tulip Punch Art Card to Celebrate Spring CLASS

Challenges:
PaperPlay - Spring Colors


CLASS  PROJECT


* Hi!


With Spring underway and our thoughts turn to all kinds of nice things, I ended up turning to PUNCH ART FLOWER making!    I guess it is the exciting - fresh colours of Spring that first had me thinking - and time for something NEW! 
SO with that in mind - I tried some new punch art and as many people, I found plenty of inspiration on the Net, and eventually found Valita's TULIP PUNCH ART - which is made from STAMPIN' UP!'s OWL BUILDER PUNCH.  


It's so wonderful to make PUNCH ART FLOWERS - very satisfying and surprising to people that such things can be made from paper! 


Therefore, my next class we will be making PUNCH ART TULIP projects similar to this one I made yesterday - please check back over the specific DATE/TIME of CLASS! 


* Card with TULIP PUNCH ART Focal Point

And here are close-up details..... .


** See my CLASS DETAILS for MAY - posted shortly!!! **
* CONTACT ME TO RESERVE A SPOT *

Bring Your Own Class Supplies -
glue - glue tape, tacky glue, or glue stick; 3 Dimensional Glue Foam {dots like Stampin' Up! Dimensionals)


28 November 2011

MERRY CHRISTMAS BOUQUET - Beautiful !

One of our perks as Demos is to receive inspiration from a monthly magazine Stampin' Success which contains awesome projects like this gorgeous PAPER FLORAL BOUQUET in a BOX!!!  

YOU CAN MAKE THIS TOO!

Yes, seriously, you can!  I can!  We all can!
Purchase the list of products and you could make this in time to present to so many awesome people in your life - and ...
it's never gonna fade away! 
ok only if they leave it in a window forever, lol! ...but this is a beautiful reminder of your affection and its a real conversation piece, so your intended will enjoy relating to others how you made it which will bring more joy to them...
so it keeps on giving! 

GET STARTED! Hopefully you have some items in your possession or can borrow some BUT order supplies today and you will have many projects waiting for you to create! Let's Go!
Stamps
Christmas Greetings Set, Gifts of Christmas SetPaper - Cardstock
Garden Green, Old Olive, Real Red, Soft  Suede and Whisper White

Ink
Classic Stampin' Pads: Old Olive, Real Red;  and Early Espresso Stampin' Write Marker; and Stampin' Pastels

Accessories & Tools
Real Red 1/4" Grosgrain Ribbon, Linen Thread, Rhinestone Basic Jewels
Stampin' Dimensionals, Color Spritzer Tool, 

PUNCHES: Boho Blossoms, Dotted Scallop Ribbon, Extra-Large Tag and
Lace Ribbon, 1-1/4" Circle, Itty Bitty Shapes Punch Pack
BIG SHOT and DIES: Flower, Daisies #2 Bigz Die, Island Floral Bigz Die
Sponge Daubers
Floral wire
Hot glue gun
Pinecones
Silver ornaments

Instructions
To decorate box: 
  1. Punch border from Whisper White Card Stock using Lace Ribbon Punch and adhere to box. Wrap Real Red 1/4" Grosgrain Ribbon around box and adhere. Wrap Linen Thread around box and adhere.
  2. Stamp flower image in Old Olive ink on Whisper White Card Stock. Stamp sentiment over flower in Real Red ink. Punch tag from stamped card stock using Extra-Large Tag Punch.
  3. Adhere tag to Old Olive Card Stock and cut out.
  4. Punch border from Real Red Card Stock using Dotted Scallop Ribbon Punch. Trim scallop border and adhere to tag. Adhere Rhinestone Basic Jewels to tag.
  5. Tie Linen Thread in a bow and adhere to tag.
  6. Punch flower from Real Red Card Stock using Itty Bitty Shapes Punch Pack. Adhere rhinestone to flower and adhere to tag. Adhere tag to box using Stampin' Dimensionals.
To create Whisper White flowers
  1. Cut flower petals from Whisper White Card Stock using Big Shot and Island Floral Bigz Die. Layer two sets of petals. Sponge Stampin' Pastels on flower center using Sponge Daubers.
  2. Spritz flower using Color Spritzer Tool and Early Espresso Stampin' Write Marker.
  3. Cut strip of Whisper White Card Stock. Snip card stock every 1/16" and roll into a cylinder. Sponge Stampin' Pastels on snipped card stock. Adhere to center of flower, standing straight up.
  4. Attach flower to floral wire.
To create Real Red/Soft Suede flowers
  1. Cut several layers of flowers from Real Red Card Stock using Big Shot and Flower, Daisies #2 Bigz Die.
  2. Punch a circle from Real Red Card Stock using 1-1/4" Circle Punch. Adhere circle over hole in one flower. Lay flower flat.
  3. Curl petals on remaining flowers and fold in half. Adhere folded flowers around center of flat flower, slightly overlapping. 
  4. Snip Soft Suede Card Stock every 1/16" and roll into a cylinder. Adhere to center of Real Red flower.
  5. Attach flower to floral wire.
To create Old Olive/Whisper White flowers
  1. Cut flowers from Old Olive Card Stock using Big Shot and Island Floral Bigz Die. Cut one petal from smallest flower and fold the rest of the flower to three petals.
  2. Punch flower from Whisper White Card Stock using Boho Blossoms Punch. Scrunch flower and adhere to center of Old Olive flower.
  3. Attach flower to floral wire.
To create Real Red flowers
  1. Cut flowers from Real Red Card Stock using Big Shot and Island Floral Bigz Die. Layer flowers, removing petals from some layers. Curl petals downward.
  2. Fold and distress small piece of card stock and adhere to center of flower.
  3. Attach flower to floral wire.
Additional pieces
  1. Cut thin strips of Garden Green Card Stock and attach to floral wire.
  2. Attach ornaments to floral wire.
  3. Attach pinecones to floral wire.
  4. Arrange flowers and additional pieces in floral arrangement.
IF YOU REQUIRE ANY HELP - ANY AT ALL - PLEASE CONTACT ME!
NOT EVERYTHING IS EASY TO UNDERSTAND ESPECIALLY IF YOU ARE NEW TO THIS HOBBY - AND WE LOVE TO SHARE, SO PLEASE ASK ANYTHING!!!

IF YOU NEED TO PURCHASE SUPPLIES - PLEASE CONTACT ME AS i AM ONLY TOO HAPPY TO HELP!  

THANKS EVERYONE!!!!

19 July 2011

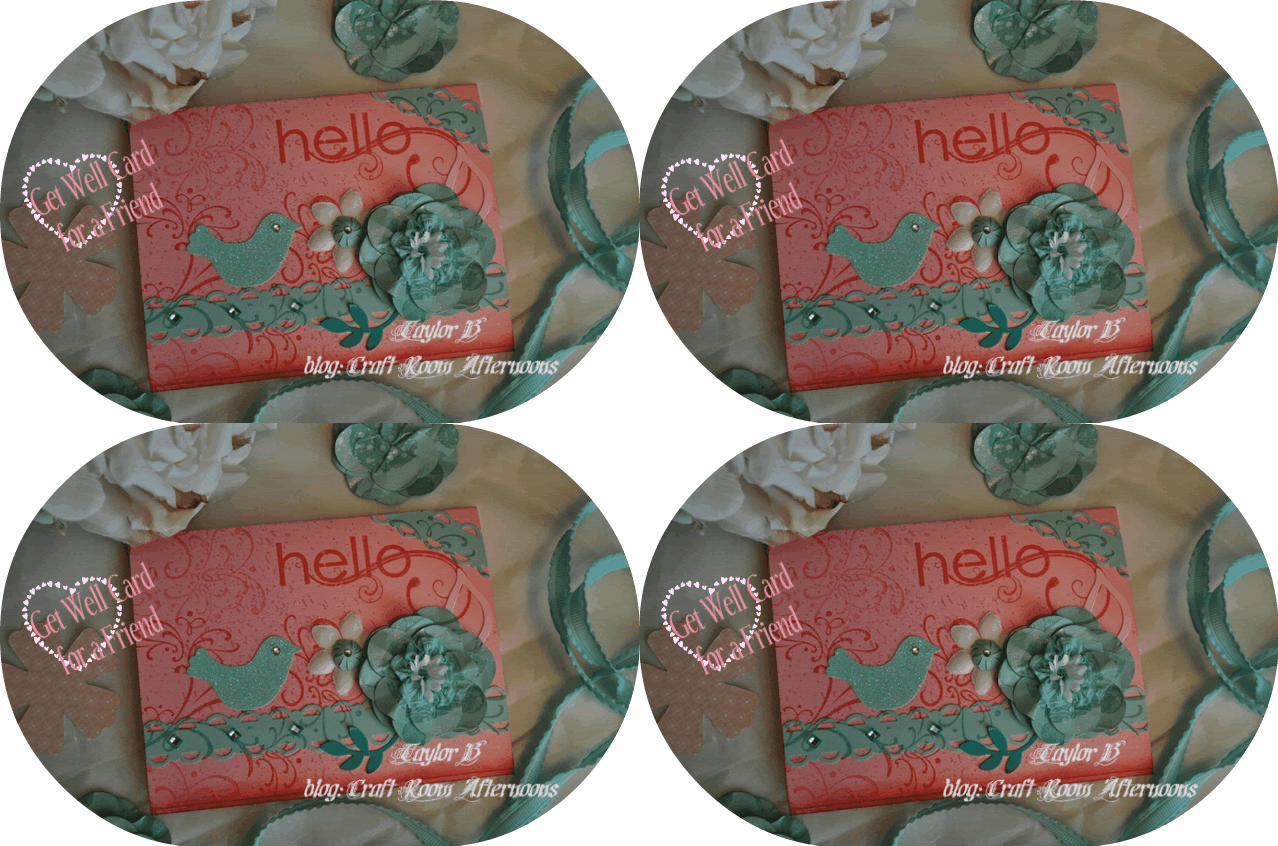
Custom Ribbon Flower Card to Cheer a Friend Featuring MY FRIEND from Stampin' Up!

Crafternoons Stampers,

Time to blog my latest...my correspondence continues this week with a card to a friend who is in recovery from surgery. I really wanted to pay special attention to this one - since I'd like to think that "Get Well" cards fall into that "special" category!!

This is one of the first chances I've had to begin with some of my fabulous NEW ITEMS from the brand spanking NEW CATALOGUE from STAMPIN' UP!  So you can imagine!

So settle down for an afternoon or evening and re-create this beauty for someone special in your life!  Or even make this a border for a frame - wouldn't that be lovely!  Hmmm, now I am thinking more here!


CLICK ON ALL PICTURES TO SEE A LARGE PHOTO


CREATING THE CARD

THE CARD BASE
It's a standard card size, 4-1/4 x 5-1/2 in STAMPIN' UP! Pretty in Pink cardstock. 
The Stamp
A CLASSIC NEW STAMP SET!!!!    

This is the greeting from MY FRIEND #122587. This set has versatility plus! Lots of images and two terrific greeting stamps so it will become a favourite among us. :)

Of course the WEDDING SWEET Stamp Set is another good choice - and its also terrific for many purposes besides the iconic wedding sentiments it includes because of the flourishes it provides! There is a smaller flourish included in the set as well as a lovely 'Thank You' stamp!


Step 1) Stamping


So using some ROSE RED CLASSIC INK - I stamped the HELLO greeting in the upper right-side corner.

Also using the same colour ink, I stamped the flourish design with the Wedding Sweet's largest stamp, going off the edges, and stamping twice before inking to get a lighter image.


Step 2) Add Spritzing/Smooching Effects
Want some fun?   Do some SPRITZING - and in part, some flinging, lol!  I made my OWN CUSTOM MADE SPRITZ by mixing a 50% solution of pharmaceutical alcohol and water into an empty misting bottle. Then to create my CUSTOM COLOUR - I dropped some  refill ink into the solution!!!!   I used a retired colour - Purely Pomegrante and swished to mix well. Pumped and directed the nozzle in the  direction of the card from one side - and sprayed.  I did it a couple of times, careful to stay mostly on one side of the card.  I immediately dried the card with my dryer to avoid the water pluming up the cardstock. No unsightly bumps if we can avoid it!  GREAT WAY TO USE UP THOSE OLDER INKS!!!

Next - I flung some of the SMOOCH using a nylon artist brush - flinging with style, lol! You do need to try to do it without over-doing it!
cardstock to the left is untouched; card to the right is spritzed, smooched


don't forget the back of the card :)


     The ACCENTS

Step 1) Add a Decorative Border - bonus: Stamp to Match the Background!   Using my NEW IN COLOR CARDSTOCK - POOL PARTY - a light greenish-blue reminiscent of the Carribean or a California sky! Very pretty colour!


With SU!'s Decorative Border Punch - SCALLOP TRIM BORDER #118402 - I punched both sides of a 1 inch wide strip of cardstock.  


TECHNIQUE TRICK - Match your Stamped Images: before attaching the border strip to the card - I challenged myself, could I "re-create" the stamped flourish on the card on to the decorative border and match them up?

Inked up the same Wedding Sweet stamp in POOL PARTY CLASSIC INK, and using my 'eagle eye' - I mimicked the direction of the rose red background image , so I could ' continue ' the stamped ' f l o u r i s h e s 'onto the pool party border strip. First time: NOPE!, but lucky us - we can TURN OVER THE CARDSTOCK AND DO IT AGAIN - and this time, I was able to make a pretty good match. Not yet trimmed, I could shift the stamped part to match the background of the card before trimming and attaching it permanently. Voila. If you have an eagle eye yourself, you can see I also added a slight match to the paper flower - see the flourish from the greeting shows up on the flower too! OK! Doing great.


Lastly I added some bling to help bring glamour to the border. Bling, bling, love the bling!


notice how the background stamp ties into the same image on the blue border?  Bird in glittery powder blue!


Step 2) The Bird and Leaf Punch Accents
Really not much to say here - its a punched Bird from a retired set from Stampin' Up!'s BIG SHOT dies - the Sizzlit Birds and Bloom. Which is kinda wrong, because there is one bird, and several flowers in this 4pc die set, lol!  But the bird is in GLITTER CARDSTOCK - oh yes! With a jewel for an eye too!

And of course, to balance the whole, a touch of a deeper blue in the same colour family - I found a punched leaf stem made of retired Bermuda Bay cardstock - uhm-hmm! Pretty!  I keep a stash of accents - don't you?  Grabbed two.  


The Custom Paper Flower Accent
Step 1 - Punch Out Flower Shapes and Supporting Circles With  XL FANCY FLOWER XL PUNCH #118073, punch out 3 flower shapes - #1,2,and 3.    
  With 1" CIRCLE MEDIUM PUNCH # 119868, in the same colour, punch out 3 circles.  


Fancy Flower Punch, Smooch Frost White (jar), Pool Party Ruffled Ribbon, and custom created paper flower (left side)

   TIP:When I layer the flower shapes, I often use circles to act as support between layers -   plus they provide a spot to glue one to the other. 
  
    TIP #2: I actually punched out dozens to make more flowers while watching TV - hey, its all about time management for me at times!

Step 2 - Decorating the Punched Flower Shapes - and Layering Together.# 1 flower shape: leave plain:
 #2 flower shape: I stamped large polka dots using our BACKGROUND DOTTED XL STAMP - this will stack on top of the plain #1 flower shape ....
#3 flower shape: I stamped only the center of the flower #3 using a smaller POLKA DOT  - this will be the top and final layer....

Now the fun part - SQUISH-SQUISH!  That's right - crumple up the two decorated flower shapes, #2 and #3!  Unfold Flower #2 so its slightly crumples but take #3 Flower, and crease it twice in two spots, and squish it flat to create permanent creases [ I glued the creases in place ]....

LAYER the Flower Shapes:
 Glue the punched 1 inch CIRCLES to the back of all 3 Flower Shapes, then, layer accordingly:
a) begin with Plain Flower #1 as the bottom...
b) attach glue to the circle of Flower #2 backside, and glue to Flower #1 beneath... slightly twisted clockwise so that the petals of Flower #1 peek through....
c) attach glue to the circle of Flower #3 backside, and glue on top of Flower #2 beneath - thus creating the top layer!


Step 3 - SPRITZ and SMOOCH the Completed FlowerAs with the card base, I smooched some FROSTED WHITE SHIMMER PAINT # 116854 on to the completed FLOWER and misted it with some GOLD GLOW SMOOCH SPRITZ #118770 spray. [you may want to do this over a protected surface - or in the bathroom like I do for easy clean-up!  Or try our cool COLOUR CATCHER for just this purpose!]

Optional - you could decorate the center of the completed Flower with other accents such as buttons, jewels, brads, bow, etc.  I have chosen to decorate it with a gathered Ribbon Circle and a Fabric Flower plus Glitter.  Read on!

THE RIBBON ACCENT

One of my new fantastic embellishments is the "ruffled, stitched ribbon" featuring our new IN COLORs - and I have it in POOL  PARTY  #122975 Its fab!

It has the heft and premier qualities of a beautiful ribbon that 'feels good to the touch'  - ruffly with that unmistakable grosgrain crisp yet silky so it slips through your fingers - what more could you want from a ribbon?

I turned it into a gathered circle to accent the  f l o w e r !  NOW THIS IS GETTING SPECIAL!  To gather, I prepped a needle with some thread/knot and stiched up one side of the ribbon, taking little 'dips' down and back up all the length of the ribbon - about 12 inches.  Then tugging till it schoooshed its way into a circle, and stitched closed. With the last of the thread, I stitched the ribbon accent right onto the paper flower!  

Still...I looked and saw that the ribbon accent left room for more!  It's open center left a bare spot - so I thought, hmmmm......I had originally thought a half-pearl would be in order. But seeing that made my card seem predictable....no good.  So I began to press my mind a little, and I grabbed a small fabric flower in white, and using a dab of glue and a small tool's handle, I pushed it right down into the center of the ribbon circle. This distorted it, but that was in keeping with the whole flower - a little grungy!   Finally, my glitter went floating down onto another dab of glue, and voila!
  MY FLOWER IS DONE AND ITS PRETTY SPECIAL!!!


- OK,  re-group and finish this card! -

You've stamped the greeting, and the flourishes onto the pink card base in a co-ordinating deep rose. Check!
You smooshed, spritzed some accent decoration to the background in a reddish and gold tone. Check!
You created a decorative border in a complimentary colour - and optional, stamped it to match the background flourishes! Check!
You punched out a bird in some pretty cardstock! Check!
You've created one special paper flower accent, ribbon and all! Check!

PUT IT ALL TOGETHER!!!

Estimate the placement of the Paper Ribbon-Flower Accent  - I chose under the greeting, slightly less than half way down the card; and then slide the border under the flower. When you have agreed that it looks good - make it permanent and attach with glue or sticky strip.   Attach in the same fashion, the bird so it sits atop the border facing the flower!   Tuck in the leaf accents, trimming as necessary. Finally, I like to add a bit of distressing to the bottom edge, so I sponged on some Rose Red ink to the bottom edge of the card. 

There you have it!!!!


Is it not special?  I know it took time - and ....
THANK YOU FOR READING THIS REALLY LONG POST ....
... I am sorry, but sometimes you just have to write it all down.  Succinct I am not!  
 Do what you will for the INSIDE GREETING!  The MY FRIEND stamp set does have another greeting stamp in a smaller type: " my friend ", so I chose that for my inside greeting and then I also made a bit more by taking a strip of no particular length of paper, folding it haphazardly, and gluing it down, then topping it with a punched shape and stamped " GET WELL" sentiment.  You, of course, do what you will!  


7 June 2011

Stampin' Up!'s Last Chance Products.....leavin', leavin', leaving!

Sigh.
Sadly, we are saying good-bye to some very familiar and well-liked products from our current IDEA BOOK and CATALOGUE 2010-2011...and I encourage you to check out the PDF files to see what is retiring.

One never knows till one is confronted with the possibility that you may not have the ability to purchase something - a little something that was always in the back of your mind, on the back burner, on the long list - however you want to put it...till its time has come, and you panic!   Whaa--!  Time is up, that is going?

So, get on in there and see what is going - knowledge is bliss they say!

Meanwhile....here is a picture I scooped up a long time ago, and it involves punch art using one of the punches that Stampin' Up! is retiring.  So I thought it appropriate to show you - lest it prompts you to want to have it before you have to start scanning ebay in hopes of finding it one day!

SPIRAL BORDER PUNCH is going, and here is the pic showing what a little creativity can be done with this punch.


[pic from songofmyheart stampers]

See - by using the SPIRAL BORDER PUNCH to create the CASTLE'S TOP EDGES!  How cool is that!
The Spiral Border Punch is often used for shabby or vintage looking projects.  

Other punches I see here are: Extra-Large Tag; Window; Circle and possibly an altered Scallop Circle {back layer of Sun}

20 May 2011

Cupcake Punch "Purses" Card


LOOK!  How cool is this to make!   

Purses begin with the CUPCAKE PUNCH {the bottom half!} and then  two of our smaller CIRCLE PUNCHES for the top and the handle of the purse - neat!

Back your purses with layers - use a textured backgrounds, a border of SCALLOPS [another of our punches], pop the purses with some dimensional glue dots, a wee bit of ribbon - voila!    What a smart card - can you imagine these using a FLORAL Designer Paper?   

Have fun with it!


STAMPIN UP CUPCAKE PUNCH 

Build A Cupcake Punch   Item # 121807


You might also like the co-ordinating product: 
                                 Create a Cupcake  Stamp Set                                                                   {or choose  Digital Stamp Set !!} 


Contact Me for your Order or Questions, I would be pleased to help you!     Beverly :)


18 April 2011

2 Step Owl Punch Anniversary Card!


"Look who's ... 9"  doesn't only have to be for 9-yr old birthdays - 
- how about someone's 9th year on the job?


And look at our cutie-pie owl  - its so much fun designing "outfits" using our 2 Step Punch.

2-Step Punches refer to the fact that the punch creates several 'parts' in one click of the punch.  So this means you can choose the paper for each of those parts - so this adorable owl comes with 'her' pink dress and pink accents, or it could of been blue clothing  if I chose to - or how about even a 'red' owl itself?   

For this celebration card, I paired my owl with several stamp set components - the balloons are from "Blowing Kisses" - a very sweet stamp set.  And 'On a Pedestal' provided, well, the pedestal, lol!   Finally, I turned to another stamp set for birthdays - this time, its "Look Who's Turning.." and highlighted the no. 9 which is significant for this recipient. 


Have some fun yourself - if you'd like to try a 2-Step Punch - let me help you!  

Thank you for taking time to visit my blog!  

xx Beverly


1 June 2010

My Stampin' Up! Scallop Circle Punch Flower Imitates Art!

Good Morning!

I am back playing with Punch Flowers!  I was at a craft auction on Saturday - I had $113 dollars to bid with - which sounds like a lot until you discover the woman next to you has $800, lol, but it was "free money" I earned and so I wasn't spending real money and it was just for fun. But - I bid on some stuff and won a few nifty things, so I was a happy camper. I picked up this paper - and at first it was because I liked the kraft paper part - and the flowers were nice too.


This is from ScenicRoute's Sonoma Collection - the Kraft Pink Garland
however, for some reason, mine is the same design but with the Red Bouquet colours. Their collection is very nice. But like I said, I was mainly wanting this just for the 'kraft' section and planned to cut off the flower border.

It wasn't until I got home and googled the paper that I saw women had done amazing things with this paper!  So I perked up!

After musing for awhile, I knew I'd need some "depth" to this paper as a SCRAPBOOK PAGE PROJECT. So I turned my thoughts to PUNCH FLOWERS.

But I really did not know how well this was going to turn out until I made my first flower!


MY FLOWER......USING STAMPIN' UP!
Looking at the detail of the print flower on the paper, I think the designer had the ruffled scallop circle flower in mind - certainly seems that way once you punch out a scallop circle, cut it and make a few creases!

So I'm on 'motor drive' now!  And I off to make my flowers!!!!

1)  I grabbed my a scrap of left-over (but returning) RED RIDING HOOD CARDSTOCK and punched out some SCALLOP CIRCLES.  I cut the scallop circles with scissors and using my bone folder, made folds and creased each one for every section. I didn't even care if the fold was centered or not - this is very casual!  I used some co-ordinating ink to darken the edges - distress them if you wish.


2) Now I grab some SO SAFFRON CARDSTOCK and my BIG SHOT and the 'SPARKLE' Sizzlit Die.  Made my 'sandwich' using the Cutting Mats and the Multipurpose Platform set on Tab 2 ....and ran it through with 2 layers of cardstock. I am making at least 2 flowers, so that saves time. 
***The Sparkle die is a busy design with lots of edges - so I don't try to make a bunch in one go, I rather 'repeat' the process. Other plainer cuts are easier to stack a bunch of cardstock to run through the Big Shot in one pass. 

3) Now I grab some BRAVO BURGANDY CARDSTOCK and one of the four Sizzlit dies in the BIRDS and BLOOMS 4 Pack Die Sets. Its the SCALLOP BUTTON - which has 2 sizes - and I want 'both', so this is great!  I make a pair for each flower. 
Once I make them, I ALTER each one by creating a SLOPPY CIRCLE - just using my scissors, and cutting the edge off all around each one in just a haphard way - no real thought involved!  Like that, heh heh! .....and they end up looking like 'raisins' - one large and one small!

4) Last part - I repeat the 'small' Scallop Button in So Saffron - and inked its edges with some CRUSHED CURRY INK - and made one for each flower. 

Here is how my flower parts [ steps #2, 3 and 4] look like - the darker burgandy  'raisin' shapes are shown beneath the Scallop Button that I made them from, and so:  


PUT IT ALL TOGETHER - AND YOU HAVE ONE COOL FLOWER!  
1 Large Scallop Circle (red) + 1 Sparkle die cut (yellow) + 1 larger Scallop Button (burgandy) + I small Scallop Button (yellow) + 1 small Scallop Button (burgandy)

=


Can YOU TELL THE DIFFERENCE?   Isn't it so similar to the flowers printed on the paper - or what! I thought this worked out so cooool!  Really did!   

Here is a larger view and where I altered the photo:


Now, I've started my Scrapbook Page and it remains to be seen how it will turn out - so stay tuned!

UPDATE:

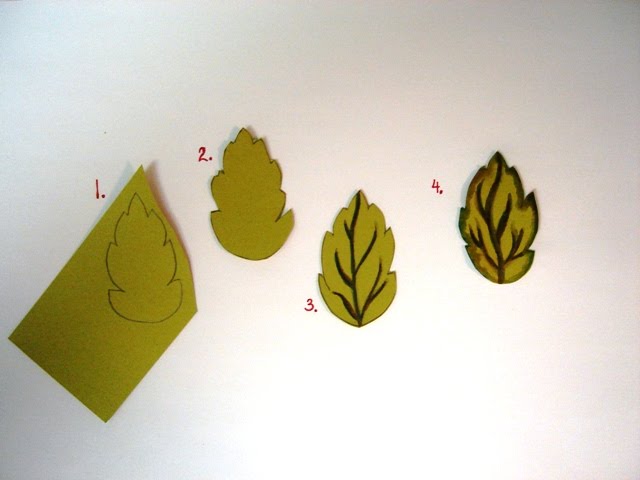
Here I am adding 3D LEAVES  I've created to my scrapbook page - and here's the process......CLICK to see a closer look


1. DRAW a leaf outline   2. Cut it out.  3. Apply Watercolour veins to leaf.  4. Aqua Painter brushstrokes to soften the watercolour veins, pulling some of the colour to the edges. 
These are made in the image of my project's paper, but you could do this in any colour or leaf shape.  


Alright - I have punched more flowers out using the BIRDS and BLOOMS 4 PC Sizzlits Pack - and made a BUTTERFLY using our BIGZ Die 'BEAUTIFUL BUTTERFLIES' .....and what else, oh yes, my TOP NOTE BIGZ Die which I will use to make my title on (later)......and here is how I've laid things out so far...


Getting busy - I know!  But I think this will be for a picture of myself and my dog in a nice garden somewhere, so I can afford to 'fluff' it up! :)
Besides - I may make more changes, ha ha! What you see is not all glued down yet, aha! 

To emphasize where I shall place a 5x7 photo, I  made a central background layer with some Kiwi Kiss paper and our SCALLOP BORDER TRIM PUNCH - it has a pattern, but its small compared to the larger pattern of the flowers - so it will work. 
I've also followed the principles of proportions by making some things large, small and in-between. 


I needed to have some highlights on the page - so I made my Birds and Bloom's flowers out of white cardstock - then toned them down a little with some pink and brown ink on the edges. Then I topped them with buttons. 

Anyways - that's it.  Won't be done till I find that perfect shot of my dog and I....thank goodness for digital cameras these days, can you imagine when we had to take photo after photo and wait till our photos got developed - and even then, cross our fingers that at least 'one' of them came out nice?

Oh, how we have changed! 


24 May 2010

Flower Punch Art - WT272 Album Cover


WT272 Album Cover

Yay - I finally finished my cover for my mini- album this morning!

Here it is!

Update - This is now my entry for SPLICOASTSTAMPERS May 27th's 'Ways to Use It' Challenge under "Paint " Technique! So I am required to post it as a 'WT272' project to help others find my entry! Hope they like it and you too!


I will post the basic steps in my process on how to make a cover such as this, so read below!

Hope everyone is having a wonderful week-end.  

Beverly


HOW I MADE MY COVER
HEART PUNCH FLOWER
1) Make a flower with 2 sizes of  HEART PUNCHES.  Bottom layer is attached with glue to a back support (paper circle)  -  use 4 large punched Hearts for bottom layer .....next, attach 6 small punched Hearts to create top layer (attach by applying glue to the tip area only).  Embellish center as you please - I used a small pink flower brad (shown in finished project).

Extra - I glossed over the large punched hearts with a thin layer of gloss medium - just to protect the paper more. I also 'crimped' the large hearts to add texture. 


Next, I created the cover by taking a 6x6 thick chipboard, and applying a layer of gesso and then 3 different colours of paint: purple, red and gold.  I applied them in large swatches covering the entire piece.   Then I began to cover up those bold colours with some light green, light blue, a bit of yellow, and then I mottled everything with white paint - using some packing plastic as my 'brush' - just dip into the paint and smudge or tap the paint "smooshing" some parts together and other areas left more "blobby".  LOL - hope you understand me!  Just go at it - there is no 'right way' - what-ever LOOKS GOOD TO YOU! 


I stamped a couple of images onto my finished paint job, dried them with my heat gun, then applied a layer of  Gloss Medium as a protection.  Now it can be handled and have a better measure of protection from fingerprints - and what-ever else I attach to it!!

Next I made a small cardstock layer with Whisper White cardstock which I decorated using the RUBBERBAND BRAYERING and EMBOSSING TECHNIQUE. (described in an earlier post) and I created and attached 4 photocorners.   


The embossing powder is Iridescent Ice - looks great white on white, but I chose to ink it up with colours! 


Now I want to title my cover - but for now I am beginning with an initial - F - for flowers of course!   I punched out an f letter in Only Orange cardstock, inked it with Razzleberry (IN COLOR) and coated it with CLEAR Embossing Powder. Now its more sturdy and ready to go!


I used the large heart to punch out some green cardstock, and cut those in half, rounded the edges to create a leaf or two......here's how to punch them out and cut: 


And now its all put together with brads, extra glitter, and just those little touches we add at the end - its all very personal - you can add as little or as much as you want!  


la la lah!!!!   Isn't it fun to go from bare to something wild!! Its like being back in grade school art class, lol. 


I will come back and add more ribbon to the binder rings holding the album together, but for now, this is all. 

 I am making the various pages, and then adding my rings at the end because I do not like the process of taking things on and off - too hard! 

Bye for now!

Talk to me to take a class on making your own album! 

Supplies: Stampin' Up! 
Embossing Powder, Ink, Versamark Pad & Marker, Cardstock, Glue, HEART PUNCHES


Template by: