Showing posts with label Technique - Folding. Show all posts

21 April 2012

T-Slider Birthday Card Tutorial

Hellooo Crafty Friends!!!


As mentioned in my previous post, I would drop by with some pictures of my progress making the T-SLIDER CARD.   But I also should direct you to the original tutorial where I was directed so YOU TOO can make this fantastic card!   


link =  http://www.splitcoaststampers.com/resources/tutorials/tslidecard


YOU SHOULD READ THE TUTORIAL ABOVE and then REVIEW MY PICTURES FOR ADDED HELP.   Best of both worlds :)


OK - I stamped this image from our SWEET SHOP SUITE of products [Occasions Mini Catalogue] and my CLEAR MOUNT stamp set is called SWEET CAKE.   


I used my CALYPSO CORAL CLASSIC INK PAD and then swooped around the outside border with my PACIFIC POINT MARKER.  Stamped it and cut it out. 


 I stamped my sentiment into the provided box area.  Because 'HAPPY BIRTHDAY' pops up when they pull on the tab, I chose to use the 'Sweet Love' sentiment as its my girl and she's a sweetie! 

Then I attached it to a mat of our lovely, lovely blue paper - POOL PARTY cardstock. This is such a pretty colour, reminds me of so many things and I love its softness!  

To 'fancy it up' - I added GLITTER of course!   Read on for my tip!!!!!


TAYLOR's TECHNIQUE TIP 

"mix-it-up glitter 3D style! "

CLICK on the above photo and you will see that my cupcake glitter is quite thick!  And it is a mixture of small to large glitter flakes as well as multi-coloured!!   GUESS WHAT -  IT STARTS OFF WITH CLEAR GLITTER!!!   How did I do this? 

Well we often have more than one colour of glitter, right?  I also have Stampin' Up!'s Clear-ish DAZZLING DETAILS glitter bottle.  With the bottle's nozzle, I can accurately apply glitter glue following any outline.

 I apply a good thickness and while its wet, I drop other colours of glitter { flakes or glue style} into my clear glitter, and mix them gently with a toothpick.  If you look, I have clear, blue and our larger Champagne Glass Glitter mixed together.  
I also applied a thick mound of the Clear Dazzling Details to the CHERRY and then piled pink flakes of glitter overtop. I pushed it into a pile with the toothpick, so its very 3D! 
Finally, I added our Real Red Dazzling Details to the heart, and did so in 3 thin layers with a small drying period inbetween. The reason is because glitter glue can spread the glitter particles a bit too far apart, so adding at least a second layer is useful. 

So in the end, the CUPCAKE GLITTERS with more panache than it would in just clear - in my humble opinion.  Otherwise it would of appeared like the glitter I applied around the text box - pretty, but I felt my cupcake needed to appear as colourful as the area surrounding it. 

Next time you glitter - try this technique !!! 


CREATING THE FRONT FOLD-UP PANEL


Here is my 4 inch square using a sheet of colourful SWEET CAKE Designer Series Paper cut and folded according to the SCS Tutorial.  {the blue with white hearts in the background is the pattern on the opposite side of this double-sided cardstock} 

 Please note the little cut-out section to the left of my pencil.  That section is closest and parallel to the fold which is nearest the cut edge {which itself is perpendicular to the 1rst, 3rd cut edges}.  I just wanted to point that out - because I had trouble at first following the twists and turns of the video. 

I put my pencil there to show the cuts and folds of the interior flap. 


Here you can see the whole flap folded upwards!  

The following pictures show the next pieces you'll work with......
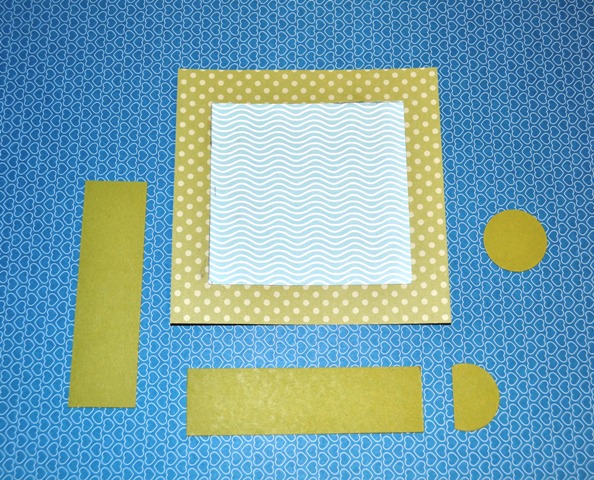

The large square has a section of cardstock which is only visible underneath the folding flap. The small rectangles are the T-SLIDE mechanisms and to create the Pull-Tab.  The circle and half circle help to re-inforce the end of the Pull-Tab itself.  More on those later. 


These parts are the POP-UP GREETING TAB.


Pictured from the back, you will insert the POP-UP GREETING TAB


Back side of folding flap, greeting tab. 


The greeting tab is inserted so that its top edge peeks out the front through
the slot, and is attached ontly with its back end  - which you can see is aligned to the fold of the flap. 


I double-check to see where and how the POP-UP GREETING TAB will be 
'BEFORE' I glue it in place!!!!   I had to do this several times to make sure it was
correct because we are using the impossible-to-remove 'Sticky-Tape' to attach it as we need its
strength, but its a do it right the first time maneuver!  


Yes - its working!  

Now return to the back side!   The 1rst rectangle portion of the T-SLIDE mechanism!  In the tutorial you
are shown where to attach each piece!  


Then the 2nd rectangle to complete the T-SLIDE mechanism. 


Edges are taped {minus the pull-tab section - see where green circles were added?}
I'm ready to attach the T-SLIDE/FOLDING FLAP/FRAME!!!! 

HERE IT IS ATTACHED TO THE GREEN BACKING FRAME!


I found it slide in and out better when I smoothed back part of the slot opening - I made a wee
'lip' {tiny blue strip by slot edge}.

Here it is from the back - all nice and tidy - and READY TO MOUNT TO THE CARD BASE!


Final step - I mount this to a CARD BASE of Pool Party Cardstock. 
I added a bit more decoration to the pull-tab, and added a satin BOW. 
THIS CARD IS READY TO IMPRESS!!!


It goes well with all the sweet things a young woman loves!  


Like I said - this card hangs between easy-to-difficult depending on your own experience!
For the few minutes it takes to pass through any difficulties pales to how this card will impress 
its intended!   Take the time to visit the TUTORIAL LINK {see at beginning and previous post} and TRY THIS CARD FOR YOURSELF - ITS CHALLENGING AND FUN! 

Cheers!  

TAYLOR :)

Have a great week-end!  

PLEASE NOTE - If you'd like to have a workshop where I demonstrate this card.....or you'd like to skip the tutorial and want to PURCHASE this card......please contact me.  I'll be happy to help! 

craftroomafternoons@gmail.com

****


28 November 2011

MERRY CHRISTMAS BOUQUET - Beautiful !

One of our perks as Demos is to receive inspiration from a monthly magazine Stampin' Success which contains awesome projects like this gorgeous PAPER FLORAL BOUQUET in a BOX!!!  

YOU CAN MAKE THIS TOO!

Yes, seriously, you can!  I can!  We all can!
Purchase the list of products and you could make this in time to present to so many awesome people in your life - and ...
it's never gonna fade away! 
ok only if they leave it in a window forever, lol! ...but this is a beautiful reminder of your affection and its a real conversation piece, so your intended will enjoy relating to others how you made it which will bring more joy to them...
so it keeps on giving! 

GET STARTED! Hopefully you have some items in your possession or can borrow some BUT order supplies today and you will have many projects waiting for you to create! Let's Go!
Stamps
Christmas Greetings Set, Gifts of Christmas SetPaper - Cardstock
Garden Green, Old Olive, Real Red, Soft  Suede and Whisper White

Ink
Classic Stampin' Pads: Old Olive, Real Red;  and Early Espresso Stampin' Write Marker; and Stampin' Pastels

Accessories & Tools
Real Red 1/4" Grosgrain Ribbon, Linen Thread, Rhinestone Basic Jewels
Stampin' Dimensionals, Color Spritzer Tool, 

PUNCHES: Boho Blossoms, Dotted Scallop Ribbon, Extra-Large Tag and
Lace Ribbon, 1-1/4" Circle, Itty Bitty Shapes Punch Pack
BIG SHOT and DIES: Flower, Daisies #2 Bigz Die, Island Floral Bigz Die
Sponge Daubers
Floral wire
Hot glue gun
Pinecones
Silver ornaments

Instructions
To decorate box: 
  1. Punch border from Whisper White Card Stock using Lace Ribbon Punch and adhere to box. Wrap Real Red 1/4" Grosgrain Ribbon around box and adhere. Wrap Linen Thread around box and adhere.
  2. Stamp flower image in Old Olive ink on Whisper White Card Stock. Stamp sentiment over flower in Real Red ink. Punch tag from stamped card stock using Extra-Large Tag Punch.
  3. Adhere tag to Old Olive Card Stock and cut out.
  4. Punch border from Real Red Card Stock using Dotted Scallop Ribbon Punch. Trim scallop border and adhere to tag. Adhere Rhinestone Basic Jewels to tag.
  5. Tie Linen Thread in a bow and adhere to tag.
  6. Punch flower from Real Red Card Stock using Itty Bitty Shapes Punch Pack. Adhere rhinestone to flower and adhere to tag. Adhere tag to box using Stampin' Dimensionals.
To create Whisper White flowers
  1. Cut flower petals from Whisper White Card Stock using Big Shot and Island Floral Bigz Die. Layer two sets of petals. Sponge Stampin' Pastels on flower center using Sponge Daubers.
  2. Spritz flower using Color Spritzer Tool and Early Espresso Stampin' Write Marker.
  3. Cut strip of Whisper White Card Stock. Snip card stock every 1/16" and roll into a cylinder. Sponge Stampin' Pastels on snipped card stock. Adhere to center of flower, standing straight up.
  4. Attach flower to floral wire.
To create Real Red/Soft Suede flowers
  1. Cut several layers of flowers from Real Red Card Stock using Big Shot and Flower, Daisies #2 Bigz Die.
  2. Punch a circle from Real Red Card Stock using 1-1/4" Circle Punch. Adhere circle over hole in one flower. Lay flower flat.
  3. Curl petals on remaining flowers and fold in half. Adhere folded flowers around center of flat flower, slightly overlapping. 
  4. Snip Soft Suede Card Stock every 1/16" and roll into a cylinder. Adhere to center of Real Red flower.
  5. Attach flower to floral wire.
To create Old Olive/Whisper White flowers
  1. Cut flowers from Old Olive Card Stock using Big Shot and Island Floral Bigz Die. Cut one petal from smallest flower and fold the rest of the flower to three petals.
  2. Punch flower from Whisper White Card Stock using Boho Blossoms Punch. Scrunch flower and adhere to center of Old Olive flower.
  3. Attach flower to floral wire.
To create Real Red flowers
  1. Cut flowers from Real Red Card Stock using Big Shot and Island Floral Bigz Die. Layer flowers, removing petals from some layers. Curl petals downward.
  2. Fold and distress small piece of card stock and adhere to center of flower.
  3. Attach flower to floral wire.
Additional pieces
  1. Cut thin strips of Garden Green Card Stock and attach to floral wire.
  2. Attach ornaments to floral wire.
  3. Attach pinecones to floral wire.
  4. Arrange flowers and additional pieces in floral arrangement.
IF YOU REQUIRE ANY HELP - ANY AT ALL - PLEASE CONTACT ME!
NOT EVERYTHING IS EASY TO UNDERSTAND ESPECIALLY IF YOU ARE NEW TO THIS HOBBY - AND WE LOVE TO SHARE, SO PLEASE ASK ANYTHING!!!

IF YOU NEED TO PURCHASE SUPPLIES - PLEASE CONTACT ME AS i AM ONLY TOO HAPPY TO HELP!  

THANKS EVERYONE!!!!

1 October 2011

World Card Making Day 2011

Well hellooooo!   A large craft event  I had planned on attending today was cancelled last minute - and its too bad for all different reasons, as I could of had a World Card Making Class after all - better luck next year! So I put my new found time to making a more elaborate card  for today!!!


Here is my card featuring a bunch of techniques!

I went over to my Big Shot with some Whisper White cardstock, and using our Scallop Circle Bigz Die - I made the large circle and then embossed it with a snowflake Textured Embossing Folder. Next, I cut out the house - free style - with my craft knife!  To back the house, using our regular Wheel Handle I rolled some musical notes onto kraft paper using Early Espresso Ink... and  used the left-over scraps for the crimped corners! Next I punched out in glittery red and white, a couple of  hearts using 2 separate Heart punches. 
Naturally I distressed the edges of the scalloped circle - first with a smidge of blue ink, followed by the brown ink. Now - to pull it together!

I decided a band behind the scallop circle would 'ground' it better onto the card face!  So I made a bit of a complicated border band!  First I cut a wide band of Whisper White cardstock - about 3 x 8-1/2 inches and  using a border punch, punched out both sides of the banner - THEN - and this is where I had to make life a little difficult - I used our Scoring Tool and created a diagonal 'trellis' by scoring the paper and then "cutting " out the spaces inbetween - not all - but a fair amount of them! Whew!  But I am not done!
To give the card a boost of colour to balance all the red, white and natural kraft tones - I threw in a band of Marina Mist which I scored, and folded accordian style. That was pretty easy, and I glued it onto the red cardstock base making sure it stood nice and stiff because I want  it to support the scallop circle centerpiece  - creating some interesting depth!  Now that is a fair amount of techniques, wouldn't you say? 

So there you have it - a nicely done card for the holidays!  I did a card similar to this awhile ago - and so I just re-visited the theme with tiny adjustments.  That is always nice when you do not have to dream up a whole new idea - just re-work an oldie but a goodie!!!!   

NOW WHAT DID YOU DO TODAY FOR WORLD CARD MAKING DAY????  

20 July 2011

Penquins Summer Fat Page


Here's my half of a Fat Page Swap which has a ' SUMMER ' theme!  We also decided that it should feature some iris folding, and some embellishments.  My iris folding didn't really turn out the traditional way, but the beach ball does have layer over layer of bright, summery glitter papers - and - some clear sequins layered on top to give it some more kick!

This is a non- SU! project, but I feel I must do one now and then, as a way of stretching my wings, let's say :)

Can you believe the little penquin is a button?

***

I was lucky to be included on the stamp's manufacturer's facebook wall of photos HERE - thanks Karen!


Template by: