Showing posts with label Punches. Show all posts

31 December 2010

January or Winter Birthday Card

Hello!  Happy New Year's Eve!

I know I said I would post another scrapbook project, but in the meantime my daughter had to quickly put together a birthday card for her beloved grandma whose birthday is in the first week of Jan!
Actually we have 2 members in our family with early year birthdays beginning with Jan 1rst - my aunt Elsie is turning 97 and she still lives by herself at home - no homecare -amazing lady! Love you Aunt!!!

So here is today's feature - a birthday card for those who have "winter" birthdays!

The pics are pretty self-explanatory - we were after a soft effect after all the red and green of christmas - it just seemed the right way to go.....plus plenty of embellishments!  We tried to do "interesting' elements including a small peek-a-boo door inside!  The handle for the door is just a rolled up scrap of paper.

A variety of 8 beautiful snowflakes can be yours with the NORTHERN FROST Decorative Strip Die  catalogue item # 120901,  please see picture below under SU! Supplies.


Dressing up your envelope is always fun!  Here its been sponged using a snowflake as a mask. Neat!


All together!

close-up of punched circles, layered for depth.

So there you have it - and I am not sure if I will post a project tomorrow. 
xx
Beverly

Stampin' Up! Supplies: 
 Cardstock = Bashful Blue and Pretty in Pink.
Punches = 1-3/4 + 1 inch Circle Punches
Die-Cutting =  1.Perfect Polka Dots Textured Impressions Folder, Item # 117335; 
    2. Northern Frost Decorative Strip Die, Item # 120901

25 June 2010

Make an Exotic Tray as a pretty catch-all!


Good afternoon!  It's Friday - and I bet the end of school for a whole lotta students who are thrilled to be free!!! So enjoy your summer with your children, grandchildren - every day is precious!

I am back today with a project I worked on for almost 2 days - but that's because I was designing it as I went along - so you could do it in about an hour if you had instructions, etc.  I will be offering instructions for this once I make a PDF file - so look for it!

OK. I love this!


I started by making a folding card - well, more importantly, I started because I wanted to use some of the fantastic new things that have been accumulating around the studio! I have also been wanting to do some of the 'vintage' style that is exploding all around the world!

So - a folding card which ended up looking pretty much how you see the middle section and the two wings.

And while I was staring at it, the wings wide open - it struck me that I should turn it into a TRAY!

Then, a tray that could be useful around our cluttered home - I always can use catch-alls to threw my rings onto, spare change or to keep some perfumes - anything really!

I created a template for a tray - which basically is following the shape of the center & sides, deciding how far the front of the tray should extend, and creating "FLAPS" to secure the tray to the vertical sides. The front of the tray has a lip - a flap that folds up and over itself.  And that was it.

Then I had another inspiration - I wanted a smaller container to catch little things - pennies, rings, who knows! So I grabbed some velvet ribbon and made a flower and a leaf and attached them to a golden coloured votive candle holder. Some gems and a pearl - its so cute, I think I'll make more of them!


OK - here the pictures!


The small velvet flower on votive candleholder! 


.....used as a spot to drop my rings in! 


Die-cuts, stamping (the shadow stamping on the brown) ...


Securing the sides with paper twist turned 'decorative'...and a close-up 
of the tray's front 'lip' - which is also stamped, inked.....


The interior of the tray is stamped in a monochromatic matching shade....


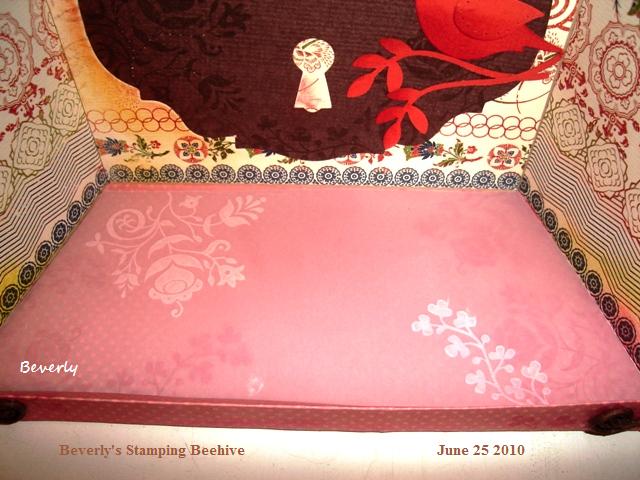
and to protect the tray's bottom from damage, I cut a vellum cover - which I stamped on its 'reverse' side
using white CRAFT ink - because of the smoothness of the vellum's surface (warning - let it dry first!)...


...vellum cover in place, and because I stamped on its underside, those white floral images
will not be harmed either!  Gotta think of these things, right?


Close-up of the flower I made using 3 layers of flowers in descending size and a white brad
to tie in with the background colour of that delicious exotic paper!
I made a border pulling out some of the 'orange' of the paper, and to make the top as interesting as the 
rest of the piece, I used some SCALLOP punches and tucked them in behind the scallop border.....


So here it is again!  It's strong It's pretty 
and it's my new favourite! 

Hope you enjoyed it! 

2 March 2010

March Class - Perfect Polka Dot Butterfly & Pillow Box Set


Perfect Polka Dot Butterfly Card & Pillow Box with Belly Band Set

Whew - that is one descriptive name for this class set, lol!

But what a fabulous set to swing into Spring with!  This class is a dynamic one because of all the thrilling things we get to do with the Big Shot!.....embossing with Polka Dots using our Simple Impressions Folder, embellishing with beautiful Butterflies and a small favour box a la Pillow Box!

Then, using our newest punch - Scallop Border - it all comes together!  Also features our latest scroll greeting & clear stamps......and some Sale-A-Bration paper too.  Lots of goodies here.  One greeting is for Easter! You can have the option of switching greetings for the sets - versatility is the theme!

Because...I designed this theme to give you two very different looks to demonstrate how versatile our products can be when you mix it up with different colours!

So we have a Shabby Chic look in the lavender & white with a dash of orange.  And look at the Swiss Dots - they remind me here of those bedspreads my Aunts would have used many years ago, if any of you have had the same experience. So very quaint!  My daughter came up with the idea of using the leaf stem as the antenna for the butterflies - clever girl!

Then, to mix it up - how about a more daring style with hot pink and black!  I might be tempted to call it Miami Chic, lol!  Not to give it away, but there is a surprise inside the card - keep you guessing!

So come and enjoy these - you make a 2 sets (1 card + pillow box = 1 set)  each for the class. That will give you the option of having 4 separate items to give away, or 2 sets for 2 special people - or just leave them displayed in your home for others to admire.

CLASS INFO:
 SUNDAY - MARCH 21rst @1 PM  or  option 2 = THURSDAY - MARCH 26th @ 6:30 PM
COST = $25 or FREE with a $75 order  (pre- S/H+tax ).
RSVP Please - we need to cut supplies which is why we ask, thank you!

See YOU there!  
$5 off for bringing a Guest!

Leave a Comment to be entered for my April Goodie Basket!


card design by B. Taylor March 2010

14 February 2010

Mini-Album - Love U Page

Remember this little album I made previously?  A basic few pages just waiting for more inspirations....

 Well here's a quickie project featuring a mini-album page. You can easily transfer this to the front of a card, tag, ATC or come up with your own idea -maybe just add it to part of a large scrapbook page.

Take a die-cut alphabet letter 'U' and drape some punched out hearts around it. I tried to make the hearts look like they were either leaning into the letter or standing on top of it.

2 Mins is all it took - 1 min. to gather your alphabet die and hearts, and 1 min. to position it on the mini-album page. That's all. Looks great over co-ordinating patterened papers too, but solids would be a great alternative as background.

Add a tiny photo if you like, or on adjoining page.


Easy Smeesy!

Big Shot Sans Serif Alphabet letter 'U', Heart to Heart punch , Real Red, Whisper White cardstock, previous christmas papers from previous Holiday Mini Catalogue  - all supplies Stampin' Up!

22 October 2009

Think of Mother-In-Laws!

While doing my bridal line-up for the upcoming show, as you know by now, I was finishing up a set of inivitation designs and turned to thinking of Thank You cards - for when the newlyweds, have returned and must tend to thanking their generous friends and family for all the great gifts.

Now granted, I was looking down at the stamp set, WONDERFUL FAVORITES, and seeing all the words I could match up with "Wonderful"....21, in fact. Words such as cousin, nephew or combos like 'to a' or 'in-law'....and that's when I thought, "wouldn't a newly-wed bride like to thank her Mother-In-Law with her own special card?  I mean, we can always find "Mother" cards just like we do when we want "Father, Daughter or Son, Aunt." etc. But "Mother-In-Law"?....well, not so often.  So that decided that and this is what I dreamed up.

I turned to my Circle Scissors Plus and made a matching ring to go with the circle. I didn't really have a size of circle in mind, but that's the beauty of the Scissors Plus because I stamped the words Mother-in-law, and then positioned the paper under the Scissors Plus and gauged my circle size 'insito' !  The ring just adds another accent. 

Next, I chose some patterned paper in green because I think greens and pink-to-purple tones always look nice together.  Two minutes of hard thinking for the embellishments....okay, maybe five mins. - you got me! (wink) .....ah yes, the 5 Petal Flower Punch to the rescue! So punch...punch...punch....glitter, glitter, glitter...and the hardest part, sewing a button on.  Well, a little bit of drudgery for such a nice effect - and there it is! 


In my haste tonight, I forgot to take the picture of the inside which says Thank You and room for the bride to write a nice note to her new mother-in-law....oh I don't know, what would you write?

16 October 2009

Hostess Christmas Punch Stamp - could be yours!

We tell customers all the time - get together some friends, learn some new stamping techniques together, have fun ....and then you can earn some free items such as this 'Christmas Punch' stamp set.  Here's a cool idea with this set - create a box of tags as a gift! I know I'd love it if a friend gave me this tag set.  [See it on page 14 of our large catalogue for a closer view.]

But more than that, it means the stamps in this set are designed to work with 6 different hand-held punches in our collection. Every so often, SU comes out with these special stamp sets, which is great when you consider that your Wide Oval or Scallop Square punch can have a new purpose - yet again!

So consider this idea yourself - talk to me about throwing your own party - small & quaint or large & lov'n it - either way, you could easily be on your way to earning a  free Hostess Level Exclusive Stamp Set!  There's more than this for Hostesses but its a great start :)


20 September 2009

Fabulous Friend Pillow Box Candy

Need a gift?  Quickly?  A Make and Tuck!
My pun on the Make and Take phrase, but a collection of these tucked in a basket and you will always be prepared to "give a little" when you need to.  Or make a collection for a friend, fund-raising and so on.

Our treat- box is made with our PILLOW BOX DIE for the  Big Shot and using CLEAR WINDOW SHEETS.  
 Fill with candy of choice.   
SU Pillow Box Candy 
Featuring….the   OVAL ALL Stamp Set painted with our  ink pads and the AQUA PAINTER brush and then punched out with the matching LARGE OVAL and SCALLOPED OVAL Punches. 

Stampin` Dimensionals will easily attach the greeting set to the plastic pillow box. Add ribbon shown here in OLD OLIVE GROSGRAIN.

TIPS – a) wind ribbon around the short end of the Pillow Box, to save money….b) block out the ``fabulous friend`` on the stamp, and write in a person`s name.
EXTRA USES – the Pillow Box Die can make a number of different projects such as upright, square boxes using four half pieces – or add a handle and make it look like a purse!


Have Fun – and be grateful for all the people who make our lives happier and easier!  :)

21 August 2009

Let's make a well-dressed up card!


This morning's crafting  was grrrr-great because I luv, luv circles but esp. when they are partial-circles - don't ask me why, I am sure there is some deep psychological reason, so let's just stick with the fact I like them (wink!)...........so here it is!
I was feeling very girly or something - and decided part way it looked a bit..well, Victorian.
So then I really dug deep into my stashes and began throwing everything on....from stacking the sentiment - plus - and I am glad to say - I found a reason for this lace! It has been kicking around my ribbon basket ever since I purchased at a rummage sale {they are the best things for finding things like this on the cheap!}....so glad for that. I tacked it on with a bit of thread. {hate tying knots on my thread :(}....
And pink-corals were fun to work with - I am feeling a bit tired and sore today with a sore tummy and so these colours perked me up! And dare I say it - glitter! hehe!
Finally, I tried to create a Victorian mood with my photo - I have a number of shells around which I like to display differently from time to time - AND - that is my dear departed Aunt Isabel's brooch on display there, looks like so much of what we are wearing today really.
Hope you'all like visiting!
Cheers - and have a nice week-end! It's Friday! :)
Stampin' Up! Supplies: cardstock: Whisper White; inks: Melon Mambo (new!), Chocolate Chip; stamps: Love You Much stamp set, adhesive.

RED, OLIVE AND A NEUTRAL - an INVITATION and a MENU for SUCCESS!


Hmmm.... the colours red, olive, black and a neutral?  What can we do? Well....here is what I came up with!
I imagined an invitation and then tucked inside - a small menu tag for the recipient to have an indication of things to come.....wouldn't this be lovely to receive?  Aaaah, if only I could be invited to have lunch under a beautiful gazebo....but I am lucky if I get invited to Tim Horton's - LOL - actually, I love coffee and a donut - I AM Canadian after all , ha ha!

Tutorial - CREATING A FLORAL 3D ARRANGEMENT. 
VASE = to create the vase and floral or leaf arrangement - use our OVAL PUNCH - and punch out an oval, and then trim the one end so its flat - that's now your vase's bottom. Next: trim the opposite end at a slight angle (or flat) - and there is your vase!  You can add some 'highlight' with our white gel pen (see supplies listed below) and/or add a small gem to add some 'twinkle'.
To create a lovely arrangement: stamp flowers or leaves or both, trim them around their 'outline' (doesn't have to be exact)....and you can glue them to the back of your vase and then use a glue dot to raise the whole piece above the surface for a fascinating look. People will really like this look!

Well - I think this colour combo is lush together - don't you?  Try it!


Stampin' Up! Supplies: cardstock = Textured Real Red. Whisper White; ink = Old Olive, Black, Real Red, White Craft; white gel pen = Uni-ball Signo;  colouring = Stampin' Pastels; stamp = dear friend; punch = large oval (created vases); misc.=ribbon, adhesive, glue dots.

16 July 2009

Wings of Friendship Card Set Part I


Hello fellow crafters!
I've been busy toodling around with my latest stamp sets - how about you? I guess we all luv it when we get new goodies - never gets old! :)
Anyhoo...I am playing at the moment with Stampin' Up!'s Wings of Friendship stamp set - this is a Hostess Level stamp set, so if you'd like one - be a Hostess and earn it free! It's the swirls and especially the bird's pretty wing that won me over! Absolutely lovely.

As well, I am working with the new IN COLORS - as you know the new catalogue came out along with the new line-up of IN COLORS - and I've chosen here to work with the Rich Razzleberry; Crushed Curry and Dusty Durango. Since they are designed to work together - there is simply no guesswork - hurray for that {on some days right?!}
I made two cards - same theme, slight variations. Features: the punched out space for a brad or gem brad. Also using the Scalloped Square punch, I broke up the expression from one stamp and layered it with 2 punches of white cardstock. But the real heart of the card is stamping flourishes everywhere! Luv,luv, luv that look!
Now I want to add some more features to this card set.....Part II coming up!

19 June 2009

Morning Coffee with Beverly


Hi sister crafters!

... I am now armed with my cup of coffee in hand...feeling all is good in the world - uhmmmm coffee!!

WELCOME to my 'creative space'!
...and this morning I am just going to poke around...let's see....What comes to mind?  I scan the table - what to do, what to do - something!
Hmmmm...there's a lot of left-over scraps of paper...so OK! I have always wanted to decorate 'the envelope! So lets!

I mean we always decorate cards - BUT the envelopes can be a whole lotta FUN too. And some easy-smeasy way - nothing fancy!
OK - 45 mins later.........ta da!
I made the card by using strips from scraps of Designer Series Papers that I have owned, and featuring the Oval Punch & Scalloped Oval Punch - my two latest.
The envelope was more a labour or love....I cut away with my cutter to make strips, glued and re-formed the size of the envelope just a tad.
Tearing open the envelope is a bit tricky....but its not a problem...most of the areas were getting covered by the strips - you can do what-ever you wish.
So .....there they are! And I think the whole thing is darling!
I should send this to a family member who is probably over-due for a card anyway, lol!
Well, I am off to re-fill my coffee...See you next time!

Template by: