Showing posts with label MOTIF - Scalloped. Show all posts

1 June 2010

My Stampin' Up! Scallop Circle Punch Flower Imitates Art!

Good Morning!

I am back playing with Punch Flowers!  I was at a craft auction on Saturday - I had $113 dollars to bid with - which sounds like a lot until you discover the woman next to you has $800, lol, but it was "free money" I earned and so I wasn't spending real money and it was just for fun. But - I bid on some stuff and won a few nifty things, so I was a happy camper. I picked up this paper - and at first it was because I liked the kraft paper part - and the flowers were nice too.


This is from ScenicRoute's Sonoma Collection - the Kraft Pink Garland
however, for some reason, mine is the same design but with the Red Bouquet colours. Their collection is very nice. But like I said, I was mainly wanting this just for the 'kraft' section and planned to cut off the flower border.

It wasn't until I got home and googled the paper that I saw women had done amazing things with this paper!  So I perked up!

After musing for awhile, I knew I'd need some "depth" to this paper as a SCRAPBOOK PAGE PROJECT. So I turned my thoughts to PUNCH FLOWERS.

But I really did not know how well this was going to turn out until I made my first flower!


MY FLOWER......USING STAMPIN' UP!
Looking at the detail of the print flower on the paper, I think the designer had the ruffled scallop circle flower in mind - certainly seems that way once you punch out a scallop circle, cut it and make a few creases!

So I'm on 'motor drive' now!  And I off to make my flowers!!!!

1)  I grabbed my a scrap of left-over (but returning) RED RIDING HOOD CARDSTOCK and punched out some SCALLOP CIRCLES.  I cut the scallop circles with scissors and using my bone folder, made folds and creased each one for every section. I didn't even care if the fold was centered or not - this is very casual!  I used some co-ordinating ink to darken the edges - distress them if you wish.


2) Now I grab some SO SAFFRON CARDSTOCK and my BIG SHOT and the 'SPARKLE' Sizzlit Die.  Made my 'sandwich' using the Cutting Mats and the Multipurpose Platform set on Tab 2 ....and ran it through with 2 layers of cardstock. I am making at least 2 flowers, so that saves time. 
***The Sparkle die is a busy design with lots of edges - so I don't try to make a bunch in one go, I rather 'repeat' the process. Other plainer cuts are easier to stack a bunch of cardstock to run through the Big Shot in one pass. 

3) Now I grab some BRAVO BURGANDY CARDSTOCK and one of the four Sizzlit dies in the BIRDS and BLOOMS 4 Pack Die Sets. Its the SCALLOP BUTTON - which has 2 sizes - and I want 'both', so this is great!  I make a pair for each flower. 
Once I make them, I ALTER each one by creating a SLOPPY CIRCLE - just using my scissors, and cutting the edge off all around each one in just a haphard way - no real thought involved!  Like that, heh heh! .....and they end up looking like 'raisins' - one large and one small!

4) Last part - I repeat the 'small' Scallop Button in So Saffron - and inked its edges with some CRUSHED CURRY INK - and made one for each flower. 

Here is how my flower parts [ steps #2, 3 and 4] look like - the darker burgandy  'raisin' shapes are shown beneath the Scallop Button that I made them from, and so:  


PUT IT ALL TOGETHER - AND YOU HAVE ONE COOL FLOWER!  
1 Large Scallop Circle (red) + 1 Sparkle die cut (yellow) + 1 larger Scallop Button (burgandy) + I small Scallop Button (yellow) + 1 small Scallop Button (burgandy)

=


Can YOU TELL THE DIFFERENCE?   Isn't it so similar to the flowers printed on the paper - or what! I thought this worked out so cooool!  Really did!   

Here is a larger view and where I altered the photo:


Now, I've started my Scrapbook Page and it remains to be seen how it will turn out - so stay tuned!

UPDATE:

Here I am adding 3D LEAVES  I've created to my scrapbook page - and here's the process......CLICK to see a closer look
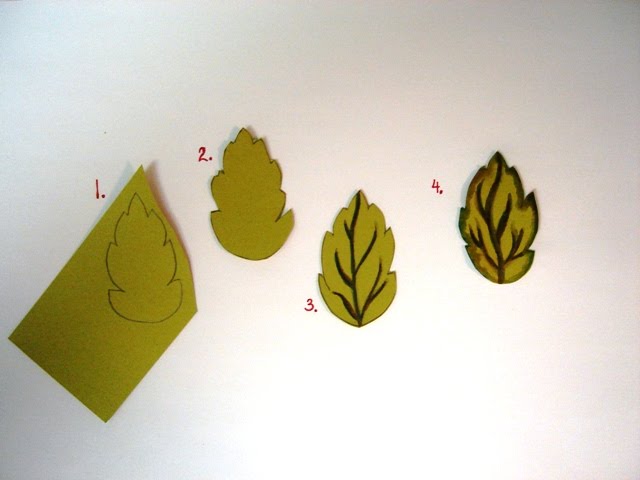


1. DRAW a leaf outline   2. Cut it out.  3. Apply Watercolour veins to leaf.  4. Aqua Painter brushstrokes to soften the watercolour veins, pulling some of the colour to the edges. 
These are made in the image of my project's paper, but you could do this in any colour or leaf shape.  


Alright - I have punched more flowers out using the BIRDS and BLOOMS 4 PC Sizzlits Pack - and made a BUTTERFLY using our BIGZ Die 'BEAUTIFUL BUTTERFLIES' .....and what else, oh yes, my TOP NOTE BIGZ Die which I will use to make my title on (later)......and here is how I've laid things out so far...


Getting busy - I know!  But I think this will be for a picture of myself and my dog in a nice garden somewhere, so I can afford to 'fluff' it up! :)
Besides - I may make more changes, ha ha! What you see is not all glued down yet, aha! 

To emphasize where I shall place a 5x7 photo, I  made a central background layer with some Kiwi Kiss paper and our SCALLOP BORDER TRIM PUNCH - it has a pattern, but its small compared to the larger pattern of the flowers - so it will work. 
I've also followed the principles of proportions by making some things large, small and in-between. 


I needed to have some highlights on the page - so I made my Birds and Bloom's flowers out of white cardstock - then toned them down a little with some pink and brown ink on the edges. Then I topped them with buttons. 

Anyways - that's it.  Won't be done till I find that perfect shot of my dog and I....thank goodness for digital cameras these days, can you imagine when we had to take photo after photo and wait till our photos got developed - and even then, cross our fingers that at least 'one' of them came out nice?

Oh, how we have changed! 


3 November 2009

Christmas Baroque Motifs and Ornament Punch

The Baroque Motifs stamp set is a very, very popular one - very!  And so is our new Delightful Decorations & Ornament Punch featured in our Holiday Mini Cataloque.  So I guess it was only a matter of time before the two came together.  One version is the first one I am showing here - with the large swirly motif paired with one ornament and a nice band of patterned paper/ribbon to top it off.

Afterwards, I wanted to make my very own version - remember how I have mentioned before about taking inspiration and making it your own? .....well, I 'softened' the look. And I was after a more romantic-antique look - something my 95 yr old Aunt would love.

By applying white craft ink over top of the stamped images, {use sponges}the colours become subdued and I think very pretty.  Then instead of a ribbon & paper band, I put 3 scalloped ovals across the top choosing to add ribbon to the ornaments {twist the ribbon into tiny knots for a different look}. This one is definitely going to my Aunt Elsie!


Well, you can see the comparison.  Both are very nice. But it goes to show you can take the same 'motif' and create very different outcomes by mixing up your technique.

Try it yourself with a stamp set you have - find a "new style" for a card you've created!


Contact me for class information if you'd like to learn how to make these cards. 

Stampin' Up! supplies:  stamps= Baroque Motifs, Many Merry Messages, Delightful Decorations.  Punches = Scalloped Oval, Ornament.  Ink = Old Olive, Rose Red.  Cardstock = Whisper White, Rose Red, Old Olive. Accessories = Buttons, ribbon, adhesive. 
Inspriration - Andrea Walford.


12 August 2009

Look Who's Turning Stamp Set - Baby Card


Here's my first real card using my "Look Who's Turning" stamp set as I mentioned in my last post....and my idea to put my Big Shot 'Bigz Scalloped Circle' came about because we were using it this past week-end {showing that post later - stay tuned!}.......and I think I came up with a pleasant idea of making different sized scalloped circles turn into the beginnings of a "baby rattle"!


I cut 4 scalloped circles - 2 large on my Big Shot, and then used a hand-held punch to cut out a smaller circle from the center of one of the big circles. Then the fourth was an even smaller scalloped circle cut from white cardstock. I used a hidden cardstock ring to raise the front of the card a bit. Hope that all made sense - lol

Using various shades of pink ink, I stamped my adorable octopus on Stampin' Up!'s Whisper White cardstock and then used their Large Scallop Oval to punch it out. Before layering it on, I used a hint of ink to create a pink shadow.

A strip of cardstock, another circle - and a few added images to the bottom, and my greeting and I was done. This took about 15 mins. Pretty good I'd say!

Hope you enjoy it!


13 June 2009

Oval All Mix and Match


Hello everyone!

Welcome to any new viewers that were at Johann's party! So glad you've dropped by! Have a look around!

To see a Stampin' Up! catalog - click on the Stampin' Up! sign over to the left side - you will go to a new location where you can see the products, new projects and learn about promotions and my classes, etc.

If you were interested in learning more about the box I demonstrated to store the note cards we made, then see directly below.


OVAL ALL Mix and Match Box Set.


Here is a downloadable class demonstrating the box and note cards set using the Oval All Stamp Set, Oval and Scalloped Oval co-ordinating punches.

Click for class instructions/photos HERE

Betty Traciak is responsible for this class and ultimately became the Winner in the category for submitting ideas for SU's Occasions Mini Catalog where you can buy the Scalloped Oval, Large Oval punch and the Oval All Stamp Set - her class sure has become a popular choice for good reason!

Note - Beverly's Version!

Here are my dimensions for creating the BOX outlined in the Oval All Mix and Match Class. To fit my cards in the dividers easier, I found I wanted a slightly LARGER BOX than the original dimensions cited in the class, so substitue the following measurements for box, box lid and the dividers and then continue to follow the rest of the instructions:
(in inches...)
Box = cut a 8 1/2 x 8 1/2 inch. square of cardstock. Score all four sides at 1 1/4 in.
Box Lid = cut a 7 1/2 x 7 1/2 inch. square of cardstock. Score all four sides at 3/4 in.
Dividers (partitions):
larger#1 divider = cut cardstock 5 7/8 x 7 7/8 in. Score at 1, 2 and 3 in. Fold.
smaller #2 divider = cut cardstock 1 x 8 in. Score at 3, 4 and 5 in. Fold.


Thanks for stopping by! Contact me if you have any questions!

Contact Info = bstampingbeehive@gmail.com 416-290-6099

5 March 2009

Why I love - love- love Punches!


Here I am to point out a pet love of mine - punches! Not the kind you throw at people - goodness, ha ha....but the kind that punches out paper and it feels fun to do! I really like the way punches cut through paper - its kinda like therapy for me, lol! I know we've all had that bit of stubborn cardstock or plastic film or something - - so you know what I mean!! {'cept for anyone whose never had the pleasure of trying punches - go try, you'll like em!} ...but its the feeling of the crisp crunch of slicing through paper that's so satisfying :)! Then, there is also this- I hate throwing stuff out! And sometimes I spy something I think will make a great "something-or-other" and so I keep it and wonder what'll I do about it. That's when a punch comes in real handy!

Take a look - here is this scrap of paper, frayed - a real possible toss-out! Not so!
I grabbed my (Mini) Scallop Envelope Bigz die * [Big Shot]and punched out the miniature envelope and still used two hand held punches to cut out 'Heart to Heart' hearts and 1/2 in. circles! So I really grazed my way through that paper til it was grazed!! Ka-put!
So, recycle to your heart's content - plus it justifies the way we crafters think of how we can make a craft out of anything - ha ha!
I added some more embellishments, a flower bouquet and now I have a sweet something out of what otherwise would have been tossed out. And 'that's' why I love-love-love punches!

***All the above mentioned punches and *Big Shot die system are available from Stampin' Up! Ask me how if you wish.
Beverly
Beverly's Stamping Beehive

Template by: