Showing posts with label SCRAPBOOK-Pages. Show all posts

21 March 2013

Altering "Sycamore Street" Designer Series Paper for the FUN of It!

**Hey, remember me?  It has been awhile since my last post featuring Stampin' Up! projects but I've been a'craftin', I just have been a bad blogger!  So here I am with a little idea I had and have decided to share :)

Ever get a pack of Stampin' Up!'s beautiful Designer Series Papers and just don't know which patterned paper you want to start with?  And you hum and haw, and  basically stall? Well, I have that happen all the time!


So this time when my friend Maria shared some of her SYCAMORE STREET DSP [ since during SAB I went with 'other' freebies ]....I looked at the patterns and just decided to play ball with them or put them down!!! LOL - I mean, I decided to be fierce!


Here is what I was looking at:*


* And looking over them, I was really intrigued with these two...


So I decided to do this....cut along the exotic floral, blue-lined shapes and attach them to the fish-scale light blue pattern and flip over the "in-between bits" and attach those to the raspberry chevron pattern!  Then I cut both into strips. Have a look.....in other words, transfer one design ontop of another! 
Play around with the patterns and be just that - playful.  Or you might miss out on a really pleasing result, like I said ' play ball! '

Next, take your newly-created "strips" and play around with those on more patterns!  


I decided to start with a white 12 inch paper, and cover it with strip after strip - like quilting in a way. 
I juxtaposed colours I liked, and the paper patterns all seem to work well together {SU! does that for you!}


 And before you know it, I had MY OWN ALTERED DESIGN....TA DA! 


 I LIKE IT ! 
And I will use some solid colour mats or frames to add my photo lay-out later on, plus I really am looking forward to embellishing it - flowers, charms, who knows what goodies will follow!

MAKE A CARD

You can do this in a simple fashion too.  Yes, just add strips of different patterns, and even of different widths, and it makes a great card.  Here is mine without final adjustments like a greeting or embellishment, but you can see what I mean.


I HOPE YOU GIVE THIS A TRY WITH YOUR OWN DESIGNER PAPERS!

CHEERS AS ALWAYS! 


30 January 2012

DIY Stamped Backgrounds for your Scrapbook Pages - Part 1

 * Crafters!  


Here's an idea I'd like to share today - and its for anyone in to scrapbooking or cardmaking or home decor projects - even fabric projects!  Simply apply the techniques to your project adapting them for your particular surface!  OK!!! 


* I have some white and vanilla 12x12 cardstock in my collection as many of us do - and every so often  I like to make a scrapbook page right from scratch - not a purchased "patterned paper' such as Stampin' Up!'s Designer Series Paper but something TOTALLY and UNIQUELY MINE!  


To do this I:  
STAMP my OWN BACKGROUND DESIGN 
onto the 12 inch cardstock. Voila!!!  


You are only limited by your own imagination, you can apply many, many techniques for this using rubberstamps, colouring techniques such as rag-rolling, spritzing or sponging ink, or even resist techniques {try scribbling a wax crayon onto the cardstock then sponging colour overtop}.  Basically the techniques we use to make most of our projects. This is just on a larger scale. 


To to get you thinking today...  
I have chosen TWO TECHNIQUES for this demo - 


  1.  using rubberstamps  and 
  2.  using a stencil.  


RUBBERSTAMPING A BACKGROUND DESIGN 
- Using a Pencil Grid 

Stamping backgrounds can be relatively easy when you take your largest stamp and stamp in no particular pattern followed by smaller stamps filling in the gaps.  The results are pleasing. 

However, some very refined designs can be created if you take the preliminary step of creating a pencil grid using lightly drawn lines which are easily erased afterwards. 

I created my grid with North-South/East-West and diagonal lines - in equal distances. I am careful to create straight lines and watch to see that the intersections cross properly.


Creating a grid of pencil lines across a 12x12 cardstock page. 

MAKING DECISIONS.
There is preparation but its not long - I did this in a few minutes by looking over my stamp sets and just experimenting! This IS fun remember? 
OK, I chose my stamps ahead of time - thinking about the type of look I am going for - ex) floral or fun characters?  You also need to consider the SIZE of the image.  A small stamped image or a large one?  Should the pattern be everywhere or widely spaced apart? 

 I have decided to create one large GRAPHIC IMAGE by combing several stamps - which share  the same style - but different styles would produce some interesting looks in my opinion. 
Today I decide to create the design using 3 stamps - it only looks like 4 
but I stamped the flower twice[ AND by flipping it's direction]! 
My choices are a leaf - a flower and a heart.

Orientation of the stamps is another decision - here is where the grid is handy: to group my stamped images together. I began by stamping the larger LEAF FLOURISH on a straight North-South pencil line, and then stamped the FLOWER on either side (a East -West direction) and slightly below and finished beneath the flowers with a HEART once again back on center!  
So 1step - 2step -3step - 4! 
Hey we're dancing!!!


CLICK ON PICTURES!

Sorry image is on its side - will fix!  LOL!  See image below!  


Once I have made my mine up as to how I want the 'design' to look - all I have to do is repeat it around the rest of the page!  


HERE IS THE PATTERN EMERGING!  


* STENCILING A BACKGROUND DESIGN

This is important to note - Stampin' Up! Customers!
SU has regrettably decided it will no longer carry our DECOR ACCENTS line of products when the new 2012-2013 catalogue is launched.   So if you are like me, and value having a stencil or two in your arsenal - then please have another look at the fabulous line of stencils we currently carry. 
I will be most pleased to help you - email me. 

To stencil a background there is not much to consider other than the stencil choice and how much of it will you stencil onto your page.  Partial images look nice off to one side - or maybe in each corner like a 'frame'.  I have one stencil here that is large and so I have chosen it to be my background. Its a lovely flourish style.  AND I will be using it for the first time - yah!

I have gone with a deeper blue this time for my ink choice - BUT - {there's always a but}...using a sponge as my weapon of choice to deliver the ink to the paper {rather than say a brayer!}....I realize I maybe stumping my sponge all night!  Its such a large design - but I carry on.  Thankfully, to sponge the ink on in a un-even fashion is more appealling than applying an even coat of ink throughout the stencil.  I decide to apply more ink towards "ends" such as the flower heads, and the tips of leaves and flourishes. 

Just keep the stencil down and stump your sponge in a direct up and down motion.  In a design like this, also be careful not to bend the stencil by accident in areas where the laser-cut design ends or is narrow - you can wash off the ink easily if you use water-soluable ink like our CLASSIC INKS. 
I am using one of our new colours " Island Indigo ".
Isn't it pretty?*


Sponging a Stencil using Stampin' Up!'s Classic Ink in Island Indigo! 


AND THE PROOF IS IN THE PUDDING - LOOK AT MY FINGERS!!!  :)


COME BACK TO SEE PART 2 TO SEE WHAT MORE I DO TOWARDS THE FINISHED PROJECTS in PART 3 !!!   

Meanwhile GET STARTED ON YOUR PROJECT!  

SEE YA!  

STAMPIN' UP STENCILS 
2 Stencil Products - Many More Designs, Assorted Sizes
MOSTLY VINTAGE STENCIL 118877 $10.85

FLOURISH DECOR STENCIL  117581 $11.95


29 December 2010

Patchwork Page or Scrapbooking Christmas with your Scrap Pieces!

Now that we snipped and glued our way through Christmas - its time to think about scrapbooking some of those pictures!  DO IT NOW - at least 2 pages!!!!   If we put them in a box - ya' know what happens, they will sit there ad infinitum!

But - if you are like me, you purchased papers and accumulated a ton of scraps. I throw the scraps into a bin on the floor to save time. and so looking at it the other day and finding some old 'purchased' (gasp!) cards, I put two + two together and decided to do this......


and close up.....


And...I like it!  Its bright and cheery - just what I wanted.  I have to make some choices as to how I will use it, but that will come a little later. The feeling of satisfaction I achieved was that I recycled, and I managed to use up more of the pricier papers....and if you have read my earlier posts, you know its important to me to use up what I have because, after all, we pay for it with our hard-earned money!  

Now, I had one lady at a party recently comment - why would I create a page, isn't that why I purchase pre-designed paper for?  And yes, it is. But. If you have a quiet time, want to create something so unique that NO-ONE else is going to have in their albums - then I say, have fun and try this!  

TIP - I used white glue to assemble this, plain white glue and a glue stick and a slick surface ( two separate sheets of those annoying large,glossy, real estate advertising  that shows up every other week!) - and so, after you are done, position the paper between something flat and heavy to weigh down the paper to create flatness. I say that because the paper does buckle a bit from the water in the glue. This method is too much to use up expensive tape adhesive! Just sayin'! 

MORE OPTIONS Another cool thing you can do - is SCAN this and make a pdf. file!  Your own "digital design"....that is probably what I will do next. Then you can download and print your design and create other things such as tags, book covers or even wrappers for crackers, wall decor projects....lots of ways to use this. 
OK I will be back soon with some more scrapbook ideas for your holiday pics!
Bye for now!
xx

1 June 2010

My Stampin' Up! Scallop Circle Punch Flower Imitates Art!

Good Morning!

I am back playing with Punch Flowers!  I was at a craft auction on Saturday - I had $113 dollars to bid with - which sounds like a lot until you discover the woman next to you has $800, lol, but it was "free money" I earned and so I wasn't spending real money and it was just for fun. But - I bid on some stuff and won a few nifty things, so I was a happy camper. I picked up this paper - and at first it was because I liked the kraft paper part - and the flowers were nice too.


This is from ScenicRoute's Sonoma Collection - the Kraft Pink Garland
however, for some reason, mine is the same design but with the Red Bouquet colours. Their collection is very nice. But like I said, I was mainly wanting this just for the 'kraft' section and planned to cut off the flower border.

It wasn't until I got home and googled the paper that I saw women had done amazing things with this paper!  So I perked up!

After musing for awhile, I knew I'd need some "depth" to this paper as a SCRAPBOOK PAGE PROJECT. So I turned my thoughts to PUNCH FLOWERS.

But I really did not know how well this was going to turn out until I made my first flower!


MY FLOWER......USING STAMPIN' UP!
Looking at the detail of the print flower on the paper, I think the designer had the ruffled scallop circle flower in mind - certainly seems that way once you punch out a scallop circle, cut it and make a few creases!

So I'm on 'motor drive' now!  And I off to make my flowers!!!!

1)  I grabbed my a scrap of left-over (but returning) RED RIDING HOOD CARDSTOCK and punched out some SCALLOP CIRCLES.  I cut the scallop circles with scissors and using my bone folder, made folds and creased each one for every section. I didn't even care if the fold was centered or not - this is very casual!  I used some co-ordinating ink to darken the edges - distress them if you wish.


2) Now I grab some SO SAFFRON CARDSTOCK and my BIG SHOT and the 'SPARKLE' Sizzlit Die.  Made my 'sandwich' using the Cutting Mats and the Multipurpose Platform set on Tab 2 ....and ran it through with 2 layers of cardstock. I am making at least 2 flowers, so that saves time. 
***The Sparkle die is a busy design with lots of edges - so I don't try to make a bunch in one go, I rather 'repeat' the process. Other plainer cuts are easier to stack a bunch of cardstock to run through the Big Shot in one pass. 

3) Now I grab some BRAVO BURGANDY CARDSTOCK and one of the four Sizzlit dies in the BIRDS and BLOOMS 4 Pack Die Sets. Its the SCALLOP BUTTON - which has 2 sizes - and I want 'both', so this is great!  I make a pair for each flower. 
Once I make them, I ALTER each one by creating a SLOPPY CIRCLE - just using my scissors, and cutting the edge off all around each one in just a haphard way - no real thought involved!  Like that, heh heh! .....and they end up looking like 'raisins' - one large and one small!

4) Last part - I repeat the 'small' Scallop Button in So Saffron - and inked its edges with some CRUSHED CURRY INK - and made one for each flower. 

Here is how my flower parts [ steps #2, 3 and 4] look like - the darker burgandy  'raisin' shapes are shown beneath the Scallop Button that I made them from, and so:  


PUT IT ALL TOGETHER - AND YOU HAVE ONE COOL FLOWER!  
1 Large Scallop Circle (red) + 1 Sparkle die cut (yellow) + 1 larger Scallop Button (burgandy) + I small Scallop Button (yellow) + 1 small Scallop Button (burgandy)

=


Can YOU TELL THE DIFFERENCE?   Isn't it so similar to the flowers printed on the paper - or what! I thought this worked out so cooool!  Really did!   

Here is a larger view and where I altered the photo:


Now, I've started my Scrapbook Page and it remains to be seen how it will turn out - so stay tuned!

UPDATE:

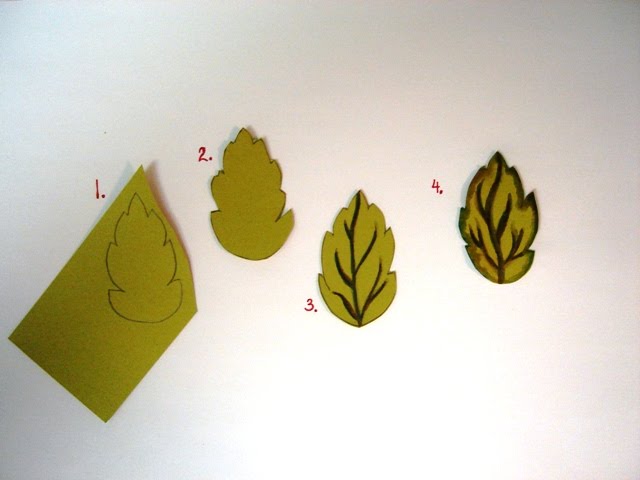
Here I am adding 3D LEAVES  I've created to my scrapbook page - and here's the process......CLICK to see a closer look


1. DRAW a leaf outline   2. Cut it out.  3. Apply Watercolour veins to leaf.  4. Aqua Painter brushstrokes to soften the watercolour veins, pulling some of the colour to the edges. 
These are made in the image of my project's paper, but you could do this in any colour or leaf shape.  


Alright - I have punched more flowers out using the BIRDS and BLOOMS 4 PC Sizzlits Pack - and made a BUTTERFLY using our BIGZ Die 'BEAUTIFUL BUTTERFLIES' .....and what else, oh yes, my TOP NOTE BIGZ Die which I will use to make my title on (later)......and here is how I've laid things out so far...


Getting busy - I know!  But I think this will be for a picture of myself and my dog in a nice garden somewhere, so I can afford to 'fluff' it up! :)
Besides - I may make more changes, ha ha! What you see is not all glued down yet, aha! 

To emphasize where I shall place a 5x7 photo, I  made a central background layer with some Kiwi Kiss paper and our SCALLOP BORDER TRIM PUNCH - it has a pattern, but its small compared to the larger pattern of the flowers - so it will work. 
I've also followed the principles of proportions by making some things large, small and in-between. 


I needed to have some highlights on the page - so I made my Birds and Bloom's flowers out of white cardstock - then toned them down a little with some pink and brown ink on the edges. Then I topped them with buttons. 

Anyways - that's it.  Won't be done till I find that perfect shot of my dog and I....thank goodness for digital cameras these days, can you imagine when we had to take photo after photo and wait till our photos got developed - and even then, cross our fingers that at least 'one' of them came out nice?

Oh, how we have changed! 


28 May 2010

Baby Scrapbook Layout and DIY " Top Note " Frame

Hello to everyone out there on this nice Friday evening!  I am going outside for my evening walk with Pepper but not before I bring out my craft results from today!  I'm really happy about this one too! Here's why....

As Stampin' Up! Demonstrators, we're entitled to receive a monthly glossy magazine, Stampin Success - and I tell you - I look forward every month to receiving mine, lol. Last December's mag, showcased our Artisan Award winners who had been given a challenge and a new stamp set from SU!

One of these lucky ladies was Demonstrator Shanna Jensen  with her pretty scrapbook page featuring a "Love You Much Frame"  - and the frame is made using 4 TOP NOTE die-cuts - and I loved it!!!

I kept this idea in the back of my head until this morning, I just got inspired to create one for myself!

Here's Shanna's inspiring project which if you notice features her putting her own 'stamp' on the Designer Paper - now isn't it just lovely?


And here is mine.....I love it! 


{Yeah....that's me and my toots long time ago! She calls it her 'unicorn hairdo' ! }


This is a nice way to frame a picture without the need to own a large-sized die-cut frame. You could make it as big as you need.  Shanna seems to have cut her frame to fit 'outside' of her picture - or with the picture mounted behind. 
I chose to mount my picture on 'top' of the frame - and here is how I made it......

1. Cut out 4 Top Note diecuts using the 'TOP NOTE' Die (see our catalogue) for the Big Shot. 

TAKE A CLOSER LOOK - CLICK ON PHOTOS TO ENLARGE 


2. Assemble the die-cuts together - layering them to over-lap, and aligning the curve outline in a pleasing fashion. Don't worry - it sort of 'falls' into place :)

See like this: 


Continue till all 4 are secured together:


Now I try not to cut or glue all of my pictures if I am using the originals, so I made photo-corners and attached those to a layer of beige patterned paper: 


Now I can glue this paper frame to the larger pink one, but  first some stamping! 

If you wish to do as Shanna and I have, pick a nice stamp that you can repeatly stamp to create a border. 

I chose our WEDDING SWEET stamp set because it has co-ordinating flourishes in several sizes - this works great to create an entire project with the same design but featuring different areas of interest. I stamped my paper borders with the smaller stamp and used the the largest stamp on the TOP NOTE FRAME.  

Once I finished stamping the frame, I put 4 small slits into it and inserted my photo layer - again no glue but it will stay there and gives me the chance to change photos!

I finished the whole piece with selections from my stash such as 
 some fab ribbon I found on sale one day!  

I stamped the " LOVE YOU MUCH " - a stamp featured in our OCCASIONS Mini Cataloque, the "Well Scripted"  and a cute little birdcage from another stamp set, " HAPPY MOMENTS".  Shanna has used the bird cage from Stampin' Up!'s "CHIC BOUTIQUE" set. 

So I really like both of our versions - this layout is terrific, and could be used for so many things. 

ALTERNATIVE USES

I am also going to make more TOP NOTE FRAMES - because....I thought the frame can stand alone on its own - punch a couple of holes - and voila, you have a wall frame!  How cute would that be - even a whole series of them in a little girl's room!  

Hope you enjoyed visiting today! 

If you'd wish for anything here shown today - contact me! I'll be happy to help you. 


2 May 2010

My National Scrapbook Day!

Hello, helloooo!

I am tired from a big day yesterday - had a lot of fun though, so it was worth it!  But it wasn't without its funny parts!

First off, I went down to the beaches because I planned on joining in on the National Scrapbook Day fun at my ol fav haunt, Scrapbooks by Design. But I like to make a day of it, so first thing I grabbed a coffee and went over to Kew Park and had my bring-a-long lunch.  Which turned out nice because a flutist was practicing and myself and the squirrels sat munching and listening to some nice lyrical music! Nice!

Then a bit of shopping. I met a lot of shopkeepers and staff - most friendly and one a little weird {yeh, nice talking to you...as I backed out of the store, lol}. Then it turned really overcast - and this is where I should have taken my cue, and headed to the scrapbook store. But no - I decided to take a look-see at my first "Master Oyster Shucker" - which I didn't even know you could be one!  However, he was busy with an order and I only saw him do one! I was hoping that he did like a bunch really fast - or something, so on I went. But that little stop-over cost me because the rain came - and I mean, came!

I got so soaked! But I kept on going to the scrapbook store hoping it would stop - you know how sudden bursts are - but it didn't - and it just became me thinking what a bad idea this was! Ha ha - I arrived at the store so soaked - my shoes, everything. Luckily a few paper towels, and complimentary donuts and a coffee turned me back into a drier version of myself.

Then, after a quick card demo - I took a look around to gather some supplies to do some - scrapbooking, of course!  Then after paying for those, I discovered that the scraptables were full to the max!  So, guess who took over the corner by the front windows - where normally, people can sit down to relax? That's right, and all in all I was right beside the donut table - so, need I say more! Ha ha!

Keep in mind, I thought I would be near all the store's tools - and so I didn't bring anything besides scissors and glue. And a few embellishments. So I was faced with "how do you scrap with no special tools?"
Easy!  I tore my solid blue paper and made photo corners and one background layer - I drew a squiggly, loopy line around another photo onto some patterned paper with marker, cut that out - another frame!
Then simply embellished with rub-ons, and a few doo-dads!

SO HERE THEY ARE - my two scrap pages......of my dog!  My first ones of Pepper.  One happy moment was when I discovered that 4 photos were of him chewing on something, so a theme! And then I really love his grassy pictures - which helped me to pick out the fun paper.

Sorry I will replace these photos with better ones later on, my lighting wasn't good - and the flash was troublesome, but its there in 'essence'!


I had a lovely day of it - - and I sure hope you'all did too! 


- LEARN SCRAPBOOK IDEAS -

14 February 2010

HAPPY VALENTINE'S DAY TO ALL YOU HAPPY SCRAPPERS!

...OR NOT - Happy Valentine's to anyone visiiting today!  Hope you are having a lovely day! 

WE are quietly enjoying 'normal' as a week of mid-term mania and illness has passed - and I finished one huge important task, so laid-back normal is kinda good!  I am going to make my famous brownies soon and then a nice chicken dinner after we play some monopoly and then a trip to the treadmill later on just to even things out a bit - :)

Did we make each other Valentine cards?  No. Is that kinda queer in a house full of card supplies? Probably 'yes'.  But I have been more focused on some scrapbooking, and just exploring some of my new goodies and I have something I'd love to share with you...remember the teaser in the previous post?  Well, heeeere it is!  It's Alex's first baby photo!  Hurray - I say that because its been in storage for 22 years!!!  Ain't that something?  SO any photo came come out to say 'hello' any ol' time as you can see here!


Let 'er rip! Stamping
First things first - I made the pages earlier before I knew I'd pair it with this photo I just grabbed some VERY VANILLA cardstock to begin the process.  And look, the previous post makes my point - take some stamps and just let loose!  That's all I did!  There was no plan at all - it was what we call in artisitic terms 'a very organic experience' .

 I used different stamps from different sets, and combined colours I thought would go well together, but there was NO DIRECTION until I stamped the letters - then all I did was aim for a 'fairly' straight line but even then, a little un-eveness looks great.  When I was done, I had two pages, the first one shown here is using our alphabet stamp set Lovely Letters - and for some reason unfathomable to me now, I made an 'W' on the end of "SWEET"...??? Who knows what brilliant idea I had at the time, but I made 'sweet history' of it by covering the odd W with a punched out heart ( Heart Punch) and problem solved.


And on the other page I left a lot of room for my journalling.  I don't always know what I am doing with these pages if I design them first without photos, so it only makes sense to leave at least one area bare. Its easier to go back and add more later if you want to. I also ripped the top of the page off, and added another 'ripped' strip of PRETTY IN PINK cardstock - and it works on both front and back of the page, that's the beauty of un-even edges, or tearing techniques! :) {showing 'backside'}

 In the end, I loved both pages!

Now it was time to find some photo worthy of my pages - and looking to my baby albums, I found our first photo of baby Alex, you know, the one they take at the hospital. Our hospital is gone now, made way for a new health center, so I guess it has more significance.  Anyways, we had a near disastrous delivery and our  poor baby was delivered dramatically and as a result was paralyzed down one side, and I never held her right away because a team of 4 came bursting through, grabbed her and whisked her away - and thankfully solved the paralyzation problem. But the poor pumpkin had a fractured shoulder and collarbone and a sore head I image from the forceps used to deliver her last minute , which is why she doesn't sit up straight and look too happy. But she was a trooper and we were even more blessed after such a difficult delivery to have her healthy after all. So this photo goes in the album with pride!


PAGE ACCENTS

I used our Heart Punch a lot to make accents, especially for tumbling some hearts together in a stack!  i only glued the pointed tips of the hearts making a place to tuck the next heart or other item like a note, in the top part - treat it like a "pocket".

Eventually I will be making  more journalling but I decided to start with her birth announcement information, and used my own hand and tried to imitate the scrolled letters in the word, Wonderful, as my inspiration. You only have to try - not be exact - and the results will be pretty good! 

TIP - for preservation methods - write in pencil. I  then "copy over the pencil " in whatever medium I like, here I used a journalling pen in pink ink overtop of the pencil. Reason is that pencil will remain for ever - whereas every pen ink we generally have access to - even 'permanent' inks - fade. They might remain but look yellow over time but pencil endurs. That is why I use it as a "base" for more decorative treatment.  Trust me - as a former Art Conservator, I used to run experiments testing for the fastness or stability of black pens on the market, ones even marked 'Archival' - and through means of speeding up the results, they all altered their appearance. OK, enough of that!

I made a small accent using our Stampin' Up! product 'Build-A-Brad' ....see the small word "My", and then I added lovely grosgrain ribbon in pink/white stripe to really emphasize the photo. Another tie in with that is added under one of the journalling lines. Just a tad bit of ribbon, no biggy, but it is enough to add some ooomph! I used ordianry cross-stitch floss. 


I measured the folds into a pattern - make your own pattern, it all works. If you want to crease the edges with an iron while working, or tack the pattern in place with pins - go for it. I used my bone folder, and some of the floss to tack the ribbon in the back before adding a small tie in the front of each folded 'bow' .  This is the only bit of aggravating piece of work - but its nice to do, and you will be glad you did!!!

So finally - its done and in its new home in my new red linen album!


Thanks for joining in!
Cheers,
Beverly

* all materials Stampin' Up!


Template by: