Showing posts with label ACCENTS - Ribbon. Show all posts

15 February 2012

HEART WALL DECOR

Gooood Morning!!!


Have you ever had an item kicking around your closet forever - and you don't seem to get around to crafting with it like you planned the first day?  YUP - we all know that feeling!  Well, here's one of mine {trust me I have many}.....its a wood heart and I can't even tell you where I got it, its been that long!  


Well - I dragged it out to the craft table and there it sat for a few weeks!  I stared at it - it stared back.  It was touch and go there for awhile!  Finally, I felt enough guilt to decide to work it!  


Then I had fun - lol!   So now I am feeling the love with this on my wall right this minute!  


Challenge Entry:  


Decorate a Wood Carft Item
Supplies:
paintable wood craft item [preferably with drilled holes - but you can improvise]
craft paint, [colour, and a white paint]
paint brush, 
fine grit sandpaper or sanding tool {in a pinch, a foot spa sander, or nail sander}
background rubber stamp [ex) script, text, floral, hearts,etc)
stamping waterproof ink [Stampin' Up! Basic Grey or Basic Black]
hanging material [ribbon, wire, twine, etc.]
Decorative Cardstock [ plain for flower, designer paper for banner]
Punch - for flower [example uses SCALLOPED FLOWER punch]
gem or pearl embellishment
stickles or glitter glue [ Stampin' Up! Cherry Cobbler Dazzling Diamonds]
thick glue dots
glue 


Instructions
PAINT YOUR WOOD CRAFT ITEM
Paint your wood craft item {my example, the heart} in the colour of choice {mine is lt. blue} and let dry; lightly sand when dry - then repeat the same again. 
Take a saucer or small foil tray and dab some white paint into it and add 2 or 3 drops of water and mix. Now you have a ' white wash '.  Paint on this white wash over your painted/sanded wood item.  The streaks are a good thing!  But not wide streaks - blend a little.  Do this until your piece is more white than the previous colour.  When dry sand lightly. You can sand till the wood shows through on the edges if you like - if you don't like, then just sand so the wood feels smooth. [note- paint 'lifts' the fibers of the wood, it swells it a bit which is why we sand!]


STAMP AWAY!


Now that your piece is painted and prepared - STAMP IT!  Take your background rubber stamp, and your ink pad and stamp the entire surface well. NOTE - this is going to work the 'first time' - so practice on paper first to see how well you stamp a large stamp. 
 When ready, place it over your painted craft item and stamp the design onto it.  This took 3 trys for me - as my heart is wider than my stamp and I stamped the center first, then added the remaining side areas.


OK - if you feel you screwed up - or don't like the look of the stamp, just RE-PAINT and start again! 


But you like it, so moving on......
Make your embellishment/ FOCAL POINT
A hand-made PUNCH FLOWER is a cool thing these days - they are in every craft project!  You could also use a bought flower to save time!  
Making a Punch Flower
Punch out several Flower shapes in one or two colours of sturdy weight cardstock. [Stampin' Up! cardstock is sturdy at an average 80 lb weight.]  NOTE: you can crumple the cardstock to make forming the flower easier and it gives that shabby chic look!    
Next - leave one flower shape intact. That is your foundation piece. After that, take a scissor and snip out a section of one shape and roll the flower like you are making a cone shape - bring the two cut sides together and overlap one section over the opposite side. Glue together and hold till the glue works. You could use a clip to help.  
Then snip out 2 sections of the next flower shape and repeat - this time the gap is wider where you cut away the section but requires you to do the same thing - bring the cut edges together, and glue overlapping them so it looks like a complete shape once more. 
Then 3 sections on the next one....and so on, till you are done with the punched flower shapes. 


When you are finished preparing each of the flower's sections - bend the petals back a little - this takes a little patience {as if the last section didn't,lol}.....but it is possible to bend those back. I use something round like a pen to roll the petals against - and I hold them over my finger while I work the next section. Do your best - and little tears only make it more 'hand-made', so don't sweat it! 
NOW - ASSEMBLE YOUR FLOWER - by gluing the smallest section into the next larger section!  Flatten the tip of the bottom of your flower a bit, and glue into place. Keep building your flower this way till you are ready to glue it to the flat foundation flower shape.  And your are DONE!  CONGRATS!  


TO FINISH - I added the flower to a banner strip I made from decorative paper. But before I glued the flower on, I added thick glue dots to the back of the banner, the entire length. This allows for it to float above the painted wood piece!  Now glue on the flower and when dry, add your decorative piece to the finished wood piece.


TO HANG - add ribbon such as my example. I tied 2 pieces of ribbon, 7 inches each by tying a knot first at one end and inserting the ribbon into the holes leaving the knot to be on the front!  Then I stitched the two remaining ends together.  You can also do this with one long piece of ribbon - about 14 inches long. Or use twine, wire, etc.
 Add beads too!  Anything you wish to decorate - use your own ideas!

THANKS FOR STOPPING BY! 
HAPPY CRAFTING! 

12 November 2011

Holiday Handmade Cards from my Stampin' Up! Archives!

Crafternoons everyone!


Until I find the drat uploading cable for my camera - I thought hmmmm...I know!   I will REVIEW some of my all time fave Stampin' Up! cards and projects I have done in the past - hurray, problem temporarily solved - sweet!


SO here I go....remember, its the concept you can use and substitute the stamps with "current sets" {aha...} or you may have the stamps, as stamp sets shown will be retired by now from our catalogue, so okay, let's start with this one - a really cool folding GATE CARD!   I love - love how these cards can be more than a card, as they make wonderful displays on shelves, china cabinets, dining tables....wow :)


 Here's how it looks tucked into the envelope......a nice scene which was stamped with BASIC BLACK (waterproof) INK and then coloured with our Stampin Pastels Chalks and touched up with Stampin' Write Markers!


I trimmed the stamped image and glued it to the front of the folded card base and then CUT it along the center fold {or if that scares you, cut the image in half and align the cut edges to the fold - then glue them in place!}     Add more cut-out images of holly and berries for interest.   And of course, some ribbon!!!
Our NATURALs CARDSTOCK shown here in Naturals White perfectly adds to the  homey feeling! 

And here it is opened - ta da!

Ahhhh.....nice, yes?   Wouldn't you LOVE getting one - I sure would!


And of course, some magic - glitter!  Not only is glitter nice anyways BUT it will sparkle when holiday tree lights or candle glow will reflect off the glitter surface !!!  Magical! 
You could substitute our MICA FLAKES from our Holiday Mini Catalogue!  And we also carry the tiniest SILVER BELLS in our Holiday Mini - that would be just perfect on the sleigh or horses - or the ribbon knot!!!  

Silver GLITTER Cardstock [ a MUST-HAVEsee our HOLIDAY MINI Catalogue! Also available in Red! ] and Silver GLITTER around the edges really help to make this 'pop'!   My combination of three narrow RIBBON pieces knotted together adds more elegance to create a very special card for someone close to you [or maybe impress the boss? LOL!]

Alright hope you enjoyed today's glimpse into my archives!  

Off for today's errands - have a lovely week-end :)

ox Taylor


8 September 2011

Holiday Cards for a Bingo Player!

This is sure to please a bingo player - and its fun to colour with Stampin' Up! Markers in the colors shown here or choose your own palate!  
The fun part with this card is that the BINGO part is a separate stamp - our BINGO CARD BACKGROUND STAMP and then you can stamp each individual square with any one of the co-ordinating teeny stamps from JOLLY BINGO BITS STAMP SET!   I mean it doesn't get more fun than that!  

The variety you will enjoy with both of these stamp sets is huge - you can alter the bingo background stamp and you have the bingo bits stamps to add a little decoration to an envelope - a border on stationary - tags - and all manner of projects!  Its great value! 

AND NOW THERE IS A HALLOWEEN BINGO BITS!  SPOOKY BINGO BITS!!


BINGO CARD BACKGROUND STAMP  # 120851

JOLLY BINGO BITS STAMP SET #120857

SPOOKY BINGO BITS STAMP SET # 123944

19 July 2011

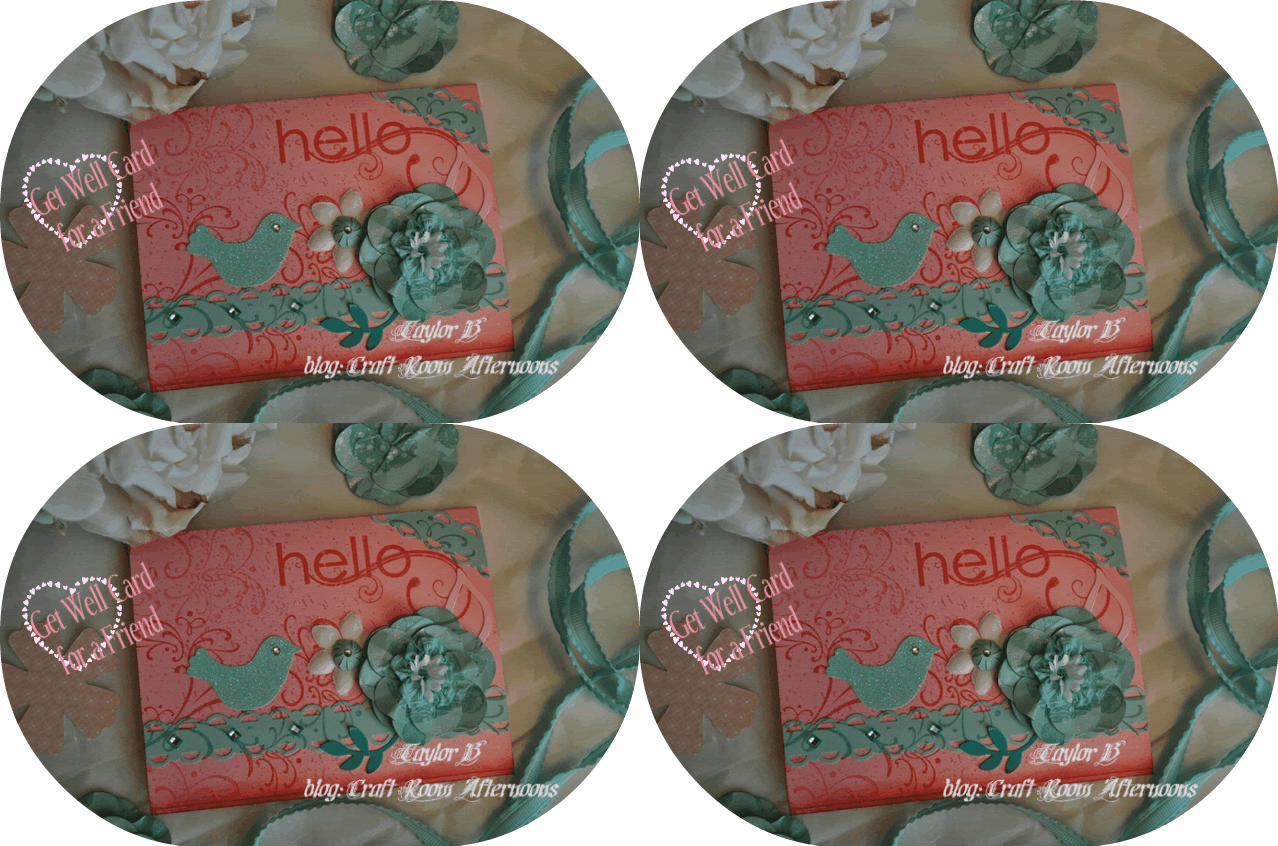
Custom Ribbon Flower Card to Cheer a Friend Featuring MY FRIEND from Stampin' Up!

Crafternoons Stampers,

Time to blog my latest...my correspondence continues this week with a card to a friend who is in recovery from surgery. I really wanted to pay special attention to this one - since I'd like to think that "Get Well" cards fall into that "special" category!!

This is one of the first chances I've had to begin with some of my fabulous NEW ITEMS from the brand spanking NEW CATALOGUE from STAMPIN' UP!  So you can imagine!

So settle down for an afternoon or evening and re-create this beauty for someone special in your life!  Or even make this a border for a frame - wouldn't that be lovely!  Hmmm, now I am thinking more here!


CLICK ON ALL PICTURES TO SEE A LARGE PHOTO


CREATING THE CARD

THE CARD BASE
It's a standard card size, 4-1/4 x 5-1/2 in STAMPIN' UP! Pretty in Pink cardstock. 
The Stamp
A CLASSIC NEW STAMP SET!!!!    

This is the greeting from MY FRIEND #122587. This set has versatility plus! Lots of images and two terrific greeting stamps so it will become a favourite among us. :)

Of course the WEDDING SWEET Stamp Set is another good choice - and its also terrific for many purposes besides the iconic wedding sentiments it includes because of the flourishes it provides! There is a smaller flourish included in the set as well as a lovely 'Thank You' stamp!


Step 1) Stamping


So using some ROSE RED CLASSIC INK - I stamped the HELLO greeting in the upper right-side corner.

Also using the same colour ink, I stamped the flourish design with the Wedding Sweet's largest stamp, going off the edges, and stamping twice before inking to get a lighter image.


Step 2) Add Spritzing/Smooching Effects
Want some fun?   Do some SPRITZING - and in part, some flinging, lol!  I made my OWN CUSTOM MADE SPRITZ by mixing a 50% solution of pharmaceutical alcohol and water into an empty misting bottle. Then to create my CUSTOM COLOUR - I dropped some  refill ink into the solution!!!!   I used a retired colour - Purely Pomegrante and swished to mix well. Pumped and directed the nozzle in the  direction of the card from one side - and sprayed.  I did it a couple of times, careful to stay mostly on one side of the card.  I immediately dried the card with my dryer to avoid the water pluming up the cardstock. No unsightly bumps if we can avoid it!  GREAT WAY TO USE UP THOSE OLDER INKS!!!

Next - I flung some of the SMOOCH using a nylon artist brush - flinging with style, lol! You do need to try to do it without over-doing it!
cardstock to the left is untouched; card to the right is spritzed, smooched


don't forget the back of the card :)


     The ACCENTS

Step 1) Add a Decorative Border - bonus: Stamp to Match the Background!   Using my NEW IN COLOR CARDSTOCK - POOL PARTY - a light greenish-blue reminiscent of the Carribean or a California sky! Very pretty colour!


With SU!'s Decorative Border Punch - SCALLOP TRIM BORDER #118402 - I punched both sides of a 1 inch wide strip of cardstock.  


TECHNIQUE TRICK - Match your Stamped Images: before attaching the border strip to the card - I challenged myself, could I "re-create" the stamped flourish on the card on to the decorative border and match them up?

Inked up the same Wedding Sweet stamp in POOL PARTY CLASSIC INK, and using my 'eagle eye' - I mimicked the direction of the rose red background image , so I could ' continue ' the stamped ' f l o u r i s h e s 'onto the pool party border strip. First time: NOPE!, but lucky us - we can TURN OVER THE CARDSTOCK AND DO IT AGAIN - and this time, I was able to make a pretty good match. Not yet trimmed, I could shift the stamped part to match the background of the card before trimming and attaching it permanently. Voila. If you have an eagle eye yourself, you can see I also added a slight match to the paper flower - see the flourish from the greeting shows up on the flower too! OK! Doing great.


Lastly I added some bling to help bring glamour to the border. Bling, bling, love the bling!


notice how the background stamp ties into the same image on the blue border?  Bird in glittery powder blue!


Step 2) The Bird and Leaf Punch Accents
Really not much to say here - its a punched Bird from a retired set from Stampin' Up!'s BIG SHOT dies - the Sizzlit Birds and Bloom. Which is kinda wrong, because there is one bird, and several flowers in this 4pc die set, lol!  But the bird is in GLITTER CARDSTOCK - oh yes! With a jewel for an eye too!

And of course, to balance the whole, a touch of a deeper blue in the same colour family - I found a punched leaf stem made of retired Bermuda Bay cardstock - uhm-hmm! Pretty!  I keep a stash of accents - don't you?  Grabbed two.  


The Custom Paper Flower Accent
Step 1 - Punch Out Flower Shapes and Supporting Circles With  XL FANCY FLOWER XL PUNCH #118073, punch out 3 flower shapes - #1,2,and 3.    
  With 1" CIRCLE MEDIUM PUNCH # 119868, in the same colour, punch out 3 circles.  


Fancy Flower Punch, Smooch Frost White (jar), Pool Party Ruffled Ribbon, and custom created paper flower (left side)

   TIP:When I layer the flower shapes, I often use circles to act as support between layers -   plus they provide a spot to glue one to the other. 
  
    TIP #2: I actually punched out dozens to make more flowers while watching TV - hey, its all about time management for me at times!

Step 2 - Decorating the Punched Flower Shapes - and Layering Together.# 1 flower shape: leave plain:
 #2 flower shape: I stamped large polka dots using our BACKGROUND DOTTED XL STAMP - this will stack on top of the plain #1 flower shape ....
#3 flower shape: I stamped only the center of the flower #3 using a smaller POLKA DOT  - this will be the top and final layer....

Now the fun part - SQUISH-SQUISH!  That's right - crumple up the two decorated flower shapes, #2 and #3!  Unfold Flower #2 so its slightly crumples but take #3 Flower, and crease it twice in two spots, and squish it flat to create permanent creases [ I glued the creases in place ]....

LAYER the Flower Shapes:
 Glue the punched 1 inch CIRCLES to the back of all 3 Flower Shapes, then, layer accordingly:
a) begin with Plain Flower #1 as the bottom...
b) attach glue to the circle of Flower #2 backside, and glue to Flower #1 beneath... slightly twisted clockwise so that the petals of Flower #1 peek through....
c) attach glue to the circle of Flower #3 backside, and glue on top of Flower #2 beneath - thus creating the top layer!


Step 3 - SPRITZ and SMOOCH the Completed FlowerAs with the card base, I smooched some FROSTED WHITE SHIMMER PAINT # 116854 on to the completed FLOWER and misted it with some GOLD GLOW SMOOCH SPRITZ #118770 spray. [you may want to do this over a protected surface - or in the bathroom like I do for easy clean-up!  Or try our cool COLOUR CATCHER for just this purpose!]

Optional - you could decorate the center of the completed Flower with other accents such as buttons, jewels, brads, bow, etc.  I have chosen to decorate it with a gathered Ribbon Circle and a Fabric Flower plus Glitter.  Read on!

THE RIBBON ACCENT

One of my new fantastic embellishments is the "ruffled, stitched ribbon" featuring our new IN COLORs - and I have it in POOL  PARTY  #122975 Its fab!

It has the heft and premier qualities of a beautiful ribbon that 'feels good to the touch'  - ruffly with that unmistakable grosgrain crisp yet silky so it slips through your fingers - what more could you want from a ribbon?

I turned it into a gathered circle to accent the  f l o w e r !  NOW THIS IS GETTING SPECIAL!  To gather, I prepped a needle with some thread/knot and stiched up one side of the ribbon, taking little 'dips' down and back up all the length of the ribbon - about 12 inches.  Then tugging till it schoooshed its way into a circle, and stitched closed. With the last of the thread, I stitched the ribbon accent right onto the paper flower!  

Still...I looked and saw that the ribbon accent left room for more!  It's open center left a bare spot - so I thought, hmmmm......I had originally thought a half-pearl would be in order. But seeing that made my card seem predictable....no good.  So I began to press my mind a little, and I grabbed a small fabric flower in white, and using a dab of glue and a small tool's handle, I pushed it right down into the center of the ribbon circle. This distorted it, but that was in keeping with the whole flower - a little grungy!   Finally, my glitter went floating down onto another dab of glue, and voila!
  MY FLOWER IS DONE AND ITS PRETTY SPECIAL!!!


- OK,  re-group and finish this card! -

You've stamped the greeting, and the flourishes onto the pink card base in a co-ordinating deep rose. Check!
You smooshed, spritzed some accent decoration to the background in a reddish and gold tone. Check!
You created a decorative border in a complimentary colour - and optional, stamped it to match the background flourishes! Check!
You punched out a bird in some pretty cardstock! Check!
You've created one special paper flower accent, ribbon and all! Check!

PUT IT ALL TOGETHER!!!

Estimate the placement of the Paper Ribbon-Flower Accent  - I chose under the greeting, slightly less than half way down the card; and then slide the border under the flower. When you have agreed that it looks good - make it permanent and attach with glue or sticky strip.   Attach in the same fashion, the bird so it sits atop the border facing the flower!   Tuck in the leaf accents, trimming as necessary. Finally, I like to add a bit of distressing to the bottom edge, so I sponged on some Rose Red ink to the bottom edge of the card. 

There you have it!!!!


Is it not special?  I know it took time - and ....
THANK YOU FOR READING THIS REALLY LONG POST ....
... I am sorry, but sometimes you just have to write it all down.  Succinct I am not!  
 Do what you will for the INSIDE GREETING!  The MY FRIEND stamp set does have another greeting stamp in a smaller type: " my friend ", so I chose that for my inside greeting and then I also made a bit more by taking a strip of no particular length of paper, folding it haphazardly, and gluing it down, then topping it with a punched shape and stamped " GET WELL" sentiment.  You, of course, do what you will!  


6 May 2011

Mother's Day or Spring Card

Have a wonderful Mother's Day to each and every Mom out there!


Recently I created a lovely card for someone special { hey Justin!} whose 'very special' Mother favoured purple - and I want to leave that card as an original piece created just for them, but I have borrowed the basic elements to re-create this card!

My favourite technique on this is - well, two things::
 one) I love duplicating accents in acetate as I have done with the butterfly!  It creates a "glossy" look that I love!
two)  using ribbon to wrap around two out of three panel sections - this leaves the third panel to help make one colour pop - or to add accents, etc.

If you take a closer look - you can see I textured the smaller butterfly - using the tips of a snowflake embossing folder!  Who knew, lol!

STAMPIN' UP! SUPPLIES:
Big Shot Die-Cutting & Embossing Machine
Beautiful Butterflies XL Die
Northern Frost Textured Embossing Folder
Perfect Polka Dots Textured Embossing Folder
Cardstock: Elegant Eggplant, Lavender Lace (retired), Crushed Curry (retired)
Clear Acetate Sheets
Organza WhisperWhite Ribbon {#114139}
Snail Adhesive

12 March 2011

My 'specially-created' SAKURA Flower using the Island Floral Bigz Die and Squash Card!

Yes helloooo to all out in craft-cyber world!

I feel really accomplished this week!  I have finished a set of gift bags for a baby shower AND a nice card in
SQUASH BOOK style - both are ready to fly out the door!!!

In order to decorate the squash booklet, I created my very own "Sakura Flower" using our Stampin' Up!'s FLORAL ISLAND BIGZ DIE.  Its one of a few select flower dies that I own, and its the same for my punches - so to create a flower, I had to borrow inspiration from my friend Maria Vanderform.  Maria specializes in many flower punch art creations, and seems to start by thinking of what she wants to create - then matching idea to tool!

So....I thought the same thing!  I looked up some flowers and chose the SAKURA Flower which is adored on a national level in Japan!  It can also be referred to as the Cherry Blossom Flower. The trees are stunning when in full bloom - and its hard for the eye to take in all the beauty of a grouping of trees, its awesome!

However, my flower is only a stylized ideal of the actual flower - meaning I took some liberties!  So here it is!


Sorry for the hint of pink through out the photo, but the camera read my flower as 'red' and its actually
 ROSE RED which goes nicely with the softer PINK accents and the GARDEN GREEN cardstock. 
The patterned paper is part of a 8x8" Cardstock Pad from Stampin' Up! - they come out with a new one every year featuring several colours cardstock. 

I will do a tutorial on the creation of the flower soon.

Meanwhile, I will show you the size of the SQUASH BOOK! 


Inside of the ' Front '


....beginning to ' OPEN ' !!!


Build-A-Brad  customize your brads!

  
The 1rst extended section ...


Look at its length!!!!  3 pages were joined together - lots of creative journalling or adding pictures! 
You could also use this for a card where many, many signatures are involved - right? 
I have to say - it's FUN to open these!!!   Brings out the kid in you!


And close 'er back up again! 

Well, I hope I've inspired you now! 
Have a great week-end! 

Don't forget SALE-A-BRATION is still ON !!!  Get in on the FREE products 
from STAMPIN' UP!


23 April 2009

Stampin' Up! Ribbon - and ribbon....and more ribbon...


Here is what 2 rolls of Stampin' Up! ribbon looks like!!!

Template by: