


Today's hot word is HOMEMADE ....
CAN YOU TELL WHICH IS THE REAL PIZZA?
LOL!


I personally think this is picture shows works of art - truly Renaissance worthy!
But that is because - moi - made these, lol! And I am not being too humble, am I?
But, honestly, my "real" homemade pizza was the best - I love making homemade pizzas because I love, love the thick, puffy crust! Plus - I can make it tailor-made to our preferableness (yes, that IS a word!)....and fresh ingrediants, mmm-hmmm!
The usual around here is FRIDAY NIGHT PIZZA - and a Movie! And I just overheard an adorable, little guy asking his Mom in the grocery store whether they could make Fridays, movie night! So I helped him out, and said "Pardon me, but we have Friday night movies too! With pizza! It's really fun!" So hopefully, the little guy gets his way...but I am thinking, its probably Friday Night Pizza in lots of households - practically a North American tradition .
Anyways - the funny thing was, that here it was last Thursday, the 7th; and my daughter came to me and asked if I'd help her with a little something for a class presentation project due Friday. She is in university, but I was intrigued when she said they needed to have:
a PIZZA PUZZLE and a WINE & CHEESE MATCH-UP CARDS.
a PIZZA PUZZLE and a WINE & CHEESE MATCH-UP CARDS.
BUT - the really funny thing was -
I had just learned HOW TO MAKE "MUSHROOM" PUNCH ART the day before!!!
I was astonished how the Universe was all coming together!!!
I had just learned HOW TO MAKE "MUSHROOM" PUNCH ART the day before!!!
I was astonished how the Universe was all coming together!!!
And since, I love a challenge - it was ON!
PIZZA PUZZLE

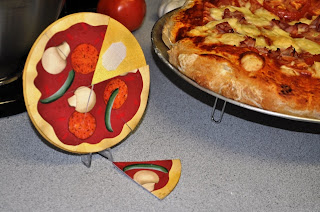
puzzle pieces attached with velcro tape


First I made the pizza base - I didn't waste good stuff, so I cut a large 7 in circle from a cereal box and covered it with a beige-yellow no-name cardstock. Then I re-created another 7 in. circle in SO SAFFRON cardstock by STAMPIN' UP! naturally. Which I distressed with our DISTRESS WHEEL and a little SOFT SUEDE ink. That was the plain part, up next was the fun stuff - making the little mushrooms!
MUSHROOM PUNCH ART
Need: Oval Punch (small or medium but large will do if necessary)
Circle Punch - 3/4 inch or 1 inch ( use larger if creating big mushrooms)
The CIRCLE and the OVAL PUNCHES are relative to each other according to the size of MUSHROOM you desire. But a little adjusting can work wonders.
1. Punch out a Circle in a light beige cardstock
2. Using your Oval punch - nip a small chunk out of the circle, using the "end" of the Oval punch.
3. Punch out an Oval in light beige cardstock.
4. "Fish" the Oval shape - glue a small strip of paper to one end of the Oval shape, and insert the Oval shape ' BACK INTO THE OVAL PUNCH' exposing one "side" of the Oval, and 'PUNCH' a big bite out of the Oval - you basically create a long 'C' shape of the side of the Oval. REPEAT to other side of the Oval shape - you will have a shape that is narrow in the center and wider at both ends.
5. Assemble ' mushroom ' from the two parts you have created.
ILLUSTRATION depicting Mushroom Punch Art Steps

TO VIEW LARGER IMAGE:

TO VIEW LARGER IMAGE:
CLICK ON THE ABOVE PICTURE
(or set your computer's zoom - see 'wrench icon' top right of your bookmark bar)
(or set your computer's zoom - see 'wrench icon' top right of your bookmark bar)
The rest of the pizza I just made up as I went along ......that is GREEN PEPPERS made with the OVAL PUNCH once more - punch a green strip of cardstock, just along the side of the Oval Punch, slide it just a wee bit above and punch 'again' and you will have a elongated 'C' shape - sliced pepper!
And of course, that is just a wonky circle which was trimmed from a large CIRCLE PUNCH shape of retired DUSTY DURANGO cardstock. Then, I went crazy with a POLKA DOT STAMP and lots of ink colours ranging from white to dark reds, and browns.
I gave everything a swipe of brown ink around edges - even highlighted a few parts with a light brown marker. And since we need TOMATO SAUCE - a un-even edged circle of REAL RED cardstock did the trick!
We "layered" our pizza - and since it is a PUZZLE - we did not clutter the surface, but left it so we could CUT the PIZZA BASE and the PIZZA TOPPINGS/SAUCE into 6 SLICES - which worked out to be a little under 3 inches around the circumference.
Attach VELCRO TAPE (Adhesive-backed) to pizza base, leaving the two parts of the tape together - ALIGN the pizza top slices - then curl off the adhesive backing, and slap the pizza slice into place and press hard to create good adhesion. VOILA - a PIZZA PUZZLE!
MATCH-UP CHEESE AND WINE CARDS


Next we needed to make a game for MATCHING CARDS of varieties of brands of CHEESE and WINE. \
The TOP NOTE DIE and my BIG SHOT
were just what I needed!
[ The objective: each Top Note is cut in half, labelled and spread on the table. Choosing a Cheese (brown cards) search and pair with a compatible Wine (red cards).]
[ The objective: each Top Note is cut in half, labelled and spread on the table. Choosing a Cheese (brown cards) search and pair with a compatible Wine (red cards).]
1. Punch out TOP NOTE Shapes - as many as reguired to match-up! In our case, we need 28 so I punched out 14 Top Note shapes in a variety of colours. My daughter meanwhile, made labels.
2. Cut Top Note shapes in half length-wise. Now you have 'pairs' !!!
3. Create a POCKET. Follow any template you wish for a box - I basically measured and cut a rectangle slightly shorter than the top note half-shapes, and then scored along both sides twice 1/4 apart, and the same again on one shorter side. Clipped the parts where the edges met when I folded it together and glued together. I did not create a 'back' as we were gluing the boxes to a paper insert for the project's presentation binder.
Hope this helps give you ideas on how to use our crafting tools to help with presentation work!
Beverly

0 comments:
Post a Comment