29 June 2013

Create Fun Flowers with Daisy Bigz Die from Stampin' Up!

Hi Crafters!

LOOK what I made the other day!  Isn't it great?


Layered DAISY #2 Bigz Die using Island Indigo cardstock and my BIG SHOT!

 I loved making it because it was  s i m p l e  but challenging enough to make the curly ends!  If you know what I mean!

You could do these watching tv, and I am all about doing some things that allow you to sit and relax beside your loved ones!  Since they endure your disappearing into your craft zone, this way you can be beside them while doing these....double the pleasure. Bring some glue, a ton of the pre-cut flowers  and grab your fav "curly tool" - mine is the paper piercer {honestly I need a flower curly tool set!}.

OK - enough babbling!

9 Layer Daisy Flower
I think its pretty self-explanatory - I glue 1 inch circles to the back of 1 daisy of each size to assist in attaching them all together. Stack 3 of each size - fill in the gaps between petals by positioning each flower slightly clockwise to the one beneath. Repeat with each set of daisies from larger to smaller sets.  In the end you should have one continuous layered 'circle' created from the 9. A very 'fringey' looking circle.

  Once I have the 9 daisies glue together - stacked largest on the bottom of course, then I set to make a center 'ball' which is nothing more than some scraps rolled tight, and a couple of daisy 'tips' glued around the ball.  You could totally do a "ribbon " center - I would have, but moi does not have this colour on hand yet!

Here it is looking down at it - luscious layers!

This is one of our newest IN COLORS called ISLAND INDIGO - and I love. love, love it !!!!   Its the blue-green range of which I can never grow tired of - seriously! Never!  A little known fact on here is that I do summer projects for my own private collection - seashells, little sea creatures, life on the coast....and so I love the water colours.

Well I will be making a group of flowers to create a wall decor project - I am using our photo on our INVITATIONS and our latest July issue of SUCCESS MAGAZINE for demos - to inspire me!  Wish me luck on finishing them soon!

Crafternoons!

22 June 2013

Birthday Card for Disney's Minnie Mouse Swimwear Collection - Use your Circle Punches!

The Disney Store - we just had to fall in there when out looking for birthday gifts for twins. Being that the twins in question are two adorable girls, our eyes popped when we spotted the Minnie Mouse Swimwear Collection - polka dots, bows and frills!!!  And  co-ordinating suits in different styles - the same yet different - perfect for twins, right? Right!  Then the accessories killed us!  We finally had to stop after awhile because our wallets told us to, but it sure was fun. So terribly guilty on the Disney - in fact I don't know which age is worse in there - kids or us adults?

Anyways, got home and began to think of an idea for a card. I don't think it was too long before I remembered I had a polka dot background stamp from Stampin' Up! and some recently acquired red cards with matching envelopes.....so a quick trip to the craft room, tossed around some drawers and came out victorious with white embossing powder, versamark and the aforementioned polka dot stamp.

I embossed the whole front of the red card and the polka dots are designed to be a bit grungy or distressed - looked amazing!

Next I searched the internet and saw a simple yet fabulous idea for crafting the minnie/mickey mouse head using your circle punches!  Back to the craft room, grabbed my 1-3/4 and 2-1/2 inch Stampin' Up! Circle Punches and Basic Black cardstock.....crunch, crunch, crunch. Spit out 3 circles - two smaller for the ears and one larger for the head.  A child could take it from here - glue the circles to look like the famous mouse head - ta da!

I added a red polka dot bow {retired SU! ribbon} and couldn't resist a bit of glitter and gemstones....but it's best in the most simpliest form, too much adornment seems to detract from the ' cute factor '.

Now - its a great gift combo!

I loved it so much, I made extra cards on the spot!

Minnie Mouse Card
Stampin' Up! Circle Punches and ' Dotted ' Background Stamp


The Twins Gift - Disney Minnie Swimwear Collection


Uh-huh, they're so cool!


Easy with circle punches and black cardstock = 1 Mouse Head
Add a bow between the ears for Minnie or below the head for Mickey!

Thanks for reading this post {I wrote it at nearly 3 am - don't ask!} :)


19 May 2013

Sympathy Card featuring Fifth Avenue Floral Stamp Set

Hello crafty friends,

Today I went to our church, Glen Ayr United and it is one of our very few remaining services as this particular community church shall be closing in June. So it is with bittersweet joy that we continue to meet and share some more time together as a congregation and I am happy that we have the beautiful weather during this time. 


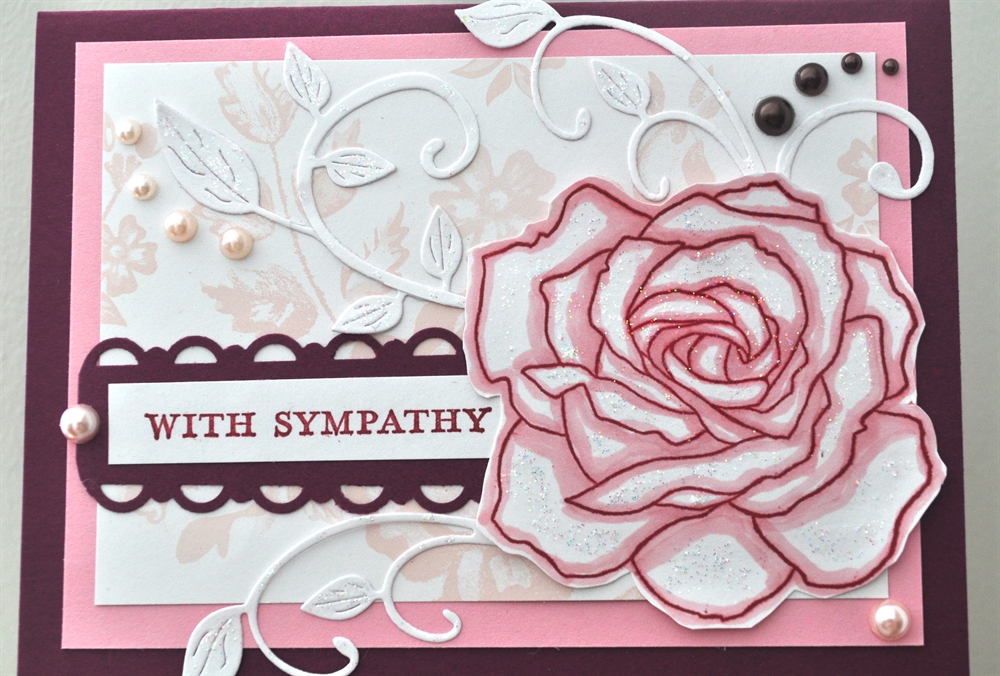
It is also sad that one of our own, Ruth, lost her life's partner, her husband Gordon not long ago. I made Ruth a card of sympathy last night which I am sharing here. 


I perused through some Stampin' Up! retired designer papers looking for some that were soft in nature and colour, and found a lovely white and pink paper dotted with roses and leaves from an old collection, Bella Rose. This immediately reminded me of Fifth Ave Floral, a stamp set from many moons ago that contained a large pretty rose. I chose to use Raspberry Ripple cardstock and ink to contrast with the aforementioned pink/white paper, and added some Pretty in Pink cardstock to bridge the two. I believe I achieved the softness I was hoping for.


Here is my card, and all supplies are Stampin' Up! save for the Cheery Lynn Fanciful Flourish and the pearl accents. 


Remembrance of a Loved One - How to offer your sympathy in a card. 

Remember if you need to do a Sympathy Card, and find writing the message a bit difficult, here's one way: after expressing your sorrow, try to recall a personal memory you have of the departed. I think your card then helps the recipient to feel a bond beyond their own memories or even discover something new of their loved one. Just keep it to the point though, you don't want to overwhelm someone who is going through something that is already taxing them. You may even wish to offer some form of support by extending an invitation to go out for lunch, or accompany them when they need to attend a matter, no offer of help can be too small.  

****
SUPPLIES
STAMPIN' Up! =  Raspberry Ripple, Pretty in Pink, White Cardstock and Bella Rose Designer Paper (retired)/ Fifth Ave Floral Stamp Set (retired)/ Scallop Trim Punch/ Raspberry Ripple Ink/ Dazzling Diamonds

OTHER = Fanciful Flourish Die (Cheery Lynn)/Copic Pink marker/ pearls (Dollarama)/tape & glue.

31 March 2013

Easter Cake Stand Centerpiece

Happy Easter,

Here's a quick Easter centerpiece using a cake stand {minus the dome}....and it only takes minutes to make!

You need:

A cake stand
small basket
faux leaves (3 large or about 5 medium)
faux spring flowers
straw grass (plain or coloured)
Easter decorations = eggs, small nests, bunnies or similar objects.
Optional
A can and something to help anchor it down [tape, marbles, pennies, etc]
doily or paper to decorate can lid [or use the straw grass]
ribbons

INSTRUCTIONS
Decide on your decorations and which will be the main features.
Then arrange the leaves and grass around the plate - much like a wreath.

Situate a can in the center of a small basket. You should weigh the can down with marbles, pennies or something so it isn't easily knocked over. Hide the lid/can with a doily or straw.

Next place your small basket in the center of the cake plate nestled in your leaves/straw arrangement. Add your main decoration in the basket situated on the hidden can - I used a ceramic Bunny. This raises the decoration among its surrounding, which adds ' visual interest'.

Now sprinkle the flowers and other decorations amongst the leaves, straw and center basket. I used eggs, a small nest, and another ceramic bunny. I also added a couple of butterflies!  You could also do some ribbons somewhere - pretty!

That's it!  This is only a guideline - feel free as a bird to design an arrangement - it looks great no matter how you arrange it.....like having a small piece of Nature adorning your home!

Happy Easter :)


26 March 2013

Friend Spring Card


I started this card by staring at some green/cream plaid cardstock.  In trying to be experimental, I decided to "add" a little extra to this cardstock and chose STAMPIN' UP!'s " MUSIC NOTES " Wheel Stamp because it's always a compatible element - much like ' script text ' is when layered over another design. 

I also love lilac and green together - and I LUV SU's Lucky Limeade colour!!!  I'm really into greens, and because this colour will be gone by June 1 because its a temporary IN COLOR, I may have to order packs and packs of it!!!  I am really hoping SU adds it to the regular line-up {they DID say they would from time to time} because its one of those nice lemony-green shades I am drawn to most of all greens. 

Anyways this card is pretty self-explanatory - lots of punching going on. Oh - I "dyed" my twine using SU chalks, that was messy but fun as I used my fingers, ha ha! 

OK, thanks for dropping by!


21 March 2013

Altering "Sycamore Street" Designer Series Paper for the FUN of It!

**Hey, remember me?  It has been awhile since my last post featuring Stampin' Up! projects but I've been a'craftin', I just have been a bad blogger!  So here I am with a little idea I had and have decided to share :)

Ever get a pack of Stampin' Up!'s beautiful Designer Series Papers and just don't know which patterned paper you want to start with?  And you hum and haw, and  basically stall? Well, I have that happen all the time!


So this time when my friend Maria shared some of her SYCAMORE STREET DSP [ since during SAB I went with 'other' freebies ]....I looked at the patterns and just decided to play ball with them or put them down!!! LOL - I mean, I decided to be fierce!


Here is what I was looking at:*


* And looking over them, I was really intrigued with these two...


So I decided to do this....cut along the exotic floral, blue-lined shapes and attach them to the fish-scale light blue pattern and flip over the "in-between bits" and attach those to the raspberry chevron pattern!  Then I cut both into strips. Have a look.....in other words, transfer one design ontop of another! 
Play around with the patterns and be just that - playful.  Or you might miss out on a really pleasing result, like I said ' play ball! '

Next, take your newly-created "strips" and play around with those on more patterns!  


I decided to start with a white 12 inch paper, and cover it with strip after strip - like quilting in a way. 
I juxtaposed colours I liked, and the paper patterns all seem to work well together {SU! does that for you!}


 And before you know it, I had MY OWN ALTERED DESIGN....TA DA! 


 I LIKE IT ! 
And I will use some solid colour mats or frames to add my photo lay-out later on, plus I really am looking forward to embellishing it - flowers, charms, who knows what goodies will follow!

MAKE A CARD

You can do this in a simple fashion too.  Yes, just add strips of different patterns, and even of different widths, and it makes a great card.  Here is mine without final adjustments like a greeting or embellishment, but you can see what I mean.


I HOPE YOU GIVE THIS A TRY WITH YOUR OWN DESIGNER PAPERS!

CHEERS AS ALWAYS! 


22 December 2012

Christmas Shadow Box Card

*Merry Christmas Crafters &  Friends - New and Old 
Welcome to my blog!  


If you're here to see the fabulous project that is featured in my Youtube Video " Christmas Shadow Box Card " I will just add a few pointers and information to help any of you - YOU MUST TRY ONE OF THESE! 


Watch Laura Cline's Tutorial Video below at the end of this post.

My Christmas Shadow Box Card.....


*Here is the beginnings where I took a kraft blank of the basic card structure and I covered it with some designer paper....I made a second one in Very Vanilla since I thought it would be better to create two right away, and after Christmas I will come back and finish the second one in a whole other style!


*Now I have created the "accordian-pleated" Shadow Frame.....


....and I have gilded the interior fold edges with metallic gold paint.


*I have added my backing paper to the Shadow Frame....it is very pretty paper which cannot be captured properly here as the circles have delicate glittery edges....so pretty. 


.....smooched edges with FROST Smooch, and added bling, and you can see that the Greeting from Christmas Lodge Stamp Set has also been embossed using the same embossing powder/glitter mix I mention in the video....


*I am keeping the palette in frosty metallics with some blue to counter all the natural tones and the flowers add just a dash of red!  But I used a metallic pen to add an accent here and there such as the Star - but then afterwards I added tiny rhinestones to the star....you can't help but glitter this project up! You can't!


SUPPLIES
Stampin' Up!
Five Petal Flower Punch
Cardstock: Espresso, Baja Breeze, Cherry Cobler, Very Vanilla
Frost Smooch
Clear Rhinestones
Versamark Pad

Other ...
Tim Holtz Distressing Powder in Weathered Wood
Ranger's Clear Embossing Powder
Martha Stewart Silver Glitter
My Mind's Eye Christmas 12x12 Cardstock Stack
Gold Metallic Paint
Variety Embellishments
***

CREDIT GOES TO:
my friend " The Country Rose" on SplitCoastStampers 
for the inspiration!
LAURA  CLINE'S  " SHADOW BOX CARD TUTORIAL"


THANKS FOR COMING BY!

11 December 2012

Hostess Christmas Gift Tags - an Easy Project!

Hey-Ho-Ho....
Often wonder what to give as a small token of your appreciation ....and at this busy time of the holidays?

Look no further than the ever-useful GIFT TAGS!

They may be the 'small touches in life' but as hand-made gifts - they are perfect for saving your friend time and money!

Recently I had such an opportunity to give a lovely person a wee gift - a Mom - who gave a group of young teens a very nice afternoon of crafting and lunch.  To offer up a note of appreciation I used the following:


  1. Stampin' Up! Tag and Curly Label Punches 
  2. Stampin' Up! small size stamps - from A Cute Christmas {retired}
  3. Stampin' Up! Real Red / Whisper White / Marina Mist Cardstock
  4. Stampin' Up! Markers {various}
  5. Stampin' Up! Espresso Bakers Twine
  6. Stampin' Up! Dazzling Details 
  7. and the ever useful sparkly shreds!  whoooo! 
  I thought a group of 6 tags was a nice set - but you stamp and colour away onto white cardstock  as many heart-warming scenes as your heart desires!  I love snowmen and the stack of gifts were real fun to colour - then its a glob of Dazzling Details on each - let dry then its time to package them together! 

Here they are getting their colours on!  


String em up together!

Let's bag them with good ol' sparkly shreds and a plain bag... 


and finally pop them in, staple a folded 'topper' on and voila...!

HOSTESS GIFT TAGS


 * So hope you have a special Hostess in mind! *

No Peeking Children's Handmade Christmas Card

Here is a really cute stamp set from Stampin' Up! called
 "No Peeking"! 
Here is the card I made with this set at Maria's stamp event in November...


Very sweet isn't it?  And I like the style of the greeting - so I think a child would LOVE a card like this!
But after searching the internet, I could see that crafters are having a field day with this stamp set - there were so many great projects out there - whew! Fabby stuff!
Here's a few that grabbed me from talented Stampin' Up Demos like

Click on their names to visit their respective blogs!

...tags galore!!! Excellent!

...just awwww! 


...great for twins!

... love the colours and layout!

This is what I luv-luv to see with a stamp set - real versatility and imaginative possibilities! 

Stampin' Up! No Peeking Stamp Set
wood mount #126290 $29.95 CDN
clear mount # 126292 $21.95 CDN

Now GO craft!  
*
  

25 November 2012

Create Scented Holiday Centerpieces or Accents of Potpourri

Hey Crafty Friends --

I decided to craft {what a surprise} a small Hostess Gift to give my friend recently and had a 'bucket' of fun doing it.  I made some scented potpourri! And presented it in a cute dish - looked great.....:) {grin} 

Not only was this fun, it was easy.  Real easy.

I know that the really nice packages of potpourri in the stores look the way they do because they add decorative elements to the mix - such as nice pinecones, or glittery straw stars - etc, etc. instead of just the plain-looking potpourri mix.  And what's a nice girl to do when money is needed to buy many, many gifts.  DO IT YOURSELF!!!!   So with that in mind, I made my way to the DOLLAR STORE - where else!

I had to actually ' pay '  for the pinecones {when I should of picked some nice ones off the ground in the fall, oh well...} but that was offset by the nice glittery straw balls, and white stars I found!  Lastly, I needed some scented oil.  And then a container.  [note - you can use clay pieces as well to hold the oil scent]


Slet's see that written down, my shopping list =   natural materials [pinecones, small straw or wood, or clay-shaped accents], plain potpourri mix, scented oil, container, clear cellophane wrap & ties, gift tag, ribbon,  bucket, rubber gloves, stir spoon.

Create - Create- Create..!
OK - when you gather your supplies, clear the table....grab a large container, don some gloves and dump everything in that container, for me it was a large pink bucket!

Pour on the scented oil.....i used a mix of expensive boutique essential oil, and a generic pretty apple-berry scented oil.  Do it a few swigs at a time - you don't want to overpower it!  Better to be add more. 

Here's the special "accents" I added to the plain bag of potpourri I purchased, and one of the oils [red box]. Just these items alone give your mix the coveted 'designer' look.  Pretty sneaky, huh? Darn right!

Here it is in the cutesy red bowl I found at the Dollar Store!  I decided smaller would be the right size for a Hostess gift. Therefore, if you make a whole bunch of the mix - you could potentially have many gifts!   

Create a pretty Gift Tag - here is another lovely Hostess Stamp Set from SU! I embossed the image in white embossing powder which is striking against the red paper!  The Designer Paper accordian-fold rosette is hand-made and the chipboard tag has been coated with red paint and glitter, and isn't it PRETTY all together?  Why not make a few of these one night and save yourself time? You know you're going to need them - there's always those last-minute gifts!

Here it is all wrapped in cellophane, tagged and oh so ready to give!  

And here is our own in a pretty plain white dish. 
Smells w-o-n-d-e-r-f-u-l  !!!

Hope you enjoy making your own home fragrant with  scented Holiday Potpourri. 
***


Maria's Annual Holiday Craft Event Nov 17


 Just one of the many cards we created. 
This features SU!'s new Snow Flurry Bigz Die


*Hellooooo!

Boy am I tired - but happy!!!   I now have several really nice HOLIDAY CARDS ready to go and I didn't even have to think them up!  Thanks to Maria's 2nd Annual Holiday Craft Event in Peterborough!  Yessiree...I attended as a guest and had a fab time - THANKS MARIA!!!

Keep your eye out for Maria's event next year if you're in her area [Kawartha Lakes] and you'll have a lovely time and come away with great cards!  And maybe win some prizes!

We also had a pot-luck lunch since it was an all-day event and I enjoyed all the nice dishes the women brought, and I enjoyed meeting them as well - very nice ladies who all made the event feel cozy and friendly!   

Maria and her friend Jane keep well-organized and help you when you need it, and Maria brings along some nice items to purchase {bring along a little spending money! its worth it :) }.....Jane has a little funny streak and made me laugh a few times!!!  We especially had a little fun at Maria's expense because Maria has the most worn-out stamp scrubber we've ever seen!  Maria - it's time to pony up, lol!  Maria's a good sport - she has to be to put up with us...."Maria?".... every few minutes, ha ha.  
 **
VISIT Maria's blog  " CRAFTY MARIA'S STAMPING WORLD" for more great ideas. 

All the supplies can be found in Stampin' Up!'s Holiday Catalogue :)  

 Here are more of the very lovely selection of cards we made....lots of layers, fun punches and accents to add....and the day just swam by we were so absorbed by the process!  

Looking forward to next year Maria!
** 

20 November 2012

Bottle Tag Tutorial


CHRISTMAS  BOTTLE  TAGS
TUTORIAL

Here is one of the items which sold out fast at the craft fair I participated in Nov 10 [see earlier post].
I was told by my friend Maria, a fab crafter in her own right, to do these but I didn't really think I needed to make that many - boy was I wrong!

The nice thing is you can put these on WINE or WATER BOTTLES, and I think on any present which they could slip on to....maybe bubble bath bottle. right? 

They are super easy to make - I used the following:

Stampin' Up! Punches
 2.5 inch Circle Punch
1. 3/4 inch Circle Punch
Holiday Stocking Punch 
Scallop Border Punch
Corner Punch or Small Circle Punch
Small Oval Punch {optional}

Cardstock in minimum of 2 colours for tag
Cardstock scraps for stockings  
Glitter Cardstock for accents  {optional}
To: and From: rubberstamps {optional}

Instructions 
[using cardstock of choice] 
TOP OF TAG 
1)  Punch a 1. 3/4 inch Circle from cardstock 
2)  Position 2.5 inch Circle Punch around the negative circle space
created from step 1, and punch. You should now have a cardstock "ring". 
This is the ring that will be at the top of the tag. 
3) Create a  rectangle from cardstock - about 3 x 5 inches. 
4)  Place the 1-3/4 Circle Punch in half-way of the top edge, punch.
5) Glue your ' RING' to the top - matching the circle inside edge to 
the newly created half-circle top edge of tag. 
Trim the cardstock from  outside the ring using a Corner Punch to create corners at top.
This helps to create the top of the tag's neck.
6) At this point, I lightly score a line across the top of the tag, on either side of the ring - just so it bends a little when draped over a bottle neck.

BASE OF TAG
7) Decorate the base of your tag! 
I used the Holiday Stocking Punch from Stampin' Up! (2011 Holiday Mini) 
and created all sorts of stocking pairs - which parts I mixed up in a
pleasing fashion.  If I add a mix of glitter or shine or velvet cardstock - it really 
makes those stockings pop!
8) Trim the length of your tag if you need to, and add a nice border accent
near the bottom. I often used the Scallop Border Punch for this, but I also
used just strips of scrap cardstock.

OPTIONS
Emboss the cardstock for the Tag base,
Sponge ink over edges, 
Sprinkle glitter over tag as accent,
Add embellishments: buttons, brads, ribbon, etc. 

BACK OF TAG
8) I added two small oval tags {used Small Oval Punch} in vanilla cardstock, and stamped
To: on one oval, and From: on the other oval.  Tied them loosely together with baker's twine, and 
glued them to the back.  You can decorate the back of the tag more but its most likely not needed.

VOILA - DONE!
This sounds more than it really takes to make these - you can get in the swing of things and 
make several of these in a session! Get some cocoa and brownies together with friends or family and have a yummy TAG-MAKING TIME! 

4 November 2012


 GIVE HANDMADE THIS YEAR!

Come and join me at the West Rouge Holiday Artisan Sale this coming Nov 10th!  Picture a cozy time looking at all the lovely items 'HAND-MADE' no less......I'm all excited!!!   Now I am going back to work to making my cards for this event - remember, if you need Holiday Cards, come and see what I have for you!  *

25 July 2012

On Holiday!

My projects will be on temporary hold as I take a holiday!  Hope everyone is having a fab-U-lous summer!
See y'all later!

29 June 2012

A Rosette by any other name....is still a rosette!


PATIO PARTY ROSETTES -  12" WALL ART  by Taylor B! 


HERE IS A GREAT HOME DECOR PROJECT FEATURING ROSETTES AND STAMPIN' UP'S PATIO PARTY DESIGNER SERIES PAPER!


Entering this project is FUSSY FRIDAY'S 'FANCY FOLD CHALLENGE 66 " HERE


PART I 


 I have a few choice words about rosettes which range from "Awesome" to 'arrgh!' on the occasion when I am all thumbs trying to put one together!!!


Luckily the Gods were good to us when they gave us steel dies!


We can now punch out rosette embossed 'blankets' and then construct those into the final, nifty, folded rosette of old!  And Stamping Up! has a great rosette die because it can make very large rosettes as you can see in my wall art project - just as it makes smaller ones too!


 So its way better .....but there are those days, when I can not put glue to paper and paper to paper without something slipping and going crooked!!!!  However, I put my thinking cap on and came up with a solution!


 I made 'rings' to the size I needed and placed my creased and nearly finished rosette into this ring to attach the stablizing 'backing' - the smaller sized paper 'core' we glue at center to the squished folds to keep them in their correct position.


  In the past, this is exactly where I goofed up!  I'd have my usual paper circle sitting and push my rosette coil down to glue it onto the circle core only to have the rosette coil shift - and then its less than perfect, and maybe even less than stable!  But my new found method works! Here in pictures is how......


I find a variety of rings to create different sizes of rosettes....here I have used a coffee cup which I cut witha a hobby blade and scissors, but try other 'rings' like biscuit cutters, hoop frames, maybe you have your own ideas. The ring's purpose is to "contain" the rosette coil.  The rosette coil is what I call the strip of accordian-folded paper that is joined at its ends to form a coil!  Now you can focus on securing the rosette's many folds at its center by attaching a paper backing!


Here's my backing.....

First, you need to establish a center - so I created a center guide! 
I made a square chipboard coaster into my ' base ' and marked 
the 'center' with pencil guide lines.  
Here is my rosettes "backing" circle core I 
spoke of just waiting for my rosette coil! I pinned the backing circle to the 
chipboard base AND the pin will act as my "centering guide" when I add
the rosette - you'll see!

Here I have positioned my ring and secured it with push pins.  You won't get a proper centered rosette if the ring shifts around! The glue has been added to the paper backing and everything is peachy! 

I added my rosette coil over the center pin which tells me that the rosette is centered. And pushed the loose rosette coil down and the glue will work its magic!  AND THIS IS WHY IT WORKS FOR ME...the ring helped me place the rosette into position and kept it there while I set it up - no shifting, sliding and I get the backing on dead center!!!  No more lop-sided results.  Instead I can focus on making the next one :) 

When it is safe to remove the rosette when the backing circle has dried in place, I can flip the rosette over and add a decorative center front!  I will be able to do this step easily since the folds are secured in place underneath to the backing. By decorating the rosette's front, you will also be doubling the strength of the rosette - you could almost set a drink on it by the time you're done!  

OK - I will be doing more on this project next time as you can see how I put the project together! 
Just one more picture and a final point.  

DIAMETER SIZE AND DEPTH OF ROSETTE
When you create ' rosettes ' the size and thickness of the rosette depends on the following:
a) the length and width of your folded strip of paper will determine the rosette's size overall 
b) the depth and number of your folds will determine how thick your rosette turns out.

See the pictures below and notice what I mean.....


The deeper, smaller rosette has folds at every half inch on a shorter length of cardstock whereas the more shallow but larger NAVY rosette on the right has a longer 'strip' of paper which was folded at every 1/4 inch. 

You can take this concept to every extreme - from the tiniest rosette with teeny-tiny folds to gigantic rosettes which make wonderful banners!  So please return to see my next set of tips and tricks to make fun and easy projects featuring the "ROSETTE"! 

My GIANT rosette fits beautifully into a 12x12 inch frame! 

To make life easier you will need a scoring tool - preferably one such as Stampin' Up!'s Scoring Tray! 


Designer Paper = Patio Party by Stampin' Up! 
Rosette XL Die by Stampin' Up! 
Project designed by Taylor B! June 2012. 

END OF PART I

Template by: