20 February 2011

Storage - Storing Cards

I am blogging today about storage because "obsessed me" finds the need to constantly organize.  A bit of irony is that I never feel I am 'quite there'!  But every once in awhile I do find some clever manner to organize a particular thing and it makes me so darn happy!

Now, who hasn't - within half a year of crafting - discover they need to think better about storage, hmmm?  Show your hands 'cuz I know that no matter how clever we start out, something accumulates past its boundaries that you had planned for it!!!  It spills out and leaves you with that nagging feeling until you start to look about for a new plan - you're not to be outwitted by it!

Now boot past that point, ... a few years down the crafty road to craft heaven - you've got a whole system up! Good for you! You may have even beaten this...you may have a 'modular' system that you can add to for the rest of your life....or at least until the stores stop carrying it, which has just happened to me - wha-wha-wha!!!

But still....honestly, it never ends!

However - I have found little bits of glorious victory over the years!  So I thought I'd start to share tid-bits, little glints of  storage jewels!  And today, I am focusing on cards - I've got em by the bucketfuls!  I hang on to them because as a demo, I have had to create them time and time again - and honestly, I just don't have that many relatives or friends, lol!

MEDIA STORAGE WORKS GREAT FOR CARDS - 5-1/2 x 4-1/4
this is no secret, so here are a few to consider...


Practical Options

Today I found this - DATA STORAGE BOX WITH 100 SLEEVES -  its untried as far as I know, but the dimensions have me thinking - good! Plus - it comes with its own "sleeves"!!!  I'm thinking  ' fantastic!'   The cover looks good enough - sleek black, but you can fuss it up yourself too......Its from UNIVENTURE - a company that has some other interesting bits we could steal for ourselves...but this is the link, HERE. where its being sold.


Here is what I also have that is unbearably practical - my RUBBERMAID PHOTO STORAGE BOXES!  I love them because: 1) they stack beautifully 2) I love the pop-off lid - works well!  3) they are clear  4) durable - so I can pop them into a trunk and go to a craft fair with no worries.....and my fav reason 5) they have removable, DIVIDERS that help my cards AND 3-D projects - to stay up!   6) can store more than cards - roomy because they have height and length! 7) I like the narrow dimensions with the length for storing in my closets!!!   


see how that divider works - I store my cards with it, then the excess room I put my little boxes, or multiple folding cards, etc. there - works great! 

I found mine locally for $5 on sale - but I believe they are more like $9.99 (why can't they just say $10?)


Want Fashion instead?......

For the fashion conscious or where you'd love some glorious colour.....have you SEEN the stuff from a company called SEMIKOLON - they are gorgeous!  The "Pierre Belvedere" line, yummy! I def'ly want some - just have to find the right place, I know Organize.Com has some of their line, but they have an extensive line - so 'CO-ORDINATING ME' could be very happy!  

For their full line-up, here is a link to their cataloque, HERE - but you'll have to trip around the net to find your own source!  


Another blogger, Stacy at her blog INKSPOTWORKSPOTBLOG  just loves them too - you will like her photo tour of fantastic and colourful objects she has found, go have a look! 


Personally, I found some great fabric boxes at Chapters that were like the above - and I was smart and bought them all on sale - now they are gone, so alas, when you see something - you may have to grab it right away!

Well I am off to walk my fav pooch - and go have my other fav activity - coffee!  
If you have an idea for storage - let's share!
Bye 
xx Beverly

15 February 2011

Classes on Hold Temporarily

Hello to my local customers and interested crafters,

Due to a fire which recently happened to our building, the facilities I use to conduct my classes are unavailable to me for now.   Which means I must halt classes which I normally hold here.

I may offer a class in the future at a different location if this recovery period is extended.

Check here for my updates.

This DOES NOT affect your holding a HOSTESS WORKSHOP.  Please email me if you are interested in hosting your own fun party!

Thanks for understanding,
Beverly

12 February 2011

Valentine Card - doesn't have to be PiNk!

No, no, no....it doesn't!

It's all about your own style - and here is one I made while experimenting with a technique.

I wanted to a) emboss and b) colour with embossed surfaces.

So I chose to:
1) ink my VERY VANILLA cardstock with all sorts of ink colours using SPONGES.
2)then I EMBOSSED my coloured and cut 4-1/4x5 inch rectangle cardstock using an EMBOSSING FOLDER where I sandwiched the cardstock and pressed it through my BIG SHOT DIE-CUTTING and EMBOSSING MACHINE.
3) now I used a separate sponge to ink over the entire piece with BLACK ink - quickly and lightly!  This colours the "raised surface" created by the embossing folder.  To get a more precise ink effect, I could of used my brayer tool.

Now, I punched out a black HEART with my Heart PUNCH, and a blue circle with my 1 inch CIRCLE punch and attached them with a black flower BRAD.


Chipboard Accent Update - My Daughter Made a Valentine!

However amazing on her part....its not for me!  I'd like to see the results of a poll of crafters who have kin living with them, children no less...who will not craft much!  Honestly, she will on occasion - but ironically, I can not expect a card - she tells me she does 3 per year, that's her limit! LOL!

But - if not for Mom, then she doesn't mind to hit my craft studio and go crazy. And when she does, I love her style!

Here is my chipboard accent (please see Feb 3rd post).....on a card she made for a friend!


My daughter's card she made as a Valentine for a friend. 

Told ya she was talented, oxox! 

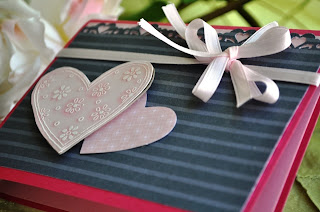
Supplies: Stampin' Up! Basic Grey Pattern Paper(striped, dots), Rose Red and Pretty in Pink (2nd layer and inside) cardstock, Vellum specialty paper,  Love You Much stamp (heart), Heart Punch, XL Flower Punch (inside grey flower).  Misc:  Heart Border Punch (Fiskars), pale pink ribbon. 

My Valentine's Banner

Here is the reveal of my Sneek Peek!

I have to say the pictures do not really give the true colours very well, my camera "reads" the green background too much and so I did my best - just bear in mind, it looks prettier in person!

But here it is....my labour of LOVE literally this past few weeks!  I did it in bits and bobs because it was just one of those projects that require your thinking beyond the norm, I usually do cards, LO's - but this was more of a collaborative - evolving - process.  I may have over-embellished, but that tends to be my style - you could do this much more simplier!

Used the TOP NOTE DIE by Sizzix and sold by STAMPIN' UP! - as I am sure many of you recoginze.  The only other thing I can say perhaps, is that the middle piece (which serves to separate the two words, Love, You) has a heart shaped frame that is made of 2 SCALLOP FRAME die pieces - also SU! dies.


Here it is in full length on my living room wall - sorry, this is a dreadful pic in terms of colour, see how the camera  reads my green walls too much - and I had to tone it down. Sorry! Maybe I need a few lessons!

But hopefully, you can see how it takes up a certain amount of space, so it could be used for an anniversary, welcome back, congratulations, new baby, birthday...all sorts of occasions, and look substantial!

It could be draped across the front of a banquet table - over a door - fireplace, lots of places!


Here is the two sections...


...LOVE...


...YOU...


 ...Here is the TOP NOTE DIE CUT (red) I used for all the letters. 
Then I layered a background paper (striped pink/vanilla) and topped it with 
a LETTER DIE CUT from my ALPHABET DIES.  
The a few of them I added extra 'embellishments' like the embossed medallion and the accordian folded circle with a small glittery paper heart.  


IMPORTANT STEP !!!

TO STRING THE FRAMES SO THEY STAY IN PLACE....
you must "KNOT" them into place.  Otherwise, they slide on the string. 
I made holes in each frame, and strung the string once through the hole - then through a bead - then back through the hole, and tightened.  That creates a "stop" .  You could make a knot if you want to like I did on the heart piece, but I found it wasn't necessary. 
I also drew a small line on a scrap of paper, and used that to measure the spaces between each and every
piece, so there was some consistency.  It is a little tedious - do this on a good day, or have a few breaks like I did. Otherwise you might go "knotty"  :)

To add VISUAL INTEREST I added a metal HEART I found at the Dollar Store between each of 
the frames,  its a cool embellishment I thought - for a dollar! Yess-um!


....the middle section...the scallop frames (see white one is the scallop frame) and take 2 of them
to create a background to the  floating piece in front!  Who knew!


There was a lot of folding going on - lol - and I am not the best at it!  But I love the look the accordian folds give to an embellishment!   I used up lots of scrap papers too - another bonus ...and fun because its like 'pickin' through your stash boxes' to see what will work with what - and that, is what craftin' is like!

HAVE A HAPPY VALENTINES DAY!


5 February 2011

Sneak Peek - what's this?

Hmmmm......working on a little something to decorate the house for Valentine's Day.   It's always a little nice to have something pretty to chirp up these blah winter days.  So here is a little peek at my project.....do you think you can quess what it is?


See you later!
oxox
Beverly

3 February 2011

Create your own Chipboard Accent! and Tuesday Trigger Sweets for the Sweet

Hey everyone!

I am deep into my crafting this morning as I had a swap project to finish, and once I was done that, I was still feelin' crafty.  I took a look at some challenges posted 'round the net and found Tuesday Trigger.  The challenge "Sweets for the Sweet" suits me!  It's soft colours of Pink are some of my favs.


So using the same stamp I merely switched to a different project and ended up with my own CHIPBOARD HEART!   I really like it!


This is the front, see - its the same pretty heart from the Stampin' Up! "Love You Much" stamp set.  It has been created in several stages using the stamp, chalks, vellum, cardstock, white embossing powder and chipboard of course!  It may be hard to tell from this angle, but it is fairly thick chipboard and  I still need to decide what I plan to use it for.......I guess that will be another post for another day!

Today, I will show you how I made it!!  This way, you can always create your own custom chipboard accents - you're not limited anymore to purchasing ones from a retailer!

Stage 1.  Stamp Image onto  Adhesive-backed Vellum and Cardstock, Emboss, Chalk.

I chose to stamp my image onto VELLUM using white CRAFT ink which allowed me to sprinkle White EMBOSSING POWDER on to the 'wet' image, heat to dry.  Now I end up with a beautiful soft design on the pale icy vellum - like a fine lacy curtain!  

However, I also want to layer it over a equally soft cardstock - a whisper of pale pink. 

Meanwhile, I cut out the vellum embossed heart image and set it aside for now.. 

To layer the vellum over a very soft pink colour cardstock -  the white ink against this paper might not "show up" very well......so, after some thought, I chose this next stage. 

In order to make the white vellum heart 'pop', I need to give it a "shadow" from behind - a contrast. 

If my vellum was not the 'adhesive-backed' type, I could simply chalk or ink on the back side of the vellum to make the white image stand out - but since I can't chalk or ink the sticky back side, I need to do the following .....

To do this,  I stamped the same design onto the pink cardstock using a deeper PINK ink, and then using pink CHALK, I 'spotlighted' the flowers and itty bitty circles, and edges, applying the chalk with a soft applicator in circular movements. The chalk darkened a tad over the pink ink- even better!

Peeling away the backing on the vellum heart, I adhered it directly over the stamped/chalked image on the pink cardstock.  Now there is a 'pink shadow'  from behind - which sharpens the white heart design.  See the picture above and below. 


So let's summarize:
1. stamp image with craft ink onto vellum; sprinkle with embossing powder, heat to set,
2. cut out vellum-embossed heart and set aside,
3. stamp image again in a darker co-ordinating ink onto cardstock, spotlight various parts 
of the image with chalk in the same colour,
4. adhere the vellum-embossed heart directly over the stamped/chalked image on the cardstock

Stage 2. Create the  Chipboard Heart

First I adhered the cut-out cardstock/vellum HEART onto a piece of chipboard. 
To CUT the chipboard heart out - I need to use my hobby knife and since the chipboard I am using is thick, I decide to use a wood-working technique.....trace holes around the shape, then cut with the blade following the holes.  See pictures. 


Here I punched holes around the edge of the heart, and then cut from hole to hole with my blade. 
To make it easier to see - I created 4 holes in a larger size, see them?  You would cut from one to the next hole, which you can do in one deep cut, or go over them several times till the chipboard is cut through.  


The accent is cut :)
I sand the edges with my sanding tool.  

This is the back side which I have also sanded lightly around the whole edge. 
I can also decorate this side later if I wish. Or journal. 

Well - that's it!  Not hard, just a bit time consuming, but you can create co-ordinating accents to match your stamping projects.

Hope you give it a try!

Beverly

SUPPLIES  All tools, inks, embossing powder, chalks, vellum, cardstock by STAMPIN' UP!
Contact Me if you have questions or wish to order these supplies. 


Template by: