Showing posts with label MOTIF-Butterfly. Show all posts

6 May 2011

Mother's Day or Spring Card

Have a wonderful Mother's Day to each and every Mom out there!


Recently I created a lovely card for someone special { hey Justin!} whose 'very special' Mother favoured purple - and I want to leave that card as an original piece created just for them, but I have borrowed the basic elements to re-create this card!

My favourite technique on this is - well, two things::
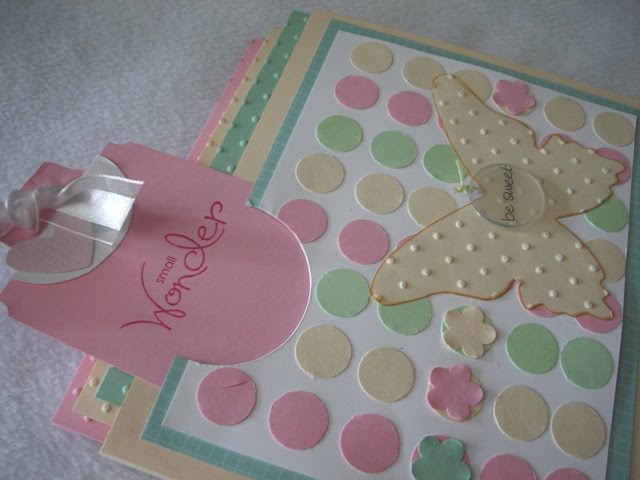
 one) I love duplicating accents in acetate as I have done with the butterfly!  It creates a "glossy" look that I love!
two)  using ribbon to wrap around two out of three panel sections - this leaves the third panel to help make one colour pop - or to add accents, etc.

If you take a closer look - you can see I textured the smaller butterfly - using the tips of a snowflake embossing folder!  Who knew, lol!

STAMPIN' UP! SUPPLIES:
Big Shot Die-Cutting & Embossing Machine
Beautiful Butterflies XL Die
Northern Frost Textured Embossing Folder
Perfect Polka Dots Textured Embossing Folder
Cardstock: Elegant Eggplant, Lavender Lace (retired), Crushed Curry (retired)
Clear Acetate Sheets
Organza WhisperWhite Ribbon {#114139}
Snail Adhesive

15 June 2010

Baby Notecard Set - Soft and Easy!


Hi - looking for a Baby Shower Gift?

I designed a notecard set which uses really simple shapes and soft colours which could be used as a gift for an expectant Mom - or even for yourself if you'd like to have a sweet collection of ready-made cards.  I chose soft colours when I was first experimenting, and liked the results, but you could substitute many colour combinations!   


Recycle some scraps. Create a fun grid of polka dots by using the small 1/2 inch circle punch......and our RETIRING Trio Flower Punch (can't believe it!) to add interest.  
A butterfly - highlights the polka dot as well.

The box is 9 inch x 5-1/2 inch  with a 1/2 inch base scored in the middle. Two strips of paper, scored to make 3 sections, each 1/2 inch wide, are attached along the sides. 

The front panel has a half -circle cut away to create a pocket to tuck a tag into.


Embossing the cardstock with polka dots and a simple design means the cards can be used for many purposes - thank you, birth announcement, 1rst birthday......etc. Flexibility! 


To help the appearance, I staggered the height of the cards - this way,
 all the colours show when stored in the box. 


Close-up of box and cut-out front section with tag. 

Time to make: 1 hour or less. 
Level of Difficulty: Easy

Hope you try this - email me for instructions if you like! 
Beverly

20 April 2010

Paint Chip inspires a Butterfly Card

Butterflies are always beautiful on cards - well, everything really.  So its no wonder I love our Big Shot's Bigz die Beautiful Butterflies.

This past week I have been working on a card where I received my inspiration from 2 places....a) a paint chip which had the colours burgandy, a gold, a peachy tone and a vanilla. I dug around my papers and came up with some Bravo Burgandy, Apricot Appeal and Very Vanilla. The peachy colour was also my second source for my inspiration .....b) a floral pick with butterflies.


So armed with that - I began to put my card together, with the Bravo Burgandy being the card base, and the Apricot Appeal (in  patterned prints) lending itself to becoming butterflies. A little embellishment went into the butterfly die cuts - I used matching Apricot Appeal chalk to darken the butterfly centers, and glittered the largest butterfly.

To add tactile interest, I crimped one of the smaller butterflies, and wrapped green ribbon around the card base to suggest the greenery of the butterflies's surroundings. Finally, I added an actual strip from the floral pick because I didn't have anything else that would be as nice!

Once I had the butterflies & ribbon attached - I had to move on to the important task of the greeting!

Since there was a large span of bare cardstock - I used tone-on-tone inking to create a 'word-scape' and chose these basic words that together suggest to the recipient that true values in life are still the basic ones: friends, nature, gratitude. To wrap it all together, my greeting says: "Count your Blessings". 

So there it is, a simple paint chip peeking at me from a corner pile of papers started it all - and a glance around my home to capture more ideas all brought me to this card's creation. You just never know where you're next inspiration will come!


Stampin' Up! Supplies: 
Punch - Scallop Corner punch; 
Cardstock - Bravo Burgandy, Apricot Appeal (retiring), Whisper White; 
Ink- VersaMark Marker(creates tone-on-tone effect);
 Other - Stampin' Pastels {Chalk}, Dazzling Diamonds Glitter, glue;
 Equipment - Big Shot Die-cutting Manual Machine, Bigz Beautiful Butterflies die; 
crimper


- LEARN HAND-MADE CARD IDEAS - 

5 July 2009

More Black Glitter and Garden themes!


So waking up this morning to promptly go look at last night's card, (see previous post)....I still had the glitter out and I thought I'd do something more with it before putting it away.


Now - believe it or not - but this rose-coloured border card - was made last summer! At that time I did not have any way of making butterflies - but a simple butterfly would compliment the exotic border stamp. Designing the card, I was playing with border motifs and it seemed to me the only other piece I could add to this would need to be a) large and b) graphic. Basic enough yet interesting to contrast with the busy borders. Hence - the butterfly.

Nowadays, I have the Butterflies Bigz Die (from you-know-who) .....and I thought being coated in black glitter would also be just the thing!

So - I guess what I am trying to say - is that everytime I try to stretch my imagination, I always end up with a interesting card!


Hope you like it - :)

14 June 2009

God's Beauty Mosaic Card


Here is a Mosaic card - because we use a strip of Stampin' Up!'s Sticky Pages (VERY tacky adhesive paper) and small pieces of beautiful paper and glitter to create a "mosaic" which we then feature on our card front. To this we add the beautiful image of a butterfly and a gem brad - its just a lovely, lovely technique! Don't you think so?

I like it very much and have used it in various projects around my house! Plus it's a neat way to use up 'scraps' of paper - scraps that you'd rather use than throw out no matter how small!

GOD’S BEAUTY MOSAIC CARD Tutorial


SUPPLIES:

Cardstock (all Stampin' Up!)
8 ½ x 11 in. green ex) Kiwi Kiss
3 ½ x 3 ¼ in. pink ex) Pink Piourette
3 x 2 ¼ Whisper White
¾ x 2 ½ Whisper White (optional for expression)

Scrap Paper -
small scraps of paper with pretty design, we used SU's Designer Series 'Walk In The Park' papers in pieces of green and pink,

Accessories
1 ½ in x 4 in. strip "Sticky Pages' (stampin' up!)
God’s Beauty Stamp Set (stampin' up!)
Pink Passion Classic Ink Stamp Pad (stampin' up!)
Old Olive Classic Ink Stamp Pad (stampin' up!)
Gem brad (co-ordinating color, ex) pink)
Silver Chunky Essentials Glitter (stampin' up!)
Double-sided adhesive
piercing tool for brad

INSTRUCTIONS:
Fold large green paper in half. Score fold.

Mosaic Strip:
Take 1 strip of Sticky Page + pull off one side of the backing papers. Set on work surface with the exposed sticky side facing up.

Cut pieces of green + Pink patterned paper + use them to cover Sticky strip – leave areas between ‘mosaic’ pieces exposed . Overlapping edges can be trimmed later.
Take “ mosaic strip” over to glitter tray, and pour glitter all over – so it fills in all remaining gaps of the sticky page strip. Press to secure. Shake off excess.
Holding strip by one of the paper pieces, pull off last remaining backing paper and carefully lay down the ‘glittered mosaic strip’ onto card, left side .


Stamp whisper white 3 x 2 ¼ in cardstock with butterfly in Pink Passion ink.
And “stamp off “ the stamp to the surrounding sides so image repeats itself in lighter shades.
Adhere to the pink 3 ½ x 3 ¼ pink cardstock.


Pierce hole in upper left corner through both cardstocks and attach gem brad. Attach the completed piece to the card, overlapping the mosaic strip ‘slightly’ – use double-sided tape.

Optional - stamp sentiment “Beauty is God’s handwriting”. Ralph Waldo Emerson, ...in Old Olive ink to small white strip and trim. Attach to lower right corner, overlapping the butterfly/pink cardstock using strong adhesive or double-sided tape.
*Note: Kiwi Kiss, Pink Pirouette are to be discontinued by June 30 - I'd order these if you would like them as soon as you can as the 'retiring' products are only til the end of the month.

Template by: