Showing posts with label POPULAR PROJECTS - Mini Albums. Show all posts

7 March 2011

Fat Page Swap - Part 1

Good Monday Morning - hope everyone is well and ready for a new week!!!

To start my blogging off, I am showing the results of a FAT PAGE SWAP I organized with a couple of fantastic people!   Today I am showing 2 of the 4 projects involved.

If anyone is wondering what a FAT PAGE is - commonly it is a 4x4 inch page decorated by creative means with a small area to the left for punching holes to allow several Fat Pages to be turned into a Mini Album.

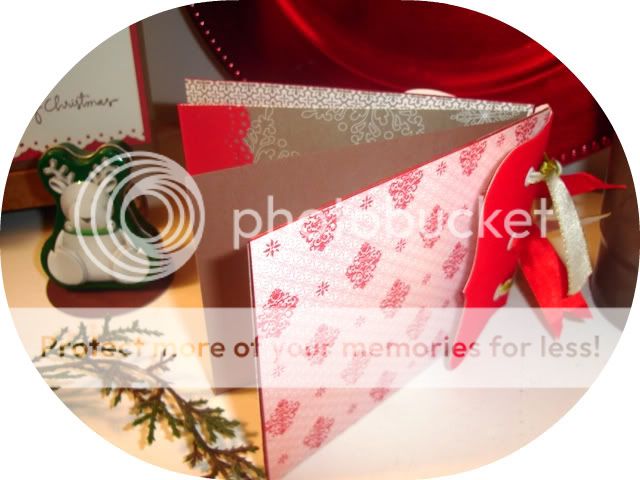
So here are the two pages exchanged between myself and crafter Vernette through Love is in the Details forum around Feb. although Vernette did a variation on the theme and created this wonderful squash booklet, but keeping to the 4 inch guideline....

Vernette's Fat Page 


Front - very nice!


Tied Closed - see those squash pages.....


Open....open....


Voila!  Look at all those pages!  Great Idea!
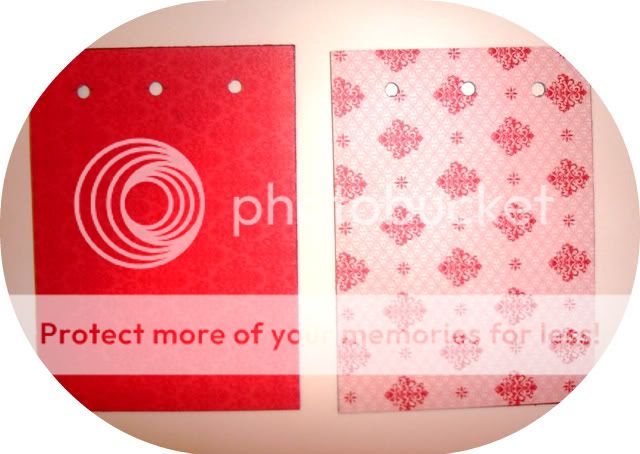
Beverly's Fat Page for Vernette


Front
                                                            
       And here is mine.......I am using several Stampin' Up! supplies including the Heart stamp from the Love You Much set, and the background stamp, Tres Chic both currently in the Idea Catalogue.


Hidden Pocket Tag


Back

Back with Tag (backside of tag)

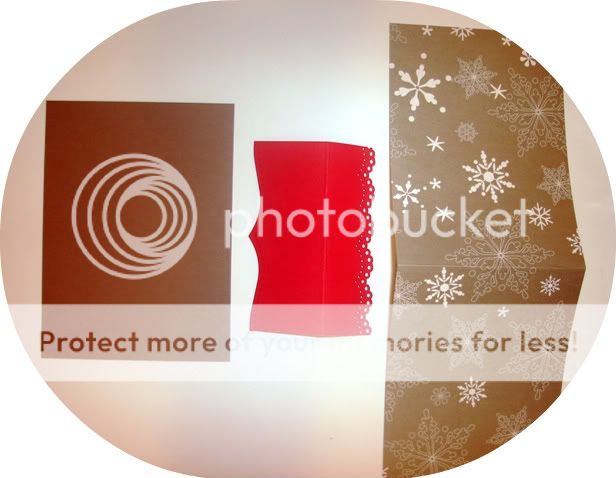
Here is a few more pictures to show how I made my Fat Page from a plain brown lunch bag....


Choose how you wish to cut the bag - I chose to use the bottom because
I liked the little flap, which I decided would be interesting to decorate. 
You will have 2 raw edges which you can create a small pocket as the bag is 2 layers thick right?


"SEWING" PAPER TIPS
I sewed the bag with my machine, leaving gaps for a pocket, and where the flap is connected to the bag (see arrows).   When sewing paper - I use a stitch length from 1 - 2 inches, depending on the thickness and I may  adjust the tension (usually at 4-5). Try on a sample piece to make sure that your stitch is catching 
properly "underneath" - you can also use a ZIG-ZAG stitch.   
HAVE FUN -  be less concerned about the straightness of your stitching - its all part of the look!  


Anyways - on a project like this, one side of your stitching may look good on the FRONT, but you can HIDE a lot, by layering the back with cardstock.  Or, you use cardstock for your design reasons. I did both. 
BUT  add the brads, eyelets or anything where parts need to be hidden to your paper BEFORE you attach the layer.  

Hope you enjoyed this post.

Tomorrow I will add Part 2!


24 November 2010

HAPPY BIRTHDAY ONE PAGE BINDING MINI ALBUM for a FRIEND, SOFIA!

HAPPY BIRTHDAY SOFI!

I made this " One 12x12 Page Binding Mini-Album " for my online friend, Sofia and I had no idea till after I sent it - that it is her birthday today!  Whooo-hooo!  Hope you had a great day girl! [Sofia does crafts and gives lots 'n' lots of people a lot of nice gestures & gifts - she's a very generous soul! Glad we are pals, Sofia!]

Its a pretty cool project and like the title, you use a complete page of 12 x 12 cardstock, which when folded creates a 'fat' mini-album which counts as a 'page' because you can bind several together with the clever end section!

You can find the instructions FREE as I did, on YouTube from the fabulous Elsa  ( Hi Elsa! ) on her tubes, under JustafewDesgins  - scroll down to bottom of this post for the link to her tutorial for this project!


Not only is this an cool project, there is a ton of ways to decorate it and incorporate tags, photo's, etc.  And all from the neat folds!  The added bonus of the 'binding' element is great - you won't need anything special to create your own album - just some rings to connect the pages. 


So I can just show my pics and all I will say, is that I was trying to use some unconventional colours and patterns to make a holiday album. It was an experiment, and while yellow may not be the traditional colour I turn to for Christmas, it has just enough holiday-style elements to make you feel the vibe!  Least, I hope so!

I left sections open, and the front for Sofia to colour is she chooses....but you can add so many little 'gifts' tucked inside - even a Christmas Gift Card. I chose to help Sofia with some christmas tags. Or she can journal on them!

I will make my own project using this and am really looking forward to doing that!   OK! Cheers! xx  Beverly

 front

                                                                         Stampin' Up! Top Note Die & faux embossed metal technique                                                  

                                                                                               open up, and fold down sections with 2 pocket areas on each side

  fold down 'flaps' to reveal photo space, or more pockets!....

                                                                            create mini-envelope of ribbon tags to tuck into a pocket

                                                                          ...flip to the next section with more wide spaces for photos {used the negative space from my top-note die as a photo frame with one side open to slide a pic in); and with a pocket on opposite section! Do what you want really!

                                                                        
                                                                                                  side view of whole piece

  
....and moving to the last section....and a lovely fold-down flap pocket for a place to tuck a few things such as a tag, and a top note die-cut.........

 ...and we are back to the front! Ta Da!

Thanks to Elsa for the nice tutorial on YouTube and HERE is the project!

Supplies:
Stampin' Up!  Products = Top Note Die; Antique Brads, various Ribbons;
Stampin' Up! Cardstock = So Saffron Patterned Paper, Whisper White Cardstock
Stampin' Up! Inks = Craft Stampin' Spot - Old Olive, Classic Black, Classic Cherry Cobbler, Versamark Gold,


14 February 2010

Mini-Album - Love U Page

Remember this little album I made previously?  A basic few pages just waiting for more inspirations....

 Well here's a quickie project featuring a mini-album page. You can easily transfer this to the front of a card, tag, ATC or come up with your own idea -maybe just add it to part of a large scrapbook page.

Take a die-cut alphabet letter 'U' and drape some punched out hearts around it. I tried to make the hearts look like they were either leaning into the letter or standing on top of it.

2 Mins is all it took - 1 min. to gather your alphabet die and hearts, and 1 min. to position it on the mini-album page. That's all. Looks great over co-ordinating patterened papers too, but solids would be a great alternative as background.

Add a tiny photo if you like, or on adjoining page.


Easy Smeesy!

Big Shot Sans Serif Alphabet letter 'U', Heart to Heart punch , Real Red, Whisper White cardstock, previous christmas papers from previous Holiday Mini Catalogue  - all supplies Stampin' Up!

4 December 2009

Mini-Album using Die-Cuts


 Here is a little project I did this morning - early - really early, lol!  Mysterious how the mind works when you need it to! :)

I got this idea because another company Quickutz released its SugarPlum series of die-cuts, which are essentially components for making a mini-album.  However, I thought we have the 'TOPNOTE' die-cut - a very versatile die-cut used in many a project; and one can merely use chipboard to make square or rectangular pages!  Use a Crop-A-Dile or similiar tool to make holes to add a method of attaching page after page - and voila!

So I began by making rectangular chipboard cover and pages, and proceeded to ink the edge with red ink, and then choose from my co-ordinating holiday papers to decorate the Covers and each page.  To make the spine, I used the TOPNOTE die with my BIG-SHOT die-cutting machine.

I created my holes and used some beautiful grommets on the front of the spine, and saved some money by using plain white eyelets on the back cover. Without any nice rings in the house at the moment, I chose to use ribbon to tie the piece together. 

I decorated the cover by adding embossed design, and a smaller piece of clear sheet to which I affixed a small bird and flower.

I don't know yet what I will put inside - but I really liked how this came out!  Hope you try it too!

Add as many pages as you want to this mini-album - by using grommets or brads with center holes, or rings..you can take it apart to add or even remove a page.

Template by: