Showing posts with label BRIDAL. Show all posts

1 April 2010

Stampin' Up! and Country Living Magazine " Cards à la Carte" and Projects

Cards a la Carte is one of our special promotions with COUNTRY LIVING Magazine, and like last year features a set that you can use for entertaining.  This year's is very pretty stationary set - elegantly sweet!


This exclusive kit (item 119113) includes the following products:

  • Dinner Party stamp set (set of 3)
  • Ballet Blue Classic Stampin' Spot
  • Preprinted stationery (24 sheets: 4 each of 6 designs)


Here is the collection and a couple of projects that you can do with it.


Project #1 is a Dinner Invitation

Stamps
Dinner Party stamp set*
Paper
Very Vanilla card stock
Very Vanilla envelope*
Ink
Ballet Blue Stampin' Spot*
Accessories
Stampin' Dimensionals


Instructions:


1. Print "You're invited" on Very Vanilla card stock and adhere to strip of Very Vanilla card stock. Wrap strip around So Saffron printed card from Country Living Cards à la Carte.

2. Stamp silverware image in Ballet Blue ink on Very Vanilla card stock. Cut out, distress one edge, then adhere to card stock strip using Stampin' Dimensionals.

3. Stamp silverware image in Ballet Blue ink on envelope flap.


Project #2   Mr. & Mrs. Card Collection


Stamps
Dinner Party stamp set*
Tiny  Tags stamp set**


Paper
Very Vanilla card stock
Very Vanilla envelope*


Ink
Ballet Blue Stampin' Spot*


Accessories
Linen thread
Very Vanilla 5/8" satin ribbon**
Stampin' Dimensionals
Medium Jewelry Tag punch**
1/16" Circle punch
1-3/4" Circle punch


Instructions:


1. Wrap Very Vanilla 5/8" satin ribbon around stack of Very Vanilla envelopes and printed cards from Country Living Cards à la Carte.


2. Stamp pitcher image in Ballet Blue ink on Very Vanilla card stock. Stamp flourish image in Ballet Blue ink in middle of pitcher. Punch out image using 1-3/4" Circle punch. Punch circle at top using 1/16" Circle punch. 

3. Stamp "Mr. & Mrs." in Ballet Blue ink on Very Vanilla card stock. Punch out using Medium Jewelry Tag punch. Punch hole in top of tag using 1/16" Circle punch. 


4. Thread linen thread through both Very Vanilla circle and tag. Tie around ribbon. Adhere tag to circle using Stampin' Dimensionals.


5. Stamp pitcher image in Ballet Blue ink on front of Very Vanilla envelope. Stamp flourish image in Ballet Blue ink on front of pitcher.

****

Cards  à la Carte  Stationary Kit Promotion - till April 30th, 2010. * Or till supplies last.


15 November 2009

What a delish Centerpiece - and it's Favour Boxes too!


Isn't this darling?  Its a stack of favour boxes - combined to look like a cake!  How sweet!

The pattern is the thing here.  You could make this over the course of an evening or two, but it would be easier with some helping hands!  Mom, grandmom, sis, heck even brother (why not!) could help you put this together - what is the old saying..."many hands make light work". 

If you come to my Bridal 101 classes - I will discuss the pros and cons of making your own projects. Just so you know where you should approach the DIY idea.....take it from someone who makes a whole lotta crafts - me!  I will mainly be talking about invitations in class 101.  However I will be adding Bridal Classes through-out next year where we will touch on different projects......this definitly could be one of them!

Contact Me - for information pertaining to Bridal Classes, or regular Craft Classes.

25 October 2009

DIY Bridal 101 Creating your own Invitations & Wedding Projects with Stampin' Up!


Thank You for all the interest shown at my table display as part of the Scarborough, Welcome Wagon Bridal Showcase today.                                                                                                                                                                                                                                                                                                                                                                                                                                                                                                                              
I really enjoyed meeting everyone of the brides-to-be and their guests, it was really lovely. 
Our purpose in participating in this event was to demonstrate the Do-It-Yourself Approach in hand-making  your INVITATIONS as well as many other items to create a very personal look to your wedding.   


The most common reaction at our table today was surprise when it was learned that everything on display was hand-made!  So many surprised faces!  I hope we managed to convey our message that with some basic preparation, ANYONE can whip up invitation sets, and learn some new ways to look at how you can enjoy making all types of projects to help you plan your events - think favours, guest books, decorations, .....if we can think it, we can make it! 


It basically comes down to two decisions.....you have money or you have time! And personally, I like to stretch my money to work for me in as many ways as possible....so I make the time! 

As a typical  Do-It -Yourself person...and listen to this - I hand-made all the projects you saw there today - just this past week!  In  less time really as shopping for other items to be used (fabric, beads, etc.) took some time. If I can do creative projects in a matter of days - just think what YOU could accomplish in a month or more!

Not only that - but it can be a fun event - grab some friends, we can coach them to using the supplies and with some SIMPLE organization, you can have a party and everyone has fun making YOUR INVITATIONS!
DO NOT WORRY THAT YOU ARE NOT CREATIVE- as I am an Stampin' Up! Creative Coach. AND the STAMPIN' UP CATALOGUE has all the supplies you could possibly want - you can order through me or purchase online!  I have classes each month and have designed a special bridal class which I will hold periodically.  See details below. It's all made easy to do!  

DIY BRIDAL 101 CLASS
Contact me to sign up for classes.  
November 21, Sat. 2 PM   
January 17, 2 PM


Attend this class to help you learn the 'basics' to DIY wedding projects.  We will discuss the materials you'll need  beginning with your choice of cardstock and envelopes and whether choose to print your invitations on the printer. Then we'll discuss expanding on the basics - where you design your invitations with some flair!  


Again - You don't need to be especially creative - Stampin' Up! has taken care of that for you!  It is VERY COST-EFFECTIVE!!!


Learn what to look for, what not to do!   Learn the practical from the exquisite! You'll decide based on your budget just how simple to how involved you'll want to be. Save in one area so you can spend in another!

Then delve into the fun and create with two different techniques leaving you with two beautiful samples to take home .


I'll post more pics later!

  I look forward to seeing the nice people again who expressed an interest today   and there is no time like the present to come and try out a project - just see what you can do!

**** PLEASE NOTE - IF YOU ATTENDED the WELCOME WAGON BRIDAL SHOWCASE and if YOU SIGNED up for my NEWSLETTER - I will draw from the list of names and ONE LUCKY WINNER will WIN this CLASS FREE!
Also, every person who dropped by my table, and would like to come to the class - you will receive $5.00 off the price of the class!!!  Let me know when you sign up for the classes which applies to you!  Thanks!

Cheers,
Beverly

22 October 2009

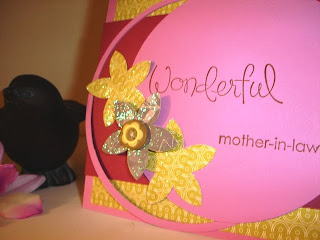
Think of Mother-In-Laws!

While doing my bridal line-up for the upcoming show, as you know by now, I was finishing up a set of inivitation designs and turned to thinking of Thank You cards - for when the newlyweds, have returned and must tend to thanking their generous friends and family for all the great gifts.

Now granted, I was looking down at the stamp set, WONDERFUL FAVORITES, and seeing all the words I could match up with "Wonderful"....21, in fact. Words such as cousin, nephew or combos like 'to a' or 'in-law'....and that's when I thought, "wouldn't a newly-wed bride like to thank her Mother-In-Law with her own special card?  I mean, we can always find "Mother" cards just like we do when we want "Father, Daughter or Son, Aunt." etc. But "Mother-In-Law"?....well, not so often.  So that decided that and this is what I dreamed up.

I turned to my Circle Scissors Plus and made a matching ring to go with the circle. I didn't really have a size of circle in mind, but that's the beauty of the Scissors Plus because I stamped the words Mother-in-law, and then positioned the paper under the Scissors Plus and gauged my circle size 'insito' !  The ring just adds another accent. 

Next, I chose some patterned paper in green because I think greens and pink-to-purple tones always look nice together.  Two minutes of hard thinking for the embellishments....okay, maybe five mins. - you got me! (wink) .....ah yes, the 5 Petal Flower Punch to the rescue! So punch...punch...punch....glitter, glitter, glitter...and the hardest part, sewing a button on.  Well, a little bit of drudgery for such a nice effect - and there it is! 


In my haste tonight, I forgot to take the picture of the inside which says Thank You and room for the bride to write a nice note to her new mother-in-law....oh I don't know, what would you write?

23 April 2009

Wedding Card


My daughter had a really nice time at her uncle's wedding. And here is the card she made them. She wanted to use colours that were part of the bride's wedding theme, lavender and yellow. Then using the stamp from the KINDRED SPIRIT set, she sprinkled the large branch with tiny hearts and set the 2 lovebirds on the main branch - all snuggled lovingly together. I lined the inside of the envelope for her because I always think that is a nice touch. I'm sure some of you now recognize the bird die-cuts as being from Birds with Leaves and Flowers., a Big Shot exclusive. I am totally finding this to be a great die to have!


I am sure she will find that the happy couple are in LOVE with her heartfelt card!

1 November 2008

Wedding Mini-Album with SU! Kindred Spirits Stamp Set


Here is an example of a mini-album I made to commemorate my friend Wendy's wedding this season.
Supplies:
On a blank mini-album purchased I used the beautiful stamp from my SU! Kindred Spirits Stamp Set. I used the Old Olive and River Rock Ink Pads. Soft clean, rag. Blank tags. Embellishments: red heart, gold corner peel-ons.
Technique:
1) First I prepared the pages by smoothing on some ink around the page edges with a soft, clean rag. You can add more ink as you desire. I also tapped the edges with the ink pad itself.
2) I stamped the botanical images onto the album and tags.
3) Using another flourish stamp, I added some detail.

By adding the stamped images throughout the mini-album, this provides the continuity the album needs but still allows the bride to add her own decorative touches and photos. I included some stamped, co-ordinating tags for her to use in the manner she would like - again, giving her options and control as well.

In the end, the my friend has a valuable resource for after her wedding, and its something personal that we both have contributed to!

Note: available in the Silhouette Collection as shown in the Fall-Winter Idea Catalog, 2008 SU!


ANOTHER PROJECT - SAME STAMP SET.
Student Notebook and Pencil Set.
Here I have made a booklet and matching pencil set for a student. They loved it....and its easy to do.
For the pencil: measure a length of decorative paper to match the length of the pencil from below the brass collar to end. Wrap the paper around the pencil to get a good fit, then apply a thin line of glue down the side of one edge - position that on the pencil, wrap it and apply another thin line of glue to the last side and hold down till its attached {I often use tacky glue for its quick-setting time}. Decorate it with a bit of ribbon at the top and - voila!

I also as a last thought, made some stamped images they can use to decorate inside or anywhere - just like a sticker. Giving people the ability to add their own touch - to be 'interactive' with the thoughtful gifts you give is a real fun booster!

By wrapping both notebook, and pencil together it looks just so polished and they will really feel special!


Template by: