Showing posts with label Techniques. Show all posts

30 January 2012

DIY Stamped Backgrounds for your Scrapbook Pages - Part 1

 * Crafters!  


Here's an idea I'd like to share today - and its for anyone in to scrapbooking or cardmaking or home decor projects - even fabric projects!  Simply apply the techniques to your project adapting them for your particular surface!  OK!!! 


* I have some white and vanilla 12x12 cardstock in my collection as many of us do - and every so often  I like to make a scrapbook page right from scratch - not a purchased "patterned paper' such as Stampin' Up!'s Designer Series Paper but something TOTALLY and UNIQUELY MINE!  


To do this I:  
STAMP my OWN BACKGROUND DESIGN 
onto the 12 inch cardstock. Voila!!!  


You are only limited by your own imagination, you can apply many, many techniques for this using rubberstamps, colouring techniques such as rag-rolling, spritzing or sponging ink, or even resist techniques {try scribbling a wax crayon onto the cardstock then sponging colour overtop}.  Basically the techniques we use to make most of our projects. This is just on a larger scale. 


To to get you thinking today...  
I have chosen TWO TECHNIQUES for this demo - 


  1.  using rubberstamps  and 
  2.  using a stencil.  


RUBBERSTAMPING A BACKGROUND DESIGN 
- Using a Pencil Grid 

Stamping backgrounds can be relatively easy when you take your largest stamp and stamp in no particular pattern followed by smaller stamps filling in the gaps.  The results are pleasing. 

However, some very refined designs can be created if you take the preliminary step of creating a pencil grid using lightly drawn lines which are easily erased afterwards. 

I created my grid with North-South/East-West and diagonal lines - in equal distances. I am careful to create straight lines and watch to see that the intersections cross properly.


Creating a grid of pencil lines across a 12x12 cardstock page. 

MAKING DECISIONS.
There is preparation but its not long - I did this in a few minutes by looking over my stamp sets and just experimenting! This IS fun remember? 
OK, I chose my stamps ahead of time - thinking about the type of look I am going for - ex) floral or fun characters?  You also need to consider the SIZE of the image.  A small stamped image or a large one?  Should the pattern be everywhere or widely spaced apart? 

 I have decided to create one large GRAPHIC IMAGE by combing several stamps - which share  the same style - but different styles would produce some interesting looks in my opinion. 
Today I decide to create the design using 3 stamps - it only looks like 4 
but I stamped the flower twice[ AND by flipping it's direction]! 
My choices are a leaf - a flower and a heart.

Orientation of the stamps is another decision - here is where the grid is handy: to group my stamped images together. I began by stamping the larger LEAF FLOURISH on a straight North-South pencil line, and then stamped the FLOWER on either side (a East -West direction) and slightly below and finished beneath the flowers with a HEART once again back on center!  
So 1step - 2step -3step - 4! 
Hey we're dancing!!!


CLICK ON PICTURES!

Sorry image is on its side - will fix!  LOL!  See image below!  


Once I have made my mine up as to how I want the 'design' to look - all I have to do is repeat it around the rest of the page!  


HERE IS THE PATTERN EMERGING!  


* STENCILING A BACKGROUND DESIGN

This is important to note - Stampin' Up! Customers!
SU has regrettably decided it will no longer carry our DECOR ACCENTS line of products when the new 2012-2013 catalogue is launched.   So if you are like me, and value having a stencil or two in your arsenal - then please have another look at the fabulous line of stencils we currently carry. 
I will be most pleased to help you - email me. 

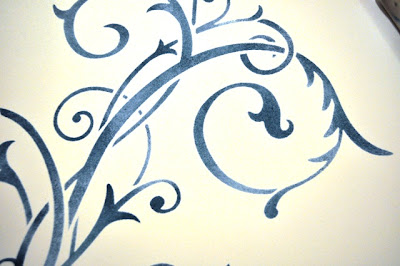
To stencil a background there is not much to consider other than the stencil choice and how much of it will you stencil onto your page.  Partial images look nice off to one side - or maybe in each corner like a 'frame'.  I have one stencil here that is large and so I have chosen it to be my background. Its a lovely flourish style.  AND I will be using it for the first time - yah!

I have gone with a deeper blue this time for my ink choice - BUT - {there's always a but}...using a sponge as my weapon of choice to deliver the ink to the paper {rather than say a brayer!}....I realize I maybe stumping my sponge all night!  Its such a large design - but I carry on.  Thankfully, to sponge the ink on in a un-even fashion is more appealling than applying an even coat of ink throughout the stencil.  I decide to apply more ink towards "ends" such as the flower heads, and the tips of leaves and flourishes. 

Just keep the stencil down and stump your sponge in a direct up and down motion.  In a design like this, also be careful not to bend the stencil by accident in areas where the laser-cut design ends or is narrow - you can wash off the ink easily if you use water-soluable ink like our CLASSIC INKS. 
I am using one of our new colours " Island Indigo ".
Isn't it pretty?*


Sponging a Stencil using Stampin' Up!'s Classic Ink in Island Indigo! 


AND THE PROOF IS IN THE PUDDING - LOOK AT MY FINGERS!!!  :)


COME BACK TO SEE PART 2 TO SEE WHAT MORE I DO TOWARDS THE FINISHED PROJECTS in PART 3 !!!   

Meanwhile GET STARTED ON YOUR PROJECT!  

SEE YA!  

STAMPIN' UP STENCILS 
2 Stencil Products - Many More Designs, Assorted Sizes
MOSTLY VINTAGE STENCIL 118877 $10.85

FLOURISH DECOR STENCIL  117581 $11.95


12 February 2011

Valentine Card - doesn't have to be PiNk!

No, no, no....it doesn't!

It's all about your own style - and here is one I made while experimenting with a technique.

I wanted to a) emboss and b) colour with embossed surfaces.

So I chose to:
1) ink my VERY VANILLA cardstock with all sorts of ink colours using SPONGES.
2)then I EMBOSSED my coloured and cut 4-1/4x5 inch rectangle cardstock using an EMBOSSING FOLDER where I sandwiched the cardstock and pressed it through my BIG SHOT DIE-CUTTING and EMBOSSING MACHINE.
3) now I used a separate sponge to ink over the entire piece with BLACK ink - quickly and lightly!  This colours the "raised surface" created by the embossing folder.  To get a more precise ink effect, I could of used my brayer tool.

Now, I punched out a black HEART with my Heart PUNCH, and a blue circle with my 1 inch CIRCLE punch and attached them with a black flower BRAD.


19 January 2011

Valentines Heart Punch Card and Busy Patterns Technique

Helloooo.....been such a long time between posts as I am in the throes of "re-organizing"!   Gosh where does all the stuff that clutters every spot come from? Anyways - I think its a good idea to use January as 'the' month to de-clutter esp. here in the wintery North.  Not much fun outside anyways, right?

But there is fun in our craft corners - and I tried a little technique with this card, so I'm here to share!

 I received a card in the summer which embodied a colourful personality - and it really made me feel great, all sun-shiny and happy!

Upon close inspection, the card involved no less than 3 patterns of cardstock. Very busy and different patterns!  Layered together as a "strip" or band against a soothing backdrop of a solid colour. The focal point - a 3D flower sat on top, slightly off-center. And all made sense together! WONDERFUL!

So: busy patterns layered together, soothing backdrop and a dimensional focal point! Voila!

Now I tried it, here it is - my Valentine's Card for a friend ( can't say who cuz they haven't received it yet!)


Colourful Patterned Band
As you can see, I made my strip from 3 patterns!  I chose the patterns from a co-ordinating collection, but as long as they share something in common in colours, you should be good!  

Combining Patterns is easy if you follow a few guidelines:
      - try 3 similar patterns - for example, all florals or all dots; 
      - or a 'combo' of one or two similar motifs (ex: flowers) with a graphic element (i.e. plaid); 
      - vary the sizes (tiny print, medium print and large print),

....I used a large plaid, with 2 floral motifs [ one a small print and the other a mostly larger print].  But they all shared  similar colours!  

Soothing Backdrop
My background is a soft pink framed with a bit of vanilla - and I have added texture {Stampin' Up's Elegant Bouquet Embossing Folder] by running the cardstock through my Big Shot - but over-all, its pretty much a large dose of a soothing backdrop to support the busier elements in front. 

Focal Point
I punched out 3 hearts in a glittered cardstock - and embellished them with buttons.  I love adding buttons - for such a small investment, they add a lot of 'punch' - lol! 


One problem emerged - my card was 'front heavy' and in danger of falling forward on its face!  To counter-balance this, I added a layer of cardstock to the back as well, and an embellishment. This weighed the problem out, as you can see here....

back of card

So there you have it - I think it turned out swell and the reaction from my daughter was great when she saw it! Unfortunately the picture doesn't do justice to the lovely colours - but I believed I achieved that zipitty-do-dah look I was after!   

TRY IT YOURSELF - its great to use up lovely bits of left-over cardstock! 

Thanks for swinging by!

STAMPIN' UP! SUPPLIES -  Heart Punch, cardstock in 'Pretty in Pink', Textured Embossing Folder 'Elegant Bouquet', 'Rose Red' Classic Ink Pad & Marker, sponge. 


28 November 2010

Birdcage and Bird Holiday Cards

I created a Holiday 'WOW' Card Swap on Love is in the Details forum, and so here is what I considered to be my 'WOW' style!  I love birds and the bird cage is the icing on the cake!

I also just purchased a new wheel stamp which creates Music Notes - and I have been just dyin' to get something like that, so I used it to create the crimped paper along the bottom.

Here they are all together!  I have to make another for myself -  I always keep a sample one so I can include it with the cards I will receive from the others in the swap.  Don't they look pretty together?


Here is the crimped paper 'ribbon' I created using our new Music Notes wheel - I squished the ends up into a partial 'fan' at one end and embellished with a snowflake, and the other end was cropped with our Scallop Border Trim punch.   

I will come back [dead tired today from yesterday's craft fair!]...and provide more details on making this card ! :)   Now I am off soon to take my dog to have his Santa picture at the mall - they allow dogs and I guess pets, to come after the mall hours tonight - last chance, so I better go groom him a bit!

Bye!

14 May 2010

Reverse Spotlighting Technique


REVERSE SPOTLIGHTING
A DIFFERENT WAY TO MAKE THINGS 'POP'!


You NEED:  
 circle punch (ex 1-1/2 ") 
Ink and stamp of choice (larger scale stamp design)....
White [3-3/4 x 5] in. cardstock
 1 Colour  cardstock scrap....
1 Colour cardstock card base [8-1/2 x 5-1/2 in.]


Basic Instructions ....

CREATE THE FRONT CARD FACE by stamping a sheet of white cardstock  [ 3-3/4 x 5 in] with black ink using a nice fluffy floral design.  Like the flower they have shown here. 

Then - with the circle punch, PUNCH a few holes into some of the flowers, leaving some of the flower design intact. 

Stamp the same design onto the scrap colour cardstock, and cut flowers out. These are lined up and MOUNTED BEHIND the flowers in the punched out circular areas - which restores the full design of the flower!!! There will still be a gap from the punched out circle, but wait......

Trim the card front layer, to clean, straight edges. 

Now mount the finished piece onto the third colour of the card base { folded 8-1/2 x 5-1/2 in.], embellish if you wish with a greeting or other accent!  

Pretty nifty!  

CLICK on picture, and then on MAGNIFYING ICON to Enlarge Photo. 


Idea submitted on Stampin' Up! Cruise 2002 by M. Hallen! ")


27 March 2010

Lovely ORNAMENT PUNCH 'ROSE' in a TEACUP - Advanced Technique

Look at this great idea. Our ORNAMENT PUNCH has been featured by many talented crafters as a means to make a ROSE FLOWER!
How neat is that!

Sooooo...I have been on a creative roll lately, plus I wanted to make something special for a friend of mine, Caroline. And I wanted to have a good challenge.

Now there are several ways to use this punch as a flower - many of which are a lot simplier than what I have done.  But if you've been a crafter for awhile, you should challenge yourself especially if you give classes - you can't expect it from others if you don't do it yourself!

It took me awhile - the petals were the most challenging. I was working 'blind' - no template, no instructions...and so each petal was a small engineering job in itself. Do I roll the petal this way or fold it that way? Should I tilt it this time or lay it straight...and so on.  To make matters interesting - I chose to make another at the same time, using crushed paper {I took a paper and squashed it over and over, then inked the creases with a sponge to distress it ....continue till the paper is 'pliable'}.  It was easy because while one flower was waiting for some glue to dry, I worked on the other one.

Before the night was done, I was finished both. However, for my gift flower, I moved on to the next part, placing it in such a way as to make a nice presentation. And in the end, the teacup flower was born!

Well - its done, and I believe she really liked it!

 I am totally going to make more of them. :)


Stampin' Up! Supplies:
Punch - Ornament (NEW from Christmas Mini Catalogue), Trio Flower (mini pink flower)
Equipment - The Big Shot
Dies - Scalloped Heart of Hearts Embosslit Die (NEW from Occasions Mini Catalogue),
Bigz Beautiful Butterflies Die, Scallop Circle Die (green collar), Bird with Leaves and Flower (stem),  

Cardstock - Bridal Specialty Paper {white}, various Good Neighbour Patterns, Melon Mambo, Whisper White, Pretty in Pink (for flower in background)
Stamp - Well Scripted (Occasions Mini catalogue) 
Ink - Melon Mambo
Other - tiny gems, ceramic teacup votive candle holder.


- LEARN CRAFT IDEAS LIKE THIS ...COME TO CLASS! - 

16 January 2010

Cute and Crafty in Fabric - Spotlighting Talent in cyberspace and Tutorial to Alter Jam Jar


 I love it when I find the darling-est things and you have to admit even if you are a non-crafty person or even, dare I say it - a minimalist in the purest sense - that these are "cutesy" period.

So check out the talent I found today while surfing....you can learn how to make these 'bottlecap pincushions' at the blog of How About Orange... and also at Craft Pudding

And then, Hawaii is one of the best places I dream of moving to (seriously I do!)....and so one of their delightful talented crafters is here at Willy Nilly Waterlily and I just love, love her
" Bashful Blooming Cactus "  - wish I could post a pix of them but you can see on her blog - the trio of them on her banner.

MY TUTORIAL TO DECORATE A JAM JAR {decorate the lid!}

In my modest manner, I have used some fabric and a Big Shot Sizzlit Die of a flower to decorate the lid of a tiny jam jar - perfect for sorting and storing my buttons.


Begin with bare jar and Here is how I altered it:

a) cut a circle of fabric slightly larger than the lid and a circle of paper  the exact diameter of the top of the lid.

 b)cut a length of ribbon to wrap around the side of the lid - baste a row of thread to pull on and draw the ribbon edges snug around the lid...use some adhesive in spots before tying a knot in your threads to secure in place.


c) next wrap the fabric circle over the paper circle, baste the edges of the fabric circle like the step above for the ribbon, and snug the two together, secure and glue to the top of the lid - hiding the edges of the ribbon.


d) to decorate the top- I used my Big Shot and a small die from my Birds & Blooms Sizzlits 4-Pack- I chose the larger single flower in  co-ordinating orange paper (use pumpkin pie, or only orange or dusty durango)
e) finally, I secured the paper flower with a smaller fabric flower and a flower brad. [see top photo]....and displayed it on my shelf!  I plan to do this to more of these tiny jars - neat way to recycle.


Well...off to surf some more! Cheers!


22 November 2009

Using Ribbons on your Projects

Another approach to making your projects, is to add embellishments such as ribbon.

Here again, when starting out, buy 1 roll at a time. More of course, if you can, but at least with one - it brings on another 'dimension' to your project - texture.

Here are some examples:

Cards Made Using One Dominant Colour

You don't need to have a whole assortment of ink or paper to get started making cards.  I always advise people starting out not to worry, but to collect ink and paper a step at a time. Starting out myself,I typically bought 2 colours at a time. Then on my next purchase, I added another 2 - that would go nicely with my first two.  All of a sudden, my options went from two combinations to eleven!  By the time I added 2 more colours - well, you see!

Here are a couple of cards which demonstrate the monochromatic look of a single dominant colour.  I happen to like this approach and here we see the colours of green and blue.

First set shown is the popular and recurring stamp set,  Winter Post , (skaters ) shown with the Medallion XL stamp in the background. I really love this green and white ribbon too - I am definitley going to buy some!

 Then the lovely Serene Snowflakes   stamp set accented with half-back pearls (Pretties Kit) and Whisper White ribbon.

5 August 2009

President Aquino - Dedication Card for a Inspiring Woman


Corazon Aquino (Jan 25,1933 - Aug 1, 2009)

I always feel particularly touched when a greatly known and courageous woman passes on, and its no different now.

Sadly, the world is grieving with the Phillipines as they have lost a wonderful woman - their former and 11th President and Asia's first woman president. I made a card in her honour and reading how yellow was her favourite colour and that the streets rained yellow confetti as her countrymen paid tribute to her, I therefore chose yellow as my starting point - discreetly - along with flowers.

I opened up one of my latest accessories, Stampin' Up!'s Textured Impressions embossing folder called Elegant Bouquet (see above photo). It works so easily - just like pressing butter! I used artist brushes and pastel chalks to colour the raised design on vanilla cardstock.

The ribbon slider I stamped the crown on to was a hand-made number I created using corner scissors. Tip: pencil guide lines on the back to help you line up the scissors for cutting.

I was lucky to find a green strip of ribbon given to me - with a flower on it resembling the flowers in the embossing. Its lovely also because it glitters - and I love glitter.

I think it would have pleased former President Aquino that I chose to be different by juxtaposing layers on different levels from one another. Its quirky but considering how her path was anything but straight in life, I feel its a reflection of that.

Restoring democracy to a unstable country; a "Woman of the Year' recipient (1986) ; and a member of the Council of Women World Leaders among other things must have been exciting beyond words but she also loved to paint ! And gave them as gifts to friends! A kindred spirit of the creative realm!!! And as the sentiment says: "Queen of hearts".....

Rest in Peace.


Stampin' Up! Supplies: Textured Impressions Elegant Bouquet folder; Crushed Curry & So Saffron cardstock, Razzle Dazzle Designer Series 12 in.paper; Stampin' Pastels (chalks) and Crushed Curry ink stamp pad and marker.

Other Supplies: crown/sentiment stamp, green ribbon, gold glitter glue.


24 June 2009

Beautiful Shaving Foam Tags!


I really am having a great deal of fun with shaving foam - almost cracked a rib laughing when I told a friend I bumped into that I was giving a class on shaving foam and she sort of paused and said "what kinda of class ARE you giving that involves shaving foam!?" ....and that's when I realized for the first time how it sounds when you say it that way - - and I was "NO! not like what you're thinking! Or whatever you're thinking!! ha ha!" {she's a nurse - so } - -well, anyways we both had a good laugh.


But here is some of my first results with it - I've made some lovely tags! See the background is the paper that has been marble-ized with the shaving foam and inks? Then I used some Stampin' Up Big Shot Dies {one has a flower which was cut in paper and tissue}, and some cut out pieces from various stamps to make 'chic' tags!
It's pleasant to sit and craft with bits and bobs - like decorating a safety pin with beads {pull it apart, bead it, re-shape it } and I carefully sewed on the buttons and wound the thread nicely - nothing too difficult.
So la te dah! You may come and try your hand at this fun technique - last class this month is June 27th.

9 June 2009

Another Cookie Cutter Card - Feminine


A counter-point to my masculine card, using a flower cookie cutter this time. Much simplier design too!
Same idea, trace and cut-out shape of cookie cutter, and use to embellish a card.
I also added a die-cut from my Big Shot - using Stampin' Up! "SPARKLE" die -
Best thing is for only a mere $5.95 for the die and you can make hundreds if you want - millions! 'K, maybe not millions but you get the idea. Its what I always tell people about the die-cutting machines - I used to buy die-cut shapes for practically the price of a die, and you'd get 5 or 6 and then your money is gone. But a die-cutting machine allows you to make your own dies to your heart's content - and eventually the intial cost is paid for, and its FUN too!

Masculine Card - using Cookie Cutter!


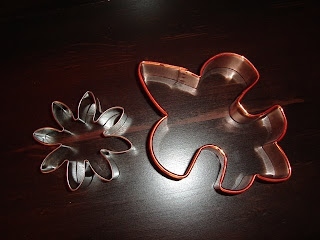
I have done this once before where I traced a copper cookie cutter I own, a fleur-de-lis design, and used it as a template for a card!

But this time around, I went with darker tones and a medieval theme. And I went 'big' using a full sheet of 8.5 x 11 - because someone I know {you know who you are! :)} is always after me to show them a 'BIG' card - so here it is!
Need: a cookie cutter of choice
stamp to co-ordinate with cookie cutter
ink & cardstock 8.5x11 in 2 colours of choice
wheel - Illuminations
ruler - to measure out diamond shapes, arch
How to: on one colour 8.5x11 cardstock {ie. black}, fold in half lengthwise and.....
a) begin by tracing out cookie cutter on 2nd colour cardstock to make a cookie cutter shape,
-cut outline of cookie cutter shape with scissors, ink edges for distressed look, and decorate with your stamp using the 'stamping off' technique to get the lighter 'background' images, set aside,
-take your main stamp {i.e. fleur-de-lis stamp}, stamp 3x onto a scrap of the same cardstock , cut each image out, set them aside,
-glue your cut-out stamped images on {I chose to glue mine inside a border I inked on with a 'line' stamp - but you can also create a border by using tape.} and/or use glue dots to attach them,
b) meanwhile, make a border using same cardstock as cookie cutter ,
-decorate your border and distress edge with slightly darker coloured ink {use a co-ordinating colour as cardstock or a greyish colour}, {use ruler to make diamond shapes, cut out}
add brads to border,
-glue border near bottom third of card
c)glue down cookie cutter cut-out shape
d) using an 'arch' shape mask {cut out large arch shape with scrap cardstock and tape or hold down over cookie cutter cut-out and some bordering area} and ink on a design to top corners with a large stamp, or wheel stamp {Illuminations wheel, Stampin' Up!}...also 'chalk' on an arch shape using ink along edges of arch mask and can decorate bottom edge with same wheel design.
Take your time - its not very hard, just a bit time consuming. Use with any cookie cutter too.
Note - all supplies by Stampin' Up! [black cardstock, green galore cardstock, black ink, silver brads, retired fleur-de-lis stamp, Illuminations stamp wheel]
The Illuminations Wheel is due to retire - so here's a chance to order one if you'd like!
Colors- cardstock, black, green galore......stamps - fleur-de-lis, Illuminations wheel....inks-white craft, black classic.....accessories-silver brads, .........all supplies Stampin' Up! Cookie cutter from personal baking collection.

Template by: