30 November 2009

Polar Bear Stargazing Snowglobe Card


I love the Cold & Cuddly Stamp set - its one of those unusual sets and is packed with little goodies!

I also fell in love with the idea of making a snowglobe card shape - and this set presented me with the perfect opportunity! 

Making a Set of Cards
Needing 11 cards for a swap, I chose this stamp set and went to work!  It's not hard to make a set of cards once you design the first one. After the designing stage, I merely set up an assembly line so-to-speak. I stamped all the polar bears, and all the ice floats onto cardstock.  Then here's the fun part - I put the stamped sheets in a plastic folder and took them with me in my tote. I stop off every morning for a coffee at Tim Ho's usually, and there I whip them out and cut them apart whilst I sip on a cup of java....you need to find a way to make things go smoothly I always say! 

OK - next stage, I made a template of the snow globe out of thin cardboard and traced it twice. Once the entire piece on to Bashful Blue cardstock; and then again partially onto pre-cut squares of Brilliant Blue cardstock. I took my sweet time cutting them - one or two at a time when I had a chance. If you're in a hurry - don't do shapes such as these mind you...stick to rectangles, etc. Or be like me, and start making these 1 week in advance - I'm just sayin'! LOL!

Before assembling the cards, I needed to do the backdrop to create a sense of his environment....I used our white gel pen, and made a line to separate sea from sky. Then switching to a rag, I dragged some white ink (cover the card above with paper) to imitate ici-ness of the North Sea.  I also did the same with a little darker blue ink so there was all the tones from light to dark.  Now I'm ready to add the ice flo and the bear.  I knew he was going to be staring up at the stars, so I set him on the ice flo as such. Glued everything in place.

To add sparkle, I used a VersaMark Pen and traced some lines where I thought it should sparkle and quickly sprinkled on glittery embossing powder, heated it till set.  I stamped the large star (really a snowflake stamp) and did the same.

Now almost done, I added the 'stars' and for these you make like small blots - mix it up between small blots and larger ones, group some, etc. Just like a clear blue evening full of stars!  I even threw in some streaking meteors by dragging the gel pen - just a little. Perhaps that is what has the bear's rapt attention!

I decided to stamp my greeting on the base of the 'snowglobe'.....and this swirly greeting does the trick, although any would do. If I had any of the fake snow, I might of added that too!

Oh - here's a serendipitous tidbit - last spring, while experimenting around, I "speckled" a 12x12 sheet of paper by flicking Bashful Blue refill ink from a toothbrush randomly over it. But then I didn't know what to do with it - so I just stashed it.  All of sudden, it occured to me that it would make a perfect background for an ice flo...pretty neat, huh!

Well - they are done and are in the hands of their new owners via our swap - I hope they are enjoyed, I kinda think they will be! :)

26 November 2009

Last Pic of Mystery Stamp Set - #4 Guess What Stampin' Up! Stamp This Is?

Update - sad to say, no one entered for the prize - therefore, no one to give to! 


Here is the last one of the game!

If you see the previous 3 entries (can look under Prize under Labels)....and guess what holiday stamp or stamp set the bitty picture is hinting at, then the first person to correctly guess and notify me with their answer is the winner!  You will win a free class on Dec 6 or 8th (same class)....so you must be able to attend the class in order to play. Them's the rules!

In this pic slice, I am only interested in knowing which of the stamps did the design in the background, not the greeting itself...unless you want to tell me both!

Gooooooooo-d Luck!


Winner announced Nov 29th!


22 November 2009

JOIN STAMPIN' UP! DIGITAL STARTER KIT SPECIAL!!!

Now is a good time to join Stampin' Up!   Why?   Because you now have our MY DIGITAL STUDIO - our latest addition to Stampin' Up product line INCLUDED in your Starter Kit!

That's fabulous!  

For a mere $234, you receive this new product which alone retails at just over $100, and your whole Starter Kit is a great deal because its actually worth over $385.  Not so shabby! 
This kit allows you to do "hybrid" projects {conventional paper and digital designs together} and of course, all the 'stand-alone projects' you can dream up!  Its really a great start!


Starter Kit includes:
My Digital Starter software;
Party Hearty and Petal Pizzazz stamp sets
Whisper White card stock (8-1/2" x 11")
Earth Elements assorted card stock (8-1/2" x 11")
Old Olive, Pumpkin Pie, Real Red, and Tempting Turquoise Classic Stampin' Pads
Chocolate Chip, Old Olive, Pumpkin Pie, and Real Red Stampin' Write markers
Chocolate Chip 1/4" grosgrain ribbon
Real Red 1" double-stitched grosgrain ribbon
Button Latte Designer buttons
Stampin' Dimensionals
Mini Glue Dots
SNAIL Adhesive
Business supplies (product catalogues, order forms, training DVD, and other supplies)

[you may substitute stamp sets, inks and papers]

10 GREAT REASONS TO JOIN STAMPIN' UP!

- want to run your own home-based business
- set your time, be your own boss
- have a flexible schedule to accommodate your busy home-life,
- set your own financial goals,
- have access to discounts,
- be the first to receive pre-orders, catalogues, other items not available to the public,
- be part of a larger community of demonstrators,
- be part of my team with my support,
- earn beautiful trips, incentives, bonuses,
- be a creative coach to others - share what you love doing!!!!

ALSO - CONTACT ME TO GET STARTED!   I will be awarding a special bonus to new recruits - more fun stuff!  You will also receive monthly support from me, Team Newsletter, Demonstrator Get-Togethers, Webinars, Technical Training....and so much more!  We swap projects, tips, - and share the glory and the hard times with one another to be a real team, no one is left out on my team! 

CANADIAN DEMONSTRATORS - STAMPIN' UP! IS EVERYWHERE!
YOU CAN LIVE ANYWHERE IN CANADA TO SIGN UP NOW WITH STAMPIN' UP!      ONLINE ARRANGEMENTS CAN BE MADE, OR BY MAIL.

LET'S JOIN FORCES!
BE PART OF A GREAT TEAM & FAMILY

#3 Entry for Mystery Stamp Set Prize - Guess Which Stampin' Up! Stamp Set This Is!


It's getting close to my Holiday Open House on November 29th, 1:30 pm. And on Nov. 28th - I will award a prize of a free class Dec. 6th to one lucky winner. (you must be able to attend this class to win, thank you).


How to win - I posted a slice of a picture featuring a stamp set that can be found in either our Mini-Holiday or regular Idea Catalogue ......See 'SHOP NOW' to take you to catalogues if you do not have one of these catty's.

The person who correctly names all 4 Mystery Stamp Pictures by leaving a comment or emailing me will win. First person!

 Look under Prize in Labels to see the first 2 pictures previously posted. Or scroll downwards.

It's not that hard, so give it a go....AND SO FAR - NOT RECEIVING MANY GUESSES, SO THIS COULD BE AN EASY PRIZE FOR SOMEONE - COME'ON....'FREE' CLASS - SO EASY! LOL
hUGs!

Using Ribbons on your Projects

Another approach to making your projects, is to add embellishments such as ribbon.

Here again, when starting out, buy 1 roll at a time. More of course, if you can, but at least with one - it brings on another 'dimension' to your project - texture.

Here are some examples:

Cards Made Using One Dominant Colour

You don't need to have a whole assortment of ink or paper to get started making cards.  I always advise people starting out not to worry, but to collect ink and paper a step at a time. Starting out myself,I typically bought 2 colours at a time. Then on my next purchase, I added another 2 - that would go nicely with my first two.  All of a sudden, my options went from two combinations to eleven!  By the time I added 2 more colours - well, you see!

Here are a couple of cards which demonstrate the monochromatic look of a single dominant colour.  I happen to like this approach and here we see the colours of green and blue.

First set shown is the popular and recurring stamp set,  Winter Post , (skaters ) shown with the Medallion XL stamp in the background. I really love this green and white ribbon too - I am definitley going to buy some!

 Then the lovely Serene Snowflakes   stamp set accented with half-back pearls (Pretties Kit) and Whisper White ribbon.

19 November 2009

Holiday Party! Sun Nov 29 Come On Over!

NOVEMBER 29th - 1:30 PM, My HOLIDAY PARTY for my customers and friends!  

I am posting today about my H O L I D A Y Par-teeeee!  (OK, my daughter will cringe when she sees that, ha ha)

Every year, I am one of those countless Hostesses myself - but I absolutely love it, so I hope to see as many friendly faces as I can !

Not that I don't love a challenge, but do you cringe just a little when deciding how to decorate for the holidays?  I think we all do!  I am happy that this year I invested in some of our Stampin' Up! holiday line's fabulous items......such as the Christmas Pop-Up Tree!  I just received it yesterday, so I must get cracking and do the learning thing - yes, I have to too!  So when you see me demo it, you'll know I stayed up late one night (with cocoa!)....figuring out the do's & don'ts (there are always don'ts...)....the sound of slicing paper, a few @!zx8u!! when I drop my paper piercer on my toe or get ink smudges - but luckily its more silence than noise as my rapt attention, task at hand  draws me into the 'crafting zone' !  


{shown above in an 'undressed' way - wait till you see it "really" decorated!}


Then - I purchased a Decor Elements piece, Holiday Mix. This is a 8-1/2 x 11 sheet filled with removable and repositionable plastic images and letters which I can use to decorate - how easy!  Just line them up and smooch them on!   Easy-smeeshy!   But not only that - you can use them to etch glass or smooth ceramic or mirrored objects!   As ususal the craft community comes up with these ideas! 


I am working on an ADVENT CALENDAR!   I do one every year - last year I believe we hung little tied up pouches of candy from a birch branch.  I love branches but I'll see if I can think of something else this year....well, with stamps sets and all the lovely bits.....I am enjoying myself immensely crafting.

Now if you can not make it to my party to have some cocoa, chat, do a quick project and just visit...don't fret!  Online - I will make a special day of it too with a project to share .....just wait to see!  I want you to share the fun! :)


TODAY's CRAFT IDEA.....brought to you by "Tree Trimmings" Stamp Set # 116722, see Holidays in our catalogue or online store.

We're all seeing how popular the ornament motif is this year - it's everywhere!  I like them myself so I have no complaints....this set is wonderful, its in our regular catalog.

IF YOU WANT TO PURCHASE ANY PRODUCTS SEEN HERE - CLICK HERE

Here are some of the lovely projects I have found for Tree Trimmings - enjoy!


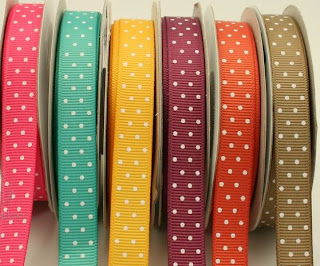
Here is a close-up of the nice 1/2 in. Polka-Dot Grosgrain Ribbon  {Rich Razzleberry, # 115613 from our IN COLORs this year} used on the project above - and the wider 1-1/4 in Striped Grosgrain Ribbon {Old Olive, #115618 } is sooooo gorgeous to have!  It's one of those yummy type products!  I have used it in one of my home decor projects which I will show online after my party!  Still plenty of time to order for yourself if you wish!


Speaking of ribbon, must get back to crafting.....and my lovely daughter is home on this damp day, so must make some soup!

Cheers all!


Images courtesy:Valerie Shreyer; Mary Fish;

18 November 2009

Mailing Dates by Canada Post

Get your Christmas stamps ladies!

Here is the Canada Post 2009  Holiday Season Suggested Mailing Dates 

It's getting there...time to line up your postage stamps!
Last year,  I stopped by the post office early in Nov to ask for stamps, holiday ones please....I was too early!  Fine, then when I came back a couple of weeks later, there was such a line-up at the post office. Finally, when it was my turn - they didn't have any christmas stamps left!

So far, I have repeated this....I was too early but I will skidaddle over tomorrow - no line-ups that I can see yet. 

Anyways....does anyone out there have someone in their lives that sends really, really 'early' cards or presents?  

We used to have a relative that we'd receive her gift - late October, lol!  I know she wanted to have them arrive safe but I used to laugh because as soon as we saw a parcel in October - we just knew who sent it and what it was!  The best part was that the parcels were for my daughter....and right on the parcel, for customs purposes, would be a clear explanation as to what the parcel contained!  Oh my gosh, you know how kids can grab a parcel....that beat you to the door first anyways, and so my daughter would see: "gloves and scarf" before I did.  And if I beat her to it....well, its hard to keep a gift hidden from Oct till Dec 25, ha ha! 

Oh, the memories! :) I'll have to share some more before soon.  Holidays really do - do - funny things!

15 November 2009

What a delish Centerpiece - and it's Favour Boxes too!


Isn't this darling?  Its a stack of favour boxes - combined to look like a cake!  How sweet!

The pattern is the thing here.  You could make this over the course of an evening or two, but it would be easier with some helping hands!  Mom, grandmom, sis, heck even brother (why not!) could help you put this together - what is the old saying..."many hands make light work". 

If you come to my Bridal 101 classes - I will discuss the pros and cons of making your own projects. Just so you know where you should approach the DIY idea.....take it from someone who makes a whole lotta crafts - me!  I will mainly be talking about invitations in class 101.  However I will be adding Bridal Classes through-out next year where we will touch on different projects......this definitly could be one of them!

Contact Me - for information pertaining to Bridal Classes, or regular Craft Classes.

14 November 2009

#2 Entry for Mystery Stamp Set Prize - Guess Which Stampin' Up Set This Is!


It's getting close to my Holiday Open House on November 29th, 1:30 pm.  And on Nov. 28th - I will award a prize of a free class Dec. 6th to one lucky winner. (you must be able to attend this class to win, thank you).

How to win - I posted a slice of a picture featuring a stamp set that can be found in either our Mini-Holiday or regular Idea Catalogue ......click on links if you do not have one of these catty's.

The person who correctly names all 4 by leaving a comment or emailing me will win.  First person!

It's not that hard, so give it a go!

Cheers!

12 November 2009

Need a Cool Gift Bag? Try our Scalloped Circle Bag!


What a charming way to present a small gift. 

The thought really counts as they say and here, it shows. A little time during one part of your day and your effort will be rewarded when the lucky recipient is thrilled with your thoughtful presentation.


This is my way of saving the money to acquire the official version - which can be purchased as an extended XL die for the Big Shot (or similar machine)....so I'm exchanging time for money,lol! 


I will post the photos explaining the process, just after I've taken the dog out!  First things first! :)


10 November 2009

Sock Monkey in his Christmas PJ's!


Well, if you haven't guessed by now, I'll tell you ....Sock Monkey is too gosh, darn, cute!  I love bringing him out from time to time and seeing what else to do with the lil guy!

I have paper pieced his pj's by stamping on a scrap of patterned paper - here in one of our regular Patterns Designer Series (in red..)...found on page 161 of our large catalogue.  Paper Piecing is just stamping and cutting out 'parts' and layering them over your main stamped image for your card or scrapbook, etc.

 I paper pieced his pjamas, his socks, tail, paws.  And his hat was stamped out on separate cardstock, layered with another separate piece for the furry band and pom-pom.  Glitter and a bit of colouring and voila! 

His accessories are many - so I knew I'd find a Santa hat and a present.  You could add more presents around him but I was making this for a craft fair and I thought the greeting I chose to add would help a parent, grandparent or friend to tuck away some money inside. I know my aunt eventually gave money to everyone rather than shop herself, so I hope this card finds its way into some youngster's christmas morning!

Oh Sock Monkey - too cute!

3 November 2009

Christmas Baroque Motifs and Ornament Punch

The Baroque Motifs stamp set is a very, very popular one - very!  And so is our new Delightful Decorations & Ornament Punch featured in our Holiday Mini Cataloque.  So I guess it was only a matter of time before the two came together.  One version is the first one I am showing here - with the large swirly motif paired with one ornament and a nice band of patterned paper/ribbon to top it off.

Afterwards, I wanted to make my very own version - remember how I have mentioned before about taking inspiration and making it your own? .....well, I 'softened' the look. And I was after a more romantic-antique look - something my 95 yr old Aunt would love.

By applying white craft ink over top of the stamped images, {use sponges}the colours become subdued and I think very pretty.  Then instead of a ribbon & paper band, I put 3 scalloped ovals across the top choosing to add ribbon to the ornaments {twist the ribbon into tiny knots for a different look}. This one is definitely going to my Aunt Elsie!


Well, you can see the comparison.  Both are very nice. But it goes to show you can take the same 'motif' and create very different outcomes by mixing up your technique.

Try it yourself with a stamp set you have - find a "new style" for a card you've created!


Contact me for class information if you'd like to learn how to make these cards. 

Stampin' Up! supplies:  stamps= Baroque Motifs, Many Merry Messages, Delightful Decorations.  Punches = Scalloped Oval, Ornament.  Ink = Old Olive, Rose Red.  Cardstock = Whisper White, Rose Red, Old Olive. Accessories = Buttons, ribbon, adhesive. 
Inspriration - Andrea Walford.


Introducing My Blog Designer Extraordinaire - my daughter!

How do you like my new look?  I was thrilled this morning when my daughter surprised me with an up-dated look to my blog!  A total surprise - wasn't that nice of her!!!

She stayed up late to do it too, awwww!  You don't know how I have struggled with the simpliest things on the technical side of blogging - sheesh - I guess I just don't have the patience to tackle the myriad of details. If my daughter has the time {which she doesn't}and shows me the steps - then I can learn it fast, but on my own....nothing but the loading of pictures {even that can get complicated in certain instances}.

SO - I am tickled pink - just pink.  I can get on with the creative side and business side of crafting which is my forte - - - SO BIG HUGS TO MY DAUGHTER!  OXOXO!

[Note - she said to say that she 'merely' edited a template as she didn't want to come up with all the HTML coding - ok hun!]   :)

1 November 2009

Happy H-owl-lidays Card

This card came as a total surprise to me. That happens & when it works... it so much fun!

I was really trying a technique with my punches. I tried to make a scallop 'wreath' shape by punching a circle and then bordering the circle with the 'slit' punch.  When I managed that, it left behind this scalloped circle 'negative' space.

I thought - "I'm sure I could use that for something - works like a frame..."    And that is what I did...when I was deciding on 'what' it should frame, my mind eventually wandered to "birds on a branch" and then to "owls on a branch" because I had my lil owl from the ANIMAL STORIES stamp set (SU). 

So, I masked one owl before stamping the second, filled in the gap using my blender pen and made the hats by cutting out the pieces & gluing into place. A little glitter 'natch!

After the owls were in place, I drew the branch and berries with our markers in Close-to-Cocoa and Real Red.   And there they are!  Little sweethearts, lol!

So this option is great for all kinds of your photo's, small stamps, greetings...have fun!


Original design by Beverly Taylor.  Contact me for classes!  All supplies by Stampin' Up!

Book Cover

Best Ghost Stories Bookcover 019
Lol! I was up to my christmas projects this morning when I passed a paperback book I had out – one I had intended to read during ‘downtime’ this past month….when an idea instantly formed and made me switch to this project!  Talk about short attention span! 
Well, actually its because I’ve borrowed a friend’s Stampin Up Alphabet Stamp Set, a beautiful one with flourished detail. And I have been seeking out projects to complete while I have it.
Now this book is important to my collection, and its tattered badly.  Not likely to find another book like it, I had protected it with a home-made paper bookcover but it was just a scribble and it too was torn.  So I made a new one!
I’ll let the pictures do the talking, but basically I stamped away, did some distressing and stamped the title with 2 different stamp sets.
I’m sure most of you have made a bookcover during your primary days in school, so you are familiar with this. Its straightforward, measure and make your folds, cut.
I also made a matching bookmark – and used Stampin! Up’s small “slit” punch to make it slide easily on the page! Voila! (I made the sides of the slit a teeny bit longer with my kraft knife)
The only fun thing I did differently was I made a small label for the home library by stamping a corresponding image and punching it out with our 1 inch circle punch and attaching it to the spine – so simple but effective!!  I will dream up other images to do the same thing for my other paperbacks. A new project – for the new year, lol!   PS - the strangest thing - late this same day, The Turner Classic Movie Channel showed a movie by this same obscure author!  Uncle Silas was the only book that was chosen for a modern movie {modern in the sense of this century}....he was well-followed back in his day, but most people wouldn't recognize his name even though he is regarded as the inventor of the 'psychological' thriller/ghost story! He completely reformed the shrieking, chain-clanging Victorian ghost stories into stories usually regarding the tense, over-wraught hero either succumbing to some terrible supernatural tragedy {whether real or imagined} or over-coming it. Anyways, I couldn't believe that the day I pulled up this book - that his movie showed up that night!  Co-incidence?  I think not!  :o
Best Ghost Stories Bookcover 013
Best Ghost Stories Bookcover 009
Best Ghost Stories Bookcover 016
Best Ghost Stories Bookcover 010
Best Ghost Stories Bookcover 011
Best Ghost Stories Bookcover 018
Best Ghost Stories Bookcover 021

Halloween Here Again! Gotta Love it!


I simply love Halloween.  Mostly because I have always loved scary movies and that led to one love affair after another with the different Hollywood iconic symbols of the time....first scary movie I remember seeing was after a sort of funny situattion - I asked if I could stay up to watch "Thriller Diller".  I was 6 yrs old and staying with a couple who were good family friends. I told them it was a Phyllis Diller movie.  They agreed.

 But it turned out to be a sort of 'swamp thing' style movie and scared the heck out of me but I couldn't take my eyes off the tv. Well, a lot of movies later and I still enjoy them....I'm just a little more sophisticated about them now. I've expanded to international films...last year, we watched a South Korean movie by director Bong Joon-ho,  'The Host' which was an excellent toss-up between funny and scary even with the terrible english translating service.  I'm sure an Americanized version will be along soon.

 Sometimes I just love 'haunting' style movies - like 'The Gift' - which is what I watched this year. I watched it twice. I just love the ending - won't say in case someone reading this has yet to see it.  And I had a little dose more of those ol' Southern style movies with their creepy elements of the deep south and effectively eerie fiddler music, such as 'The Skeleton Key'.

We also went on our traditional walk around the neighbourhood last night. Chilly outside but we dressed up our dog's an orange coat with a pumpkin face and put his little red blinking light on and off we went. It was fun running into groups of halloween'd children walking together - you could see the excitement written all over them - some things never change!  We found excellent dressed up properties as well. One in particular was great! It actually was scaring the dickens out of people.

Other than that, I was a little too busy to do my own things like decorations. Sad but true. I received 2 cards however - that was fun! One is from a friend in the US and I am sooo sorry I didn't get one off to you! I'll make it up next year! If you look at Tammy's card, you can see she did all that scroll work by hand! Nice Tammy!  Love the lil witch boots, lol!

The other card I received is from another SU Demonstrator - and I am showing it to you as it arrived - in our clear envelopes, which, yes, you can mail in!  Just add a postage stamp and the Post Office will deliver, and its kinda different right?


Oh by the way, Happy Anniversary Caroline!

Template by: