Showing posts with label ribbon. Show all posts

18 July 2010

Playing with FLoWers and RiBBon


Having a fantastic afternoon - listening to music and making ribbon and flowers come together!

Needed a 'special' birthday card....
 HAPPY BIRTHDAY

MARGARET!


And so I wanted to make one flower/ribbon combo, but I really got into it - must of been the music, and so I made more......I can always do more to these cards, but we're just focusing on the flowers, right?

HOW TO MAKE A PRETTY FLOWER
 with RIBBON ACCENT

YOU WILL NEED:  fabric flower + ribbon + needle/thread + pattern cardstock + (1 " Circle Punch, optional) + adhesive {strong}

{CLICK on pictures for a closer view!} 

TO START:   cut some lengthes of ribbon.    Next take your fabric flower, and ....'Fold' both the ribbon and the flower - stitch the ribbon folds onto the front of the flower, spanning them out - as many as you like. I am using 3 ribbon pieces.

*TIP - you can always trim ribbon to create a 'new' ribbon - I trimmed my ribbon off of the wider striped blue/brown/white ribbon because I did not want the brown and I need a narrower strip.


It doesn't look like much now but.......


...it will on the card....

Make your card 
...layer cardstock of choice onto your blank cardstock card base......


Add a Decorative Border

Above, I've made a strip (turquoise) and trimmed both sides with
 Stampin' Up!'s Scalloped Trim Border Punch; and layered
it with a colourful patterned cardstock.


Create a Center for the Ribbon-Flower
....I cut a  small circle from the patterned 
designer paper [see above], and layered it onto pink, then turquoise 
cardstock - cutting it out in a "wonky" style!  [look at the small circle, lower right]
No need to be neat! 


Assembling the Card
I added my flower-ribbon, and topped it with a 1 inch circle 
using STICKY STRIP tape...
... now it's lookin' better, right?


Finito! 

Here is the card! 
Along with the flower to the right, where I basically did the same
treatment to the fabric flower - only difference is I 
made the whole flower; and added a real button. 


Whole Flower with Ribbon and Button Close-up 

And that birthday card?  

Ta Da!   In glorious tropical colours! 


This girl is going on a cruise soon....so I think we are feeling that here, lol! 


So go ahead - experiment,  try different versions of 
this project yourself - that's the best way!

Well, back to my music! 

16 December 2009

Favourite Trick - Rings and Ribbons!

I hope I didn't mention this earlier this year but its worth it if I did, because this has to be one of my fav ways to dress up a card - using " rings and ribbons " !!!

It's simplicity is great but the fascination I get is from all the combinations I can make by using this technique!

All you do is punch out a ' ring '  - I use a die-cut that has concentric circles in one die, and choose the size I want. Then you 'embed' the ring half-way behind a layer of paper or tag, etc. This 'anchors' the ring by gluing down the hidden part of the ring, allowing you to loop some ribbon through the exposed portion of the ring. See close-up pictures.

It works great for just one ring & ribbon - and it looks scrumptious when you use a whole lotta rings and ribbons!

Give it a try!      


[Note - if you do not have ring die-cut to do this, try using a length of narrow ribbon to make a loop, or even create a circle and cut away or punch out the middle - I am sure there are even more ways to do this if you think on it!]

CLICK on pictures for larger views.                                                                                                  

22 November 2009

Using Ribbons on your Projects

Another approach to making your projects, is to add embellishments such as ribbon.

Here again, when starting out, buy 1 roll at a time. More of course, if you can, but at least with one - it brings on another 'dimension' to your project - texture.

Here are some examples:

25 September 2009

One Cute Stamp Set - OWL TOGETHER NOW

Luckily one of the trends in the craft world has forged its way into mainstream - our ability to create cards for any occasion using any colour scheme we want!  And it brought excitement and sighs of relief when it did - because who doesn't like to bend the rules once in awhile?

Take owls for instance.  I tend to think of them in a couple of ways....as spooky creatures of the night-type themes, or for Fall seasonal motifs. And usually Fall digs up the traditional colours - hey, which is great but another way is to expand on the colour combo's and here is a card which does that using pink, white and green colours.

Owl Together Now is a stamp set  I adored from the moment I played with it at a workshop last year - and its still just as popular as ever.

This card has one of the lil owls {there are 3}....and it can be put together "tout de suite'!  Or should I say 'hoot de suite"!


So think outside the box a little when thinking of seasonal cards!  [Top Note Bigz Die; Owl Together Now Stamp Set, Window Punch. ]

But if you'd like to remain traditional....here is another fabby creative version!  [Watercolour paper, aqua painter, Kraft cardstock]


If you'd like to order this stamp set { # 111534} - just contact me, come to a class or click on the Stampin' Up Logo on the left side, or under Cataloque in the Links to Luv to be taken to our 24 hour online shopping!
bye for now!
Beverly xx
                                                      

16 July 2009

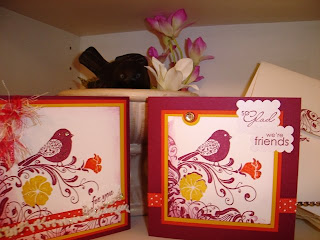
Wings of Friendship Card Set Part I


Hello fellow crafters!
I've been busy toodling around with my latest stamp sets - how about you? I guess we all luv it when we get new goodies - never gets old! :)
Anyhoo...I am playing at the moment with Stampin' Up!'s Wings of Friendship stamp set - this is a Hostess Level stamp set, so if you'd like one - be a Hostess and earn it free! It's the swirls and especially the bird's pretty wing that won me over! Absolutely lovely.

As well, I am working with the new IN COLORS - as you know the new catalogue came out along with the new line-up of IN COLORS - and I've chosen here to work with the Rich Razzleberry; Crushed Curry and Dusty Durango. Since they are designed to work together - there is simply no guesswork - hurray for that {on some days right?!}
I made two cards - same theme, slight variations. Features: the punched out space for a brad or gem brad. Also using the Scalloped Square punch, I broke up the expression from one stamp and layered it with 2 punches of white cardstock. But the real heart of the card is stamping flourishes everywhere! Luv,luv, luv that look!
Now I want to add some more features to this card set.....Part II coming up!

Template by: