Showing posts with label CARDS - Birthday. Show all posts

10 June 2012

TWINS 1rst BIRTHDAY CARDS

Good Morning!!!

I've something special to share today.....take a look at this handprinted greeting....and you will notice that it reads 'birday' and this is the funny part because when my daughter meant to write birthday and realized the goof up, she groaned because there was 10 mins. before she needed the card - of course!  But when I dashed to gather something to correct it, my brilliant daughter said "well, it does go with the card!"  And I stopped in my tracks because she was soooo right!  Yeah - a happy mistake!   Whooo-hooot!


...and here is why the greeting matches.....are they not adorable!!!!

TWINS!   And TWIN BIRTHDAYS no less!


CLICK ON PHOTOS FOR A CLOSE VIEW


How'd She Do That?  
  • Begin by punching a 1/2 oval section off the side of cardstock with the Large Oval punch. 
  • Follow w/ the Scallop Oval punch positioned above the mini-bite you made using the Large Oval, and punch creating a lightly curved 'scallop slice'.  Make this as deep and wide as you like! [Trim later]
  • Repeat to create as many scallop 'layers' - 2 or 3 for a tutu!  More for wedding dresses!  
  • Then, layer the slices and attach to the Owl's vest piece. 
  • Trim the scallop layers to meet the curves of the dress or owl. 
  •  Trim vest top to create a bib. [optional]
  • Embellish - have FUN!

* TECHNIQUE TIP - when you are working on plain cardstock - add interest by chalking the background 
as was done here with the pink-ish rectangle behind the owls.  This helps for your focal piece or accent
to 'pop' and is especially helpful when using minimal numbers of colours ! *

I too have been in an owly mood lately - you will see another project soon which features my OWL BUILDER PUNCH - the builder punches are awesome because you can do sooooo many "other" projects with them!  The stamping community always comes up with brilliant ideas, so if you can't think of one, chances are someone already has!  So invest in one!   And Stampin' Up!'s OWL BUILDER PUNCH is a great one to start with......ok, moving on!

Pink for little girls.....border punches, birthday stamps, and colouring done with inks and pastels!  A little bling....well, you can see from the pics how cute this card is - not to hoot our own horn too loudly, but hope this inspires YOU to acquire the punch and make some awesome fun!


include yourself inside the card...!!! 
I think the reason I LOVE LOVE LOVE this punch is because of the number or ways you can play "dress-up" with the owls!  I mean, c'mon - you have to love being able to customize your owl or owls like here today with little girl sundresses AND sunglasses!!   Yeah?  And its so fun!  That is the scary part - we could sit all day and create dressed up owls!


A happy set! 

And if you have TWINS in your family, this card is one of many you could make.......!


Cheers!
Taylor

SUPPLIES USED FOR THIS PROJECT
Stampin' Up!
Punches = Owl Builder 118074, Bird Builder (wings) 117191, 1" Circle 119868, Large Oval 119855, Scallop Oval 119856, 1-3/4" Scallop Circle 119854;
Stamps = Sock Monkey Accessories (retired) for balloons.  

2 June 2012

NEW PRODUCTS for FANTASTIC PROJECTS!!!


Dig this Birthday Card - featuring some really fab new products like our cute TICKET PUNCH!!! 

Happy Birthday Card (4" x 4")


Stamps
Itty Bitty Banners Stamp Set
You're Amazing Stamp Set

Paper
Calypso Coral Card Stock
Early Espresso Card Stock
Pool Party Card Stock
Whisper White Card Stock
World Spectacular Designer Series Paper

Ink
Island Indigo Classic Stampin' Pad
Soft Suede Classic Stampin' Pad
Calypso Coral Stampin' Write Marker
Cherry Cobbler Stampin' Write Marker
Island Indigo Stampin' Write Marker
Soft Suede Stampin' Write Marker

Accessories & Tools
Linen Thread
Stampin' Dimensionals
Ticket Duo Punch
Big Shot
Bitty Banners Collection Framelits Dies
Labels Collection Framelits Dies
Argyle Textured Impressions Embossing Folder

21 April 2012

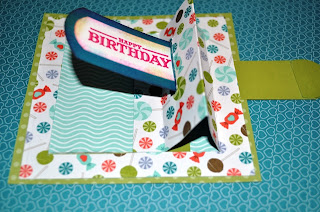
T-Slider Birthday Card Tutorial

Hellooo Crafty Friends!!!


As mentioned in my previous post, I would drop by with some pictures of my progress making the T-SLIDER CARD.   But I also should direct you to the original tutorial where I was directed so YOU TOO can make this fantastic card!   


link =  http://www.splitcoaststampers.com/resources/tutorials/tslidecard


YOU SHOULD READ THE TUTORIAL ABOVE and then REVIEW MY PICTURES FOR ADDED HELP.   Best of both worlds :)


OK - I stamped this image from our SWEET SHOP SUITE of products [Occasions Mini Catalogue] and my CLEAR MOUNT stamp set is called SWEET CAKE.   


I used my CALYPSO CORAL CLASSIC INK PAD and then swooped around the outside border with my PACIFIC POINT MARKER.  Stamped it and cut it out. 


 I stamped my sentiment into the provided box area.  Because 'HAPPY BIRTHDAY' pops up when they pull on the tab, I chose to use the 'Sweet Love' sentiment as its my girl and she's a sweetie! 

Then I attached it to a mat of our lovely, lovely blue paper - POOL PARTY cardstock. This is such a pretty colour, reminds me of so many things and I love its softness!  

To 'fancy it up' - I added GLITTER of course!   Read on for my tip!!!!!


TAYLOR's TECHNIQUE TIP 

"mix-it-up glitter 3D style! "

CLICK on the above photo and you will see that my cupcake glitter is quite thick!  And it is a mixture of small to large glitter flakes as well as multi-coloured!!   GUESS WHAT -  IT STARTS OFF WITH CLEAR GLITTER!!!   How did I do this? 

Well we often have more than one colour of glitter, right?  I also have Stampin' Up!'s Clear-ish DAZZLING DETAILS glitter bottle.  With the bottle's nozzle, I can accurately apply glitter glue following any outline.

 I apply a good thickness and while its wet, I drop other colours of glitter { flakes or glue style} into my clear glitter, and mix them gently with a toothpick.  If you look, I have clear, blue and our larger Champagne Glass Glitter mixed together.  
I also applied a thick mound of the Clear Dazzling Details to the CHERRY and then piled pink flakes of glitter overtop. I pushed it into a pile with the toothpick, so its very 3D! 
Finally, I added our Real Red Dazzling Details to the heart, and did so in 3 thin layers with a small drying period inbetween. The reason is because glitter glue can spread the glitter particles a bit too far apart, so adding at least a second layer is useful. 

So in the end, the CUPCAKE GLITTERS with more panache than it would in just clear - in my humble opinion.  Otherwise it would of appeared like the glitter I applied around the text box - pretty, but I felt my cupcake needed to appear as colourful as the area surrounding it. 

Next time you glitter - try this technique !!! 


CREATING THE FRONT FOLD-UP PANEL


Here is my 4 inch square using a sheet of colourful SWEET CAKE Designer Series Paper cut and folded according to the SCS Tutorial.  {the blue with white hearts in the background is the pattern on the opposite side of this double-sided cardstock} 

 Please note the little cut-out section to the left of my pencil.  That section is closest and parallel to the fold which is nearest the cut edge {which itself is perpendicular to the 1rst, 3rd cut edges}.  I just wanted to point that out - because I had trouble at first following the twists and turns of the video. 

I put my pencil there to show the cuts and folds of the interior flap. 


Here you can see the whole flap folded upwards!  

The following pictures show the next pieces you'll work with......


The large square has a section of cardstock which is only visible underneath the folding flap. The small rectangles are the T-SLIDE mechanisms and to create the Pull-Tab.  The circle and half circle help to re-inforce the end of the Pull-Tab itself.  More on those later. 


These parts are the POP-UP GREETING TAB.


Pictured from the back, you will insert the POP-UP GREETING TAB


Back side of folding flap, greeting tab. 


The greeting tab is inserted so that its top edge peeks out the front through
the slot, and is attached ontly with its back end  - which you can see is aligned to the fold of the flap. 


I double-check to see where and how the POP-UP GREETING TAB will be 
'BEFORE' I glue it in place!!!!   I had to do this several times to make sure it was
correct because we are using the impossible-to-remove 'Sticky-Tape' to attach it as we need its
strength, but its a do it right the first time maneuver!  


Yes - its working!  

Now return to the back side!   The 1rst rectangle portion of the T-SLIDE mechanism!  In the tutorial you
are shown where to attach each piece!  


Then the 2nd rectangle to complete the T-SLIDE mechanism. 


Edges are taped {minus the pull-tab section - see where green circles were added?}
I'm ready to attach the T-SLIDE/FOLDING FLAP/FRAME!!!! 

HERE IT IS ATTACHED TO THE GREEN BACKING FRAME!


I found it slide in and out better when I smoothed back part of the slot opening - I made a wee
'lip' {tiny blue strip by slot edge}.

Here it is from the back - all nice and tidy - and READY TO MOUNT TO THE CARD BASE!


Final step - I mount this to a CARD BASE of Pool Party Cardstock. 
I added a bit more decoration to the pull-tab, and added a satin BOW. 
THIS CARD IS READY TO IMPRESS!!!


It goes well with all the sweet things a young woman loves!  


Like I said - this card hangs between easy-to-difficult depending on your own experience!
For the few minutes it takes to pass through any difficulties pales to how this card will impress 
its intended!   Take the time to visit the TUTORIAL LINK {see at beginning and previous post} and TRY THIS CARD FOR YOURSELF - ITS CHALLENGING AND FUN! 

Cheers!  

TAYLOR :)

Have a great week-end!  

PLEASE NOTE - If you'd like to have a workshop where I demonstrate this card.....or you'd like to skip the tutorial and want to PURCHASE this card......please contact me.  I'll be happy to help! 

craftroomafternoons@gmail.com

****


20 January 2012

1rst Birthday Card for a Boy!

Boy oh boy - this stamp has been just sitting waiting for the right project - and one finally came along!!!


A Happy Birthday for a boy turning 1 years old - well, you can't beat that - unless it's a girl turning 1 too!

But how adorable is this stamp, ELEBRATION?   Huh or what!  Its one of the A la carte stamps on page 18 of Stampin' Up!'s main Idea Book and Catalogue.  

Elebration

Now here is what was created with the special boy in mind.....


Finished Birthday Card


Close-up of colouring, embellishments


Inside Card


Close-up detail

As handsome as this is in Night of Navy and More Mustard Cardstock - this stamp will be astonishingly CUTE in pinks or soft pastels for a lovely girl!   And its equally fun in bright, cheery colours for any occasion - maybe you know some elephant people out there - a zookeeper perhaps?  [secretly wish I was a zookeeper!] .....anyways, its a great stamp!  

Cheers!
Taylor *


4 March 2011

My Birthday Cards - ta da!

Another birthday for me has come and gone!  3 cheers for me as I am feeling well and my loved ones are with me - and I had a few milestones such as going on my first cruise!

I am also thrilled to bits with the fact that nearly all my b-day cards were hand-made! I received one extra-special one this year, more about that later :)

First up is my daughter's card - she snuck in and did one while I wasn't looking, although we did have a funny moment when she tried to convince me that "I" left out a ribbon jar when I asked her if she had been playing with my ribbon and hadn't put it away .....


I always love her cards, no exception this time :)

Now on to my "extra-special" card is from her boy friend, and here it is - isn't it adorable?  


with a hand-drawn cupcake no less inside!  Awesome! 


And a couple more.....from two friends,


first this one with its clever folding.....from Sofia!


Then a very interesting punch art card from Maria...
...believe it or not, she used the 2-Step Bird punch shown here to 
fashion her ' Bird of Paradise ' flower - I know!

Along with a card all the way from California, here they are!
Enjoying the view, I can see them all week until I need to scatter them
to my studio!  
Thanks to everyone for taking time to make me one - I really love them!!!


Actually, Maria also sent me a nice card after hearing about our fire ....


...you can't see all the details, but besides the artful butterfly stamps, she
is using SU!'s Garden Gala Designer cardstock, and I have that on
my 'wish' list!  It also has some pretty orange/yellow papers - well, a 
bunch of lovely papers. 

And what did I get for a  b-day gift from my darling daughter?
Well......look!  

A scoring board !!!!   Boy I've been wanting one for some time,
and can't wait to get started on a multi-fold project! 
 This even comes with an envelope template/scoring tool!  

I tried it out, and as long as you have good eyesight, and can keep your hands 
steady as you score along then this is great.....mainly, it can help you to skip 
a lot of the calculating that goes into the folds, you know....2 inches here,  4-1/4 inches 
there...and so on. The handy guides on this eliminates much of the really
annoying steps. 

Also cool is the pretty papers from K&Co in Sweet Berry - I know its an 
older line-up but I still have some of the chipboard sock monkeys in
a drawer somewhere, and the prettiness of this paper stack is totally 
going to put a spring into some projects soon!! 
Thanks hunny-bun - Momma loves it all! 


31 December 2010

January or Winter Birthday Card

Hello!  Happy New Year's Eve!

I know I said I would post another scrapbook project, but in the meantime my daughter had to quickly put together a birthday card for her beloved grandma whose birthday is in the first week of Jan!
Actually we have 2 members in our family with early year birthdays beginning with Jan 1rst - my aunt Elsie is turning 97 and she still lives by herself at home - no homecare -amazing lady! Love you Aunt!!!

So here is today's feature - a birthday card for those who have "winter" birthdays!

The pics are pretty self-explanatory - we were after a soft effect after all the red and green of christmas - it just seemed the right way to go.....plus plenty of embellishments!  We tried to do "interesting' elements including a small peek-a-boo door inside!  The handle for the door is just a rolled up scrap of paper.

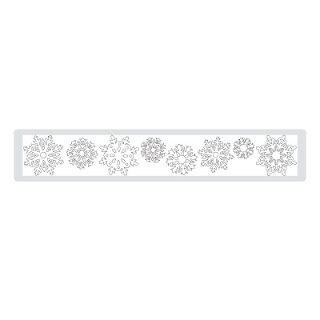
A variety of 8 beautiful snowflakes can be yours with the NORTHERN FROST Decorative Strip Die  catalogue item # 120901,  please see picture below under SU! Supplies.


Dressing up your envelope is always fun!  Here its been sponged using a snowflake as a mask. Neat!


All together!

close-up of punched circles, layered for depth.

So there you have it - and I am not sure if I will post a project tomorrow. 
xx
Beverly

Stampin' Up! Supplies: 
 Cardstock = Bashful Blue and Pretty in Pink.
Punches = 1-3/4 + 1 inch Circle Punches
Die-Cutting =  1.Perfect Polka Dots Textured Impressions Folder, Item # 117335; 
    2. Northern Frost Decorative Strip Die, Item # 120901

27 January 2010

The More Candles the Bigger the Wish! Card

Are you enjoying SALE-A-BRATION yet?  Well most of us are!!  Here's one more good reason to motivate you to take advantage of the benefits of SAB - its a lovely set of 6 expressions that cover a lot of ground for your cards now and in the future.  And paired with some pretty new papers...and you'll have a beautiful card to give to someone special - well, for those old enough to read! And if they can't - they're probably more interested in what else you have to give them, lol!

The stamp set is called WHIMSICAL WORDS and it can be yours for FREE  from our SAB catalogue if you purchase $65 worth of Stampin' Up! products ( regular IDEA Cataloque or our new Occasion Mini Cataloque), and for every additional $65 in your purchase - you may choose another FREE item from the SAB cataloque - so ok, that's that. Now let's look at the card...

First, we take some paper from the fabby "Sweet Pea" paper stack and our trusty TOP NOTE Big Shot Bigz Die. We're going to make a top note in the 'paper pieced' method, or sometimes known as 'paper quilted'.

Pick 4 patterns of the Sweet Pea papers, and cut them into small  2-1/2 x 2-1/2 squares and arrange them into a larger square in any order. Adhere this arrangement to a piece of larger white paper ( 5x5 inch). When you're done, place the sheet centered over the Top Note die. Line up the center lines in both direction to meet the "pointy" part of the Top Note - you're centered.  Run it through the Big Shot or your manual die-cutting machine. Set aside for the moment.


Next, grab a scrap of whisper white and stamp the expression - The more candles, the bigger the wish!  and  beside this stamp the 'cake' from the stamp set, "Happy Moments"  - one of the FREE stamp sets from the SAB cataloque. 
 Layer this over a slightly larger piece of cardstock, in my example, a piece of Melon Mambo cardstock - that very pretty pink. To rev it up, glue some pretty pink glitter over the little flowers of the cake!  PRETTY!


Now - take your prepared Top Note piece and top it with the greeting/cake piece. Together  they will decorate a card base { Melon Mambo with Whisper White layered on top} .... 

and, Voila!  A lovely, lovely card!


12 August 2009

Look Who's Turning Stamp Set - Baby Card


Here's my first real card using my "Look Who's Turning" stamp set as I mentioned in my last post....and my idea to put my Big Shot 'Bigz Scalloped Circle' came about because we were using it this past week-end {showing that post later - stay tuned!}.......and I think I came up with a pleasant idea of making different sized scalloped circles turn into the beginnings of a "baby rattle"!


I cut 4 scalloped circles - 2 large on my Big Shot, and then used a hand-held punch to cut out a smaller circle from the center of one of the big circles. Then the fourth was an even smaller scalloped circle cut from white cardstock. I used a hidden cardstock ring to raise the front of the card a bit. Hope that all made sense - lol

Using various shades of pink ink, I stamped my adorable octopus on Stampin' Up!'s Whisper White cardstock and then used their Large Scallop Oval to punch it out. Before layering it on, I used a hint of ink to create a pink shadow.

A strip of cardstock, another circle - and a few added images to the bottom, and my greeting and I was done. This took about 15 mins. Pretty good I'd say!

Hope you enjoy it!


Template by: