8 May 2010

Recent Cards I've Made


These simple but playful monogram cards can be easily made with our large alphabet dies, Sans Serif.  Then use your imagination with our crimper! 


I am trying my hand with a shabby look, slightly vintage too if you consider the watchclock. I have used a scrap piece of acetate which I printed a excerpt from Robert Frost's  Blue-Butterfly Day....and I painted the background stamp with some markers and chalk, while also using a wheel stamp, and gold ink to hightlight areas. And a little pink 'frosting' on the sides. But mainly, I wanted to use the 'window' technique where I have rolled back the top paper layer to create a space behind for my focal point, its really nice technique!  

*****

STAMPIN' UP SUPPLIES: 
Equipment - The Big Shot,  crimper tool,
Dies - Bigz 'Beautiful Butterflies'; Bigz Sans Serif Alphabet for monogram letter, L; Bigz Bird with Leaves and Flower ( floral stem), 
Stamps - Fresh Cuts, 
Colouring - Pink Passion Stampin' Write Marker, Stampin' Pastels (chalk); Encore Gold Ink Pad,
Cardstock - 
8.5x11 - Window Card = Chocolate Chip, Whisper White, Melon Mambo and Pretty in Pink
              Monogram Card =  Bermuda Bay, and Pretty in Pink
6 x 6 -    Monogram Card = Good Neighbor (in Bermuda Bay)  Sale-A-Bration cardstock,
12 x 12 - Window Card =  CLEAR Window Sheets {medium}Item # 114323, 
Other - glue, glue dots 

* our dies are compatible with manual die-cutting machines such as The Big Shot, The Cuttlebug, etc. Please inquire if you have any questions. 

- LEARN HAND-MADE CARD IDEAS -

The ways stamping becomes part of the home! Create photo memories of your hobby.

You know, I love taking pictures of just plain things around our home - they're snapshots of how we are living today, for us to view tomorrow!  I've been doing it now for a really long time. And I am fond of looking at them from time to time - just little postcard reminders of a time now past.


Like long ago, I took a picture of my daughter's tiny shoes placed next to mine by the door.  Or how a vase of flowers was by the kitchen sink - with a flower in it that she brought home from school. Those are esp. fun to see now.

Sometimes, its just a mess of my craft supplies - a table setting, a little vignette of personal belongings grouped together in the china cabinet....once I took a picture of myself peering through a clear vase filled with blue tinted water. The vase's shape curved my face - it was one of the more interesting portraits of myself because it was just whimsically goofy - something I am sure my daughter will laugh at in years to come.

I do try to convince everyone to let their guard down and let us take pictures of each other in everyday moments - as you come out after a shower in a housecoat and your hair wrapped in a towel -- its more 'you' that speaks to your close family than any fancy portrait taken in a studio.

See, this is me.....photo op for a craft event I was doing...


But so is this...I look like this making up projects in the wee hours...


But often, I decorate things in my home - or leave messages - or even like in my earlier post, make entire projects with my rubber stamps, my tools, inks and ribbons, etc. And they become an integral part of my life ---for a time!   And by taking a snapshot of them, seals that particular time making a little " time capsule" called my photo collection!

Here is what I mean....our two keychain/door passes that I decorated, side by side....


And also, our dog's biscuit jar that I put stickers on....


Or for awhile, when we first got the dog, I made these signs and posted them everywhere, lol....even on my daughter's bathroom mirror, lol!


Now, I've made her a small clipboard center - where she can keep those darn ID tags and cards she needs - and can't find at the last minute!   It's got a little post it note pad - so technically, its a message center!  She also said, I needed to go outside my 'usual' colour choices - well, I hope she got her wish! ha ha ....


The family unit! 


My own 'reminder' systems....


Another stamper friend and I taking pictures of each other!


Look - I'm stamping last minute - on the bus!  I am so proud of myself, I took my own picture to prove it, lol!


Look - one day, this will remind me of all the ribbon I started to collect....a scrapbook moment! 


And my little 'Bee' mascot watching on during a class...it's Beverly's Stamping Beehive after all! 


Now that Stampin' Up! has clear blocks and repositionable rubber stamps - pictures like this will be less often!  

I'm sure my daughter will be pleased to be reminded of when we held a craft event at Ronald MacDonald House at christmas time....


So, however you wish to do it....just take pictures of all sorts of things in those quiet times, the crazy-paced times, and of things that seem quite ordinary - and anything to do about your hobby -  because after all, it is a collection of what we are!  And just see if you don't find a way to put it together in a scrapbook!  I double-dare ya!

Have a great week-end!  Be Back to finish off my Mother's Day project - and I'm off tomorrow to another craft event, yeahhhhh! 

yours truly, B! 


7 May 2010

Our Pet Management Visual Aid System!

Two people and 1 dog.
The dog's day? Why daily morning and evening meals & ditto for his outdoor 'visits'.
 The two people's day? Why hectic and sometimes vastly different morning schedules.
 And toss in the daily predictable conversation dazzlers such as  " did you take the dog out this morning?" or  "When did Pepper eat last!"
And you have the feeling that everyday is going to be like the last - forever confused!

As I lay blissfully sleeping recently one morning, I heard my daughter's voice breaking through the muddle of my mind - first faintly, then becoming painfully clearer with each repitition: "Mom! - did Pepper go this morning?"

Being "so" asleep moments earlier, it was all I could do to drawl: noooo-oo-o - .

 Then, her, casually: "OK - just checking - thought maybe you took him out really late like you do sometimes" ......and then she was gone! Just like that. No compunction for having wakened me from critical slumber - and all over a dog's peeing!

I had enough!

It was time to come up with a better "communication" system. Something neither of us had to be awake in order for the other to understand - and better than having to write something down (because after awhile, we never do!) ....and something sort of fun, so we would continue to do it.  Plus, something that I wouldn't mind if it was displayed on a wall - so cute would be good too!

Here is what I came up with.

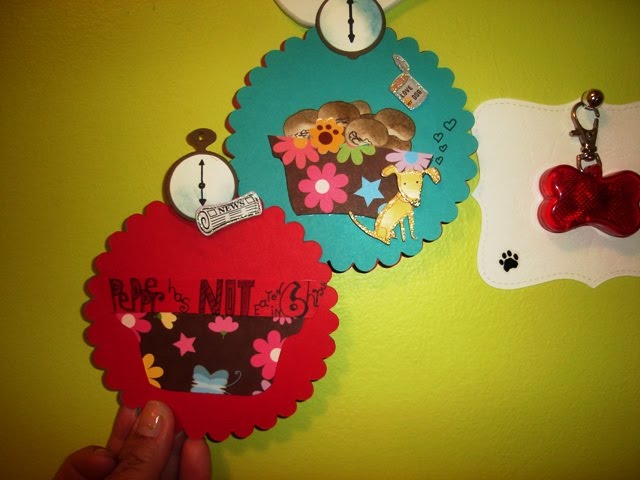
Using my Big Shot, I took the Bigz Scalloped Circle, and 2 colours of cardstock - one green to signify 'YES' and one reddish for 'NO'.  More cardstock in a fun print. A few dog-related stickers and embellishments, and something small dies that I'll point out later.

I made the Scalloped Circles in each colour and glued them back to back. These were to represent our dog's feeding - so I hand cut some nifty patterened 'dog bowls' from the print cardstock - in a fun floral pattern. Then I made some 'food' for one bowl - and I used a small 2x2 die for 'jelly beans'!  I made them in brown colours - and piled some in the bowl, and it looked reasonably like his dry dog food, I think! I mean, c'mon - they're lumps!

I pasted this all on the green scalloped circle, and added some final touches with - and lucky me, a 'dog food can' sticker, and a few other fun things. Voila!


{Click on pictures for larger views}
I left the food bowl on the opposite side, the red scallop circle, empty. It signifies the dog needs feeding.
But just in case, I drew 2 wavy lines with black marker, and had fun ' p r i n t i n g ' a message that Pepper has NOT eaten in the past 6 hours. Embellishments - and now, the whole ' TAG ' is done.  Or is it?


I wanted to hang it - but where?  I went to the hallway, and there was a large wooden bone on the wall - and it occurred to me that it should hang on there, so I need a way to make the tag 'hang'.
Another inspiration came, when I realized a "watchclock" die I was working with earlier - could serve as the tag's hook!  And show the time frame - the last 12 hours or 6 hours.

After this I still need a tag to deal with "outdoor visits" [code for peeing, ha ha].

 I went to task making a "smaller scalloped circle" - in much the same way - only this one shows  a dog walking meaning that the dog needs to go outside for his dutiful and very necessary function - if you get my drift as any one with a dog  or small children knows - those nighttime visits are important, LOL!  I was really lucky that I had a fire hydrant sticker too - how appropriate for this tag!!!

After showing them to my daughter, it was her idea to make 2 of the feeding tags, and leave only 1 tag to represent his 'night' outdoor visit - as that is the one that is crucial for the following morning. If he does not get out within 12 hours of his last outdoor function, we're all in trouble.

So here they are and this is my system:
Here is what the first person up in the  morning will see - 2 red tags meaning the dog needs to go out to pee, and requires his first feeding.  (ignore the little red bone collar safety light)...so its this person's duty to make sure that the dog goes out right away - to do his thing! Feeding him is not the top priority, if this person must be off to work fast.....

 
Now, the next person up will see that the dog has been out to pee, but still requires his first of two feedings for the day - so that's what they do.  His lengthy daily walk can be done at any time since we are not in a hurry to get him outside since his outdoor morning visit has been done. 


Later in the day, anyone can tell that he has had his first feeding, and one more to go. Its still too early for his nightly outdoor visit, so that tag (small one on the right) is still green . And on it goes....

We 're-set' it at night after his last feeding, and night outdoor visit, to 'red' for both tags. We're ready for the next day.

So far - its working, no one has to come and wake me up. I love that - God Bless America! LOL - gosh, I love un-broken sleep when I can get it! Don't you?

****

STAMPIN' UP! SUPPLIES:  Bigz Scallop Circle {for manual die-cutting machines}, Big Shot, Small Scallop Circle Punch, Melon Mambo and Bermuda Bay IN COLOR 8.5x11 cardstock, black Stampin' Write Marker, Taken with Teal Ink Pad, glue. 


,

2 May 2010

Cool Ideas....on another note!

CLICK ON PHOTO ABOVE!

Isn't this pretty?  Just had to share....


Its from an artist named Paula Hayes 
who specializes in nature projects. 
This is an acrylic bird bath.
You can check her out: Paula Hayes

HALL OF SHAME


Well - does this belong in a HALL OF SHAME or what! 

 Ha ha....we were particularly impressed with the mounted Moose Head and the Fur Skin....I mean what Mother wouldn't want to scrapbook a page for her son with those - not to mention the rifle and bullets!

Well - I'll post them when I find them!  If you have any, please share!!

My National Scrapbook Day!

Hello, helloooo!

I am tired from a big day yesterday - had a lot of fun though, so it was worth it!  But it wasn't without its funny parts!

First off, I went down to the beaches because I planned on joining in on the National Scrapbook Day fun at my ol fav haunt, Scrapbooks by Design. But I like to make a day of it, so first thing I grabbed a coffee and went over to Kew Park and had my bring-a-long lunch.  Which turned out nice because a flutist was practicing and myself and the squirrels sat munching and listening to some nice lyrical music! Nice!

Then a bit of shopping. I met a lot of shopkeepers and staff - most friendly and one a little weird {yeh, nice talking to you...as I backed out of the store, lol}. Then it turned really overcast - and this is where I should have taken my cue, and headed to the scrapbook store. But no - I decided to take a look-see at my first "Master Oyster Shucker" - which I didn't even know you could be one!  However, he was busy with an order and I only saw him do one! I was hoping that he did like a bunch really fast - or something, so on I went. But that little stop-over cost me because the rain came - and I mean, came!

I got so soaked! But I kept on going to the scrapbook store hoping it would stop - you know how sudden bursts are - but it didn't - and it just became me thinking what a bad idea this was! Ha ha - I arrived at the store so soaked - my shoes, everything. Luckily a few paper towels, and complimentary donuts and a coffee turned me back into a drier version of myself.

Then, after a quick card demo - I took a look around to gather some supplies to do some - scrapbooking, of course!  Then after paying for those, I discovered that the scraptables were full to the max!  So, guess who took over the corner by the front windows - where normally, people can sit down to relax? That's right, and all in all I was right beside the donut table - so, need I say more! Ha ha!

Keep in mind, I thought I would be near all the store's tools - and so I didn't bring anything besides scissors and glue. And a few embellishments. So I was faced with "how do you scrap with no special tools?"
Easy!  I tore my solid blue paper and made photo corners and one background layer - I drew a squiggly, loopy line around another photo onto some patterned paper with marker, cut that out - another frame!
Then simply embellished with rub-ons, and a few doo-dads!

SO HERE THEY ARE - my two scrap pages......of my dog!  My first ones of Pepper.  One happy moment was when I discovered that 4 photos were of him chewing on something, so a theme! And then I really love his grassy pictures - which helped me to pick out the fun paper.

Sorry I will replace these photos with better ones later on, my lighting wasn't good - and the flash was troublesome, but its there in 'essence'!


I had a lovely day of it - - and I sure hope you'all did too! 


- LEARN SCRAPBOOK IDEAS -

30 April 2010

Alter an Alphabet Letter for a New Look!

Hey!

Ever think you may not have exactly what you want in your stash?  Well - maybe you do but you don't realize it!
I will show you how to 'alter' a pre-finished Alphabet Letter - watch as it goes from plain fuzzy yellow to crazy, treasure glitter!

OK - this morning while having coffee, I looked around to see what I want to work on in my craft studio.....when I spot this book, a project that is a work-in-progress. You may have seen my earlier post when I altered a children's book into this.....here is the cover:


It's covered with new paper, but its bare - it needs embellishing!
I figured a good place to start was to add an alphabet chipboard letter as my beginning point - and later I can progress from there. 
But a quick look tells me that I do not have any letters slightly resembling my book!
Time to do some altering!!!

I go to my supply cupboard and bring out my chipboard alphabet box, some glitter and gems.
See the yellow and blue chipboard alphabet letters in the baggies - yup, I am going to alter one of those!


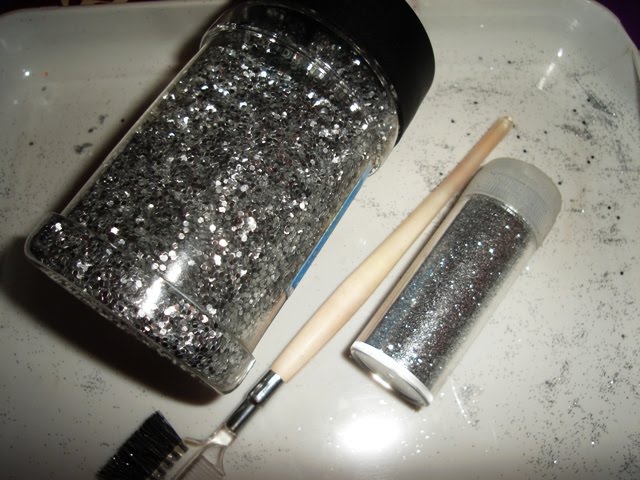
Oh - a quick note - its best if you have 2 sizes of glitter as the finer glitter will "fill in" the gaps left by the larger glitter. Don't forget your glittering tray!  Alright!


Now let's roll!


GLITTER UP! 
First cover your chipboard [or even paper] with a liguid glue and sprinkle liberally with the largest glitter. Press and tap off the excess ...
Now, switch to the finer glitter, and shake it all over your letter. 
Gently shake your letter to allow the glitter to fall into the cracks, and see if the edges are coated.
 You can always come back when everything is dry, add glue to bare spots, and repeat. 

ADD MORE PIZAZZ WITH GEMS
Now its time to add more depth, and interest to your letter. I am doing this with gems. 
So I use a pointed object like a push pin, and scrap away an area that is slightly smaller than the gem I wish to add, and add a small dab of glue, then push my gem into the spot and press it down.

This should allow your gem to snuggle in the surrounding glitter. A lot of the time, my glue squished up and out the sides of the gem - so I sprinkled more fine glitter over it - voila!

Repeat, adding gems till you are satisfied with your design. 


Its hard to photo the larger clear opalescent gems I've used, or the smaller coloured ones - but they are there! 

And finished, here is how it looks on my book, with a lil' bit of ribbon!
Later on, I will be adding a ton more stuff, but its good for a quick craft project this morning :)


So there you go - you can easily transform one object into something else!  You could paint them, glue fabric on them - pretty much anything!
So if you even spot some alphabets or something - really cheap - and they may not be what you want exactly, just remember - you can ALTER them!  
Have fun! 


- LEARN CRAFT IDEAS - 


Template by: