10 January 2012

Pepper my Pooch!

Just had to share this with you!   He was being so nice sitting in the window with his bow on....he likes to sit in the window so he can watch me craft!


He also puts up with us dressing him up with bows, bells, and the like. What a sweetie! We luv im!


And of course, what pooch doesn't need his own coat hook so his coat and accessories can hang? 


Pep's cheery collars, bows and antlers!  Otherwise he's a tough guy with his skull bling! LOL! 

I got suckered into buying this dog tree ornament!  We never even LOOKED at this stuff before we got him!  Now we are like 'crazy dog people!"  What happens I wonder!


Ok that's all of Pep!  


1 January 2012

HAPPY NEW YEAR EVERYONE!

HAPPY NEW YEAR TO ALL MY FRIENDS, CRAFTERS AND BLOG FOLLOWERS!!!


I HOPE YOU ALL WILL BE BLESSED WITH A WONDERFUL NEW YEAR AHEAD, AND THAT 2012 IS JUST THE BEST YEAR EVER! 


A very special Christmas Card using Stampin' Up! Christmas Lodge Stamp

It's special because its for our "special" family friends, the Shillolo's who hail from northern Ontario!  To celebrate their northern home, I thought the CHRISTMAS LODGE STAMP SET was an excellent stamp to use for them!


I was also dying to try stamping with a duo of red ink and clear embossing powder!!!  I'd seen this on a card example and decided it was really a nice technique.


A GATED CARD FOLD as my preferred choice because it allows me to use so many techniques, and I love the fact that they can remove the belly band - open the card and  the tree is revealed!  I really pained myself to add the teeny tiny bells in just the right way here, but I did say this was special, ha ha!


The card will have a micro fold to create depth and will require a bit of fussy packing into the envelope to secure it properly but I knew that going into this project, so I was prepared.


Now I'll just post the pictures to share - enjoy!


The tree in its glory! 


.....the bells strung with Bakers Twine...


...the Christmas Lodge Belly Band
Cardstock is Crumb Cake and Soft Suede plus Very Vanilla....


....the reveal!....


Red embossed tree with clear gem stones!  See how the red makes a lovely tree?  Who knew!  I stamped the tree and cut it out and used pop-dots to elevate it over the embossed background. 
A small amount of patience for such a large amount of friendship to send to friends!  


I am glad to report the card made it just fine! 

More additions to my christmas kitchen....adding a skating tag to my chalkboard and a cookie cutter all decked out with back of designer paper, ribbon and buttons.  Each year the small projects I make as demonstrations for my blog build up and one way for me to enjoy them afterwards is to just hang them around the house very casually for everyone who passes by to see!   It adds 'character' as they say! 


Decorating in Many Ways Around the House with Stampin' Up! Supplies


This dollar-store clock was altered with a few of Stampin' Up! punches and Designer Papers and of course, some gems to add some cheery zing to the kitchen!  It's easy to do - all you need is to pop off the back of the clock {usually all you need is a screwdriver} and then its up to you how you want to decorate!!!

I used a lot of circle punches, Ornament and Bird Builder punches. Then a die strip called Northern Frost to make snowflakes [actually every year I make a whole carton of snowflakes so I can grab them when I need 'em!]  I also hot glued a string of cheap christmas pearl trim around the edge {as long as the cover goes back on - throw on the embellishments!}.plus buttons..and topped it all off with a healthy dose of glitter sprinkled everywhere!  


Here it is in the kitchen!  I am not afraid to use it as it didn't cost much to make but what's important is the it brings back good memories every year when I will glance at it :) 

Crafting a Teacher's Tag!

* I love crafting with the 'young' ones - it always is a pleasure as I soak up their enthusiasm with relish!  Here is a young friend who made a tag for her special teacher!  


I find offering them choices is the best way I can share this craft with them and hopefully encourage them to consider this hobby - you never know what 'seeds' are laid through these experiences, you might be responsible for the birth of a new stamper, lol! 


So I will offer up suggestions but keeping them contained to just a few and add a very brief explanation describing the effects or the physical nature of the suggested products - this way the young person can make informed choices.  First I recommend about 3 colours and then ask which one they'd like to choose. 


Then we talk about the type of project: card, or tag {keep it simple!} and depending on the age, I will then decide how elaborate we will decorate the project. In this case, this young person has a lot of creative experience, so we are good to go! 


We embossed, we smooched, we glittered, we punched, glued, pop-dotted our way around this tag!  We even customized it by punching out the letters to spell the teacher's name - how cool is that!  It took us about an hour but I could tell she was never bored :)  In fact, I have sold her mother on one of the punches, which is arriving tomorrow and she will be on her way to making some more very cool projects - sweet! 


Here's her result - awesome Carrie! 


A big beautiful tag for teacher :)

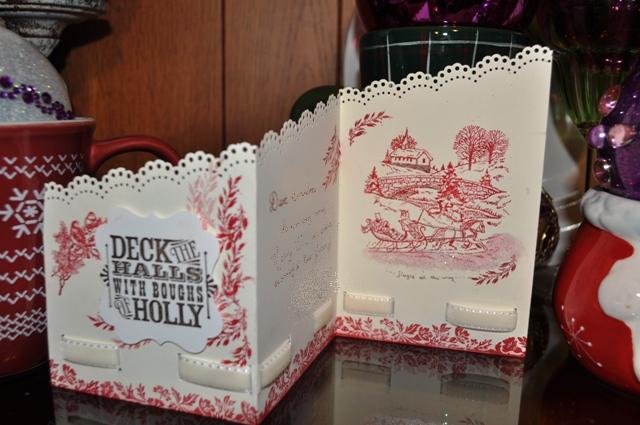
Christmas Lodge Card with gorgeous Very Vanilla Ribbon!

*Here are more of our Holiday Cards for 2011!  They were all a varied set - each made with the recipient in mind. I loved all of our Stamping Up! supplies this year and the only regret I have is that we didn't have as much time as we wished to make projects...time slipped up this year but it happens once in awhile, doesn't it?   And so it made the ones we did make all that more precious....so here we go....


I loved this ribbon from the moment I set my eyes on it - and now I wished  I had purchased more of it!  
However here is the card that features it - a card created for one of my daughter's Grandmothers! 


 It is meant to evoke a romantic look - and we chose to use a toile effect by using  red and vanilla as our main colours!


And to make a card worthy of someone special we resorted to take our time to make thisand  by ....a) to use romantic details such as the soft, rich velvet ribbon {it has tiny edge stitching!} and the delicate scalloped edge....b)  to add interesting details in our techniques - such as how the card is folded and the manner in which the ribbon is attached.  A little labour intensive, but worth every minute!  


We always take out all the stops when we create for the people closest to us right?


Christmas Lodge stamp set was our first choice but other stamp sets provided many other parts to this: the Merry & Type set provided the "Deck the Hall.." expression and the red border is from Vintage Vogue!  However, a retired set, was dusted off to provide the main scene: our sleighers!  This is an old favourite set of mine, and is called Sleigh Bells Ring - my, such a nice way to go to church with beautiful horses pulling you and ring, ring, ringing in the air!  How romantic is that! 


Well here it is, and the only difficulty stage really is the slotting of the ribbon. I do not have the punch that would of made this easier but a craft knife did wonders, lol albeit a bit of time! 


To cut ribbon slots you make tiny measured slots  so the thickness of the ribbon can be threaded through....then make others 1 inch apart and continue the width of your project.  I leave about 1/4 of an inch border on opposite ends of the card, and adhere the ribbon underneath so it 'disappears' , but you could 'wrap' the ends of the ribbon around the card's sides too. 

CLICK ON PICTURES TO SEE CLOSE UP! 

Thanks for stopping by! 
***

Template by: