
19 May 2013

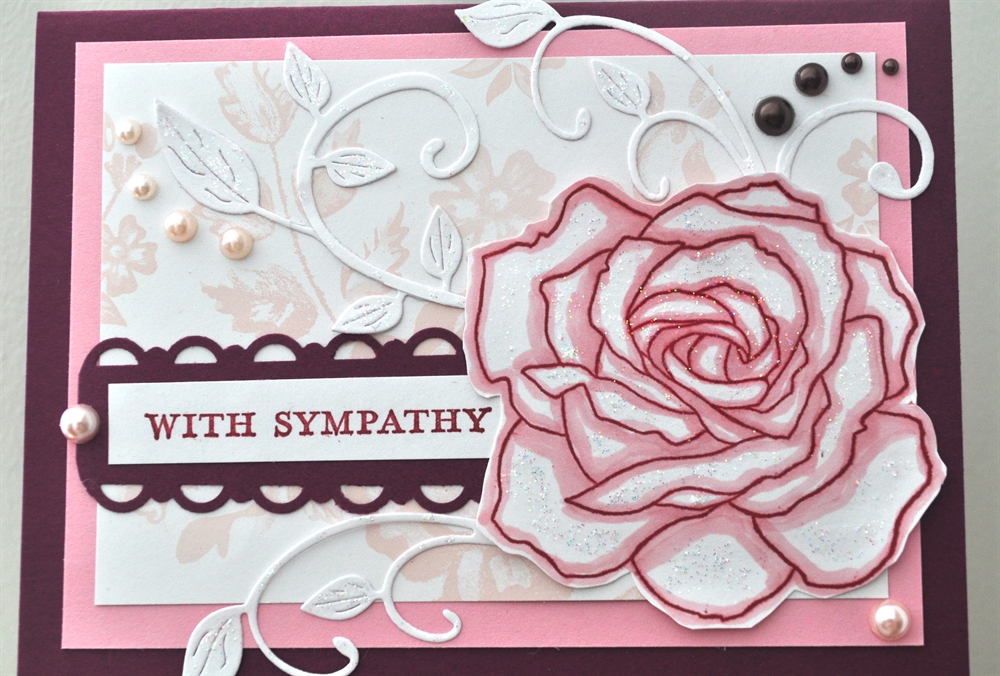
Sympathy Card featuring Fifth Avenue Floral Stamp Set

Hello crafty friends,

Today I went to our church, Glen Ayr United and it is one of our very few remaining services as this particular community church shall be closing in June. So it is with bittersweet joy that we continue to meet and share some more time together as a congregation and I am happy that we have the beautiful weather during this time. 


It is also sad that one of our own, Ruth, lost her life's partner, her husband Gordon not long ago. I made Ruth a card of sympathy last night which I am sharing here. 


I perused through some Stampin' Up! retired designer papers looking for some that were soft in nature and colour, and found a lovely white and pink paper dotted with roses and leaves from an old collection, Bella Rose. This immediately reminded me of Fifth Ave Floral, a stamp set from many moons ago that contained a large pretty rose. I chose to use Raspberry Ripple cardstock and ink to contrast with the aforementioned pink/white paper, and added some Pretty in Pink cardstock to bridge the two. I believe I achieved the softness I was hoping for.


Here is my card, and all supplies are Stampin' Up! save for the Cheery Lynn Fanciful Flourish and the pearl accents. 


Remembrance of a Loved One - How to offer your sympathy in a card. 

Remember if you need to do a Sympathy Card, and find writing the message a bit difficult, here's one way: after expressing your sorrow, try to recall a personal memory you have of the departed. I think your card then helps the recipient to feel a bond beyond their own memories or even discover something new of their loved one. Just keep it to the point though, you don't want to overwhelm someone who is going through something that is already taxing them. You may even wish to offer some form of support by extending an invitation to go out for lunch, or accompany them when they need to attend a matter, no offer of help can be too small.  

****
SUPPLIES
STAMPIN' Up! =  Raspberry Ripple, Pretty in Pink, White Cardstock and Bella Rose Designer Paper (retired)/ Fifth Ave Floral Stamp Set (retired)/ Scallop Trim Punch/ Raspberry Ripple Ink/ Dazzling Diamonds

OTHER = Fanciful Flourish Die (Cheery Lynn)/Copic Pink marker/ pearls (Dollarama)/tape & glue.

31 March 2013

Easter Cake Stand Centerpiece

Happy Easter,

Here's a quick Easter centerpiece using a cake stand {minus the dome}....and it only takes minutes to make!

You need:

A cake stand
small basket
faux leaves (3 large or about 5 medium)
faux spring flowers
straw grass (plain or coloured)
Easter decorations = eggs, small nests, bunnies or similar objects.
Optional
A can and something to help anchor it down [tape, marbles, pennies, etc]
doily or paper to decorate can lid [or use the straw grass]
ribbons

INSTRUCTIONS
Decide on your decorations and which will be the main features.
Then arrange the leaves and grass around the plate - much like a wreath.

Situate a can in the center of a small basket. You should weigh the can down with marbles, pennies or something so it isn't easily knocked over. Hide the lid/can with a doily or straw.

Next place your small basket in the center of the cake plate nestled in your leaves/straw arrangement. Add your main decoration in the basket situated on the hidden can - I used a ceramic Bunny. This raises the decoration among its surrounding, which adds ' visual interest'.

Now sprinkle the flowers and other decorations amongst the leaves, straw and center basket. I used eggs, a small nest, and another ceramic bunny. I also added a couple of butterflies!  You could also do some ribbons somewhere - pretty!

That's it!  This is only a guideline - feel free as a bird to design an arrangement - it looks great no matter how you arrange it.....like having a small piece of Nature adorning your home!

Happy Easter :)


26 March 2013

Friend Spring Card


I started this card by staring at some green/cream plaid cardstock.  In trying to be experimental, I decided to "add" a little extra to this cardstock and chose STAMPIN' UP!'s " MUSIC NOTES " Wheel Stamp because it's always a compatible element - much like ' script text ' is when layered over another design. 

I also love lilac and green together - and I LUV SU's Lucky Limeade colour!!!  I'm really into greens, and because this colour will be gone by June 1 because its a temporary IN COLOR, I may have to order packs and packs of it!!!  I am really hoping SU adds it to the regular line-up {they DID say they would from time to time} because its one of those nice lemony-green shades I am drawn to most of all greens. 

Anyways this card is pretty self-explanatory - lots of punching going on. Oh - I "dyed" my twine using SU chalks, that was messy but fun as I used my fingers, ha ha! 

OK, thanks for dropping by!


21 March 2013

Altering "Sycamore Street" Designer Series Paper for the FUN of It!

**Hey, remember me?  It has been awhile since my last post featuring Stampin' Up! projects but I've been a'craftin', I just have been a bad blogger!  So here I am with a little idea I had and have decided to share :)

Ever get a pack of Stampin' Up!'s beautiful Designer Series Papers and just don't know which patterned paper you want to start with?  And you hum and haw, and  basically stall? Well, I have that happen all the time!


So this time when my friend Maria shared some of her SYCAMORE STREET DSP [ since during SAB I went with 'other' freebies ]....I looked at the patterns and just decided to play ball with them or put them down!!! LOL - I mean, I decided to be fierce!


Here is what I was looking at:*


* And looking over them, I was really intrigued with these two...


So I decided to do this....cut along the exotic floral, blue-lined shapes and attach them to the fish-scale light blue pattern and flip over the "in-between bits" and attach those to the raspberry chevron pattern!  Then I cut both into strips. Have a look.....in other words, transfer one design ontop of another! 
Play around with the patterns and be just that - playful.  Or you might miss out on a really pleasing result, like I said ' play ball! '

Next, take your newly-created "strips" and play around with those on more patterns!  


I decided to start with a white 12 inch paper, and cover it with strip after strip - like quilting in a way. 
I juxtaposed colours I liked, and the paper patterns all seem to work well together {SU! does that for you!}


 And before you know it, I had MY OWN ALTERED DESIGN....TA DA! 


 I LIKE IT ! 
And I will use some solid colour mats or frames to add my photo lay-out later on, plus I really am looking forward to embellishing it - flowers, charms, who knows what goodies will follow!

MAKE A CARD

You can do this in a simple fashion too.  Yes, just add strips of different patterns, and even of different widths, and it makes a great card.  Here is mine without final adjustments like a greeting or embellishment, but you can see what I mean.


I HOPE YOU GIVE THIS A TRY WITH YOUR OWN DESIGNER PAPERS!

CHEERS AS ALWAYS! 


22 December 2012

Christmas Shadow Box Card

*Merry Christmas Crafters &  Friends - New and Old 
Welcome to my blog!  


If you're here to see the fabulous project that is featured in my Youtube Video " Christmas Shadow Box Card " I will just add a few pointers and information to help any of you - YOU MUST TRY ONE OF THESE! 


Watch Laura Cline's Tutorial Video below at the end of this post.

My Christmas Shadow Box Card.....


*Here is the beginnings where I took a kraft blank of the basic card structure and I covered it with some designer paper....I made a second one in Very Vanilla since I thought it would be better to create two right away, and after Christmas I will come back and finish the second one in a whole other style!


*Now I have created the "accordian-pleated" Shadow Frame.....


....and I have gilded the interior fold edges with metallic gold paint.


*I have added my backing paper to the Shadow Frame....it is very pretty paper which cannot be captured properly here as the circles have delicate glittery edges....so pretty. 


.....smooched edges with FROST Smooch, and added bling, and you can see that the Greeting from Christmas Lodge Stamp Set has also been embossed using the same embossing powder/glitter mix I mention in the video....


*I am keeping the palette in frosty metallics with some blue to counter all the natural tones and the flowers add just a dash of red!  But I used a metallic pen to add an accent here and there such as the Star - but then afterwards I added tiny rhinestones to the star....you can't help but glitter this project up! You can't!


SUPPLIES
Stampin' Up!
Five Petal Flower Punch
Cardstock: Espresso, Baja Breeze, Cherry Cobler, Very Vanilla
Frost Smooch
Clear Rhinestones
Versamark Pad

Other ...
Tim Holtz Distressing Powder in Weathered Wood
Ranger's Clear Embossing Powder
Martha Stewart Silver Glitter
My Mind's Eye Christmas 12x12 Cardstock Stack
Gold Metallic Paint
Variety Embellishments
***

CREDIT GOES TO:
my friend " The Country Rose" on SplitCoastStampers 
for the inspiration!
LAURA  CLINE'S  " SHADOW BOX CARD TUTORIAL"


THANKS FOR COMING BY!

11 December 2012

Hostess Christmas Gift Tags - an Easy Project!

Hey-Ho-Ho....
Often wonder what to give as a small token of your appreciation ....and at this busy time of the holidays?

Look no further than the ever-useful GIFT TAGS!

They may be the 'small touches in life' but as hand-made gifts - they are perfect for saving your friend time and money!

Recently I had such an opportunity to give a lovely person a wee gift - a Mom - who gave a group of young teens a very nice afternoon of crafting and lunch.  To offer up a note of appreciation I used the following:


  1. Stampin' Up! Tag and Curly Label Punches 
  2. Stampin' Up! small size stamps - from A Cute Christmas {retired}
  3. Stampin' Up! Real Red / Whisper White / Marina Mist Cardstock
  4. Stampin' Up! Markers {various}
  5. Stampin' Up! Espresso Bakers Twine
  6. Stampin' Up! Dazzling Details 
  7. and the ever useful sparkly shreds!  whoooo! 
  I thought a group of 6 tags was a nice set - but you stamp and colour away onto white cardstock  as many heart-warming scenes as your heart desires!  I love snowmen and the stack of gifts were real fun to colour - then its a glob of Dazzling Details on each - let dry then its time to package them together! 

Here they are getting their colours on!  


String em up together!

Let's bag them with good ol' sparkly shreds and a plain bag... 


and finally pop them in, staple a folded 'topper' on and voila...!

HOSTESS GIFT TAGS


 * So hope you have a special Hostess in mind! *

No Peeking Children's Handmade Christmas Card

Here is a really cute stamp set from Stampin' Up! called
 "No Peeking"! 
Here is the card I made with this set at Maria's stamp event in November...


Very sweet isn't it?  And I like the style of the greeting - so I think a child would LOVE a card like this!
But after searching the internet, I could see that crafters are having a field day with this stamp set - there were so many great projects out there - whew! Fabby stuff!
Here's a few that grabbed me from talented Stampin' Up Demos like

Click on their names to visit their respective blogs!

...tags galore!!! Excellent!

...just awwww! 


...great for twins!

... love the colours and layout!

This is what I luv-luv to see with a stamp set - real versatility and imaginative possibilities! 

Stampin' Up! No Peeking Stamp Set
wood mount #126290 $29.95 CDN
clear mount # 126292 $21.95 CDN

Now GO craft!  
*
  

Template by: