30 June 2009

Hello! Just chit chat.....


Thought I'd show you where I went to 'work' today! Deciding to take my paperwork with me and work in a pleasant atmosphere at the same time, I took off to a large office complex near me and this is where I always end up, sitting by the fountain.


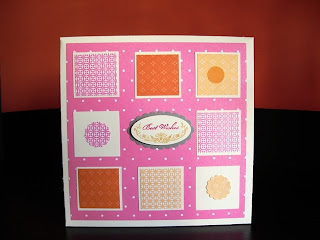
So since I was trying to get a nice photo of my card - I took it here - lol! Looks funny I know! And I am sure anyone watching me thought I was one coffee bean short of a cappuccino, ha ha!


But today is our last day of the catalog - and I wanted to get my paperwork done too. Didn't happen though - got distracted having coffee and working on some creative ideas....ah well. That is something though - so by tomorrow I will have my new schedule done. Save the rest for Thursday.


And before I wake up tomorrow - a early "HAPPY CANADA DAY" !!!!


That happy day will be here once again! Yaaaay!

Heard - for anyone in my town - that Mandarin Resturant is giving away a free meal for Canadians on Canada Day .......hmmm, sort of have to decide if its worth the long line probably have to weather.....decisions!


Feel bad for the strike affecting some places that will have to cancel their local celebrations - bad timing, I'm afraid. But hopefully everyone will come up with a way to celebrate - even at a minimum around here we have strawberries and whipped topping in some form or another - so have some beautiful strawberries in the fridge right now - really good-looking ones happy to say! We try to come up with different ways to have our strawberry dessert - I think this year we're making the cake we saw on the front of Canadian Living - yummm!


Well - enough chit chat - have a great evening - and a great day tomorrow!!

29 June 2009

Some Class Cards - gorgeous!


Look - two particularly pretty sets of cards from Sat.'s "Shaving Foam Cards" Class! I meant to get a group shot of everyone's - but as my usual dizzy self, I was too busy yakking and forgot, geez!

Everyones were just lovely, lovely and we all had a good deal of fun. Here's a photo of Alex's (to the left)and Candace's card/tag sets.....

This class was also about using up supplies, and esp. about the retiring stamps - and Illuminations is one of those that are a great stamp set and which I am glad I have since its going, ahh well.

Well - must do this again soon! :)


[Illuminations stamp set, expression and flower from God's Beauty stamp set, ink: Red Riding Hood, refill ink: Pomegranate Red, Old Olive, Groovy Guana - cardstock: Pink Pirouette, Whisper White, Kiwi Kiss, Chocolate Chip, Tangerine Tango, ribbon: Pink Pirouette]


24 June 2009

Beautiful Shaving Foam Tags!


I really am having a great deal of fun with shaving foam - almost cracked a rib laughing when I told a friend I bumped into that I was giving a class on shaving foam and she sort of paused and said "what kinda of class ARE you giving that involves shaving foam!?" ....and that's when I realized for the first time how it sounds when you say it that way - - and I was "NO! not like what you're thinking! Or whatever you're thinking!! ha ha!" {she's a nurse - so } - -well, anyways we both had a good laugh.


But here is some of my first results with it - I've made some lovely tags! See the background is the paper that has been marble-ized with the shaving foam and inks? Then I used some Stampin' Up Big Shot Dies {one has a flower which was cut in paper and tissue}, and some cut out pieces from various stamps to make 'chic' tags!
It's pleasant to sit and craft with bits and bobs - like decorating a safety pin with beads {pull it apart, bead it, re-shape it } and I carefully sewed on the buttons and wound the thread nicely - nothing too difficult.
So la te dah! You may come and try your hand at this fun technique - last class this month is June 27th.

19 June 2009

Morning Coffee with Beverly


Hi sister crafters!

... I am now armed with my cup of coffee in hand...feeling all is good in the world - uhmmmm coffee!!

WELCOME to my 'creative space'!
...and this morning I am just going to poke around...let's see....What comes to mind?  I scan the table - what to do, what to do - something!
Hmmmm...there's a lot of left-over scraps of paper...so OK! I have always wanted to decorate 'the envelope! So lets!

I mean we always decorate cards - BUT the envelopes can be a whole lotta FUN too. And some easy-smeasy way - nothing fancy!
OK - 45 mins later.........ta da!
I made the card by using strips from scraps of Designer Series Papers that I have owned, and featuring the Oval Punch & Scalloped Oval Punch - my two latest.
The envelope was more a labour or love....I cut away with my cutter to make strips, glued and re-formed the size of the envelope just a tad.
Tearing open the envelope is a bit tricky....but its not a problem...most of the areas were getting covered by the strips - you can do what-ever you wish.
So .....there they are! And I think the whole thing is darling!
I should send this to a family member who is probably over-due for a card anyway, lol!
Well, I am off to re-fill my coffee...See you next time!

17 June 2009

DAD's Card


Hello!
I started to fool around with my new JUMBLE ALPHABET - and also wanted to do a Father's Day Card. This card literally "fell together" because I just experimented as I went along.
I know that paper quilting is a favourite trick for card-making so I thought I'd give it a go using up scraps of Delicate Dots paper from who else, but Stampin' Up!, lol! AND....I used an extra TOP NOTE die-cut I had lying about and snipping away I soon had it covered with the scrap papers. I layered it on to another paper, Kiwi Kiss (soon to retire) - and - then just cropped around the die-cut shape to get the extra border. I didn't even glue just used a brad.
I cut out my alphabet letters using my Circle Scissors Plus - which worked beautifully - (just remember to secure the paper down with some Dotto Dots so it won't slip on you :)). Made some larger circles in Sahara Sand which I covered in ink using a cloth. Then created that important word...DAD! Just to make sure he knows he is extra special, I turned a coffee mug with a heart stamp into a beer stein (draw & cut out the beer foam) and penned #1 on the heart. Cute! On to the next step!
Here's where I must admit I went out of my norm! I thought it would be boring to just slap it on the front of a card since I do that so often....no, I wanted to try to come up with something different. Picking up a couple of strips of Bashful Blue paper, I was holding them with both hands and they sort of created a V shape - and then I thought of a ladder! Thinking that was 'fatherly-like' - cuz, we don't want all frills, right! But then - whoop - a giant "A" - you know, Dad is an 'ace' or gets a "A" for being the 'best dad'! So I happily went in that direction!
The Top Note shape has a point and would be troublesome to stand on its own, and soon I realized I would make the 'A' into an 'easel' - it could be both. Plus it could stand on its own like a card. So I created a shelf on the A, and a supporting leg behind it. {I made everything double-thickness plus glued a thin wood stir stick for added support} You could add a string running between the front to the back leg for limit its ability to 'open' if you run into problems.
Anyways - I put my DAD assemblage on the 'A-turned-Easel ' and used a clip to secure it in place AND FINALLY I got to use my tin star! I have had this baby for a couple of years and didn't know when I'd use it.

Hope you like it! B :)


14 June 2009

God's Beauty Mosaic Card


Here is a Mosaic card - because we use a strip of Stampin' Up!'s Sticky Pages (VERY tacky adhesive paper) and small pieces of beautiful paper and glitter to create a "mosaic" which we then feature on our card front. To this we add the beautiful image of a butterfly and a gem brad - its just a lovely, lovely technique! Don't you think so?

I like it very much and have used it in various projects around my house! Plus it's a neat way to use up 'scraps' of paper - scraps that you'd rather use than throw out no matter how small!

GOD’S BEAUTY MOSAIC CARD Tutorial


SUPPLIES:

Cardstock (all Stampin' Up!)
8 ½ x 11 in. green ex) Kiwi Kiss
3 ½ x 3 ¼ in. pink ex) Pink Piourette
3 x 2 ¼ Whisper White
¾ x 2 ½ Whisper White (optional for expression)

Scrap Paper -
small scraps of paper with pretty design, we used SU's Designer Series 'Walk In The Park' papers in pieces of green and pink,

Accessories
1 ½ in x 4 in. strip "Sticky Pages' (stampin' up!)
God’s Beauty Stamp Set (stampin' up!)
Pink Passion Classic Ink Stamp Pad (stampin' up!)
Old Olive Classic Ink Stamp Pad (stampin' up!)
Gem brad (co-ordinating color, ex) pink)
Silver Chunky Essentials Glitter (stampin' up!)
Double-sided adhesive
piercing tool for brad

INSTRUCTIONS:
Fold large green paper in half. Score fold.

Mosaic Strip:
Take 1 strip of Sticky Page + pull off one side of the backing papers. Set on work surface with the exposed sticky side facing up.

Cut pieces of green + Pink patterned paper + use them to cover Sticky strip – leave areas between ‘mosaic’ pieces exposed . Overlapping edges can be trimmed later.
Take “ mosaic strip” over to glitter tray, and pour glitter all over – so it fills in all remaining gaps of the sticky page strip. Press to secure. Shake off excess.
Holding strip by one of the paper pieces, pull off last remaining backing paper and carefully lay down the ‘glittered mosaic strip’ onto card, left side .


Stamp whisper white 3 x 2 ¼ in cardstock with butterfly in Pink Passion ink.
And “stamp off “ the stamp to the surrounding sides so image repeats itself in lighter shades.
Adhere to the pink 3 ½ x 3 ¼ pink cardstock.


Pierce hole in upper left corner through both cardstocks and attach gem brad. Attach the completed piece to the card, overlapping the mosaic strip ‘slightly’ – use double-sided tape.

Optional - stamp sentiment “Beauty is God’s handwriting”. Ralph Waldo Emerson, ...in Old Olive ink to small white strip and trim. Attach to lower right corner, overlapping the butterfly/pink cardstock using strong adhesive or double-sided tape.
*Note: Kiwi Kiss, Pink Pirouette are to be discontinued by June 30 - I'd order these if you would like them as soon as you can as the 'retiring' products are only til the end of the month.

13 June 2009

Oval All Mix and Match


Hello everyone!

Welcome to any new viewers that were at Johann's party! So glad you've dropped by! Have a look around!

To see a Stampin' Up! catalog - click on the Stampin' Up! sign over to the left side - you will go to a new location where you can see the products, new projects and learn about promotions and my classes, etc.

If you were interested in learning more about the box I demonstrated to store the note cards we made, then see directly below.


OVAL ALL Mix and Match Box Set.


Here is a downloadable class demonstrating the box and note cards set using the Oval All Stamp Set, Oval and Scalloped Oval co-ordinating punches.

Click for class instructions/photos HERE

Betty Traciak is responsible for this class and ultimately became the Winner in the category for submitting ideas for SU's Occasions Mini Catalog where you can buy the Scalloped Oval, Large Oval punch and the Oval All Stamp Set - her class sure has become a popular choice for good reason!

Note - Beverly's Version!

Here are my dimensions for creating the BOX outlined in the Oval All Mix and Match Class. To fit my cards in the dividers easier, I found I wanted a slightly LARGER BOX than the original dimensions cited in the class, so substitue the following measurements for box, box lid and the dividers and then continue to follow the rest of the instructions:
(in inches...)
Box = cut a 8 1/2 x 8 1/2 inch. square of cardstock. Score all four sides at 1 1/4 in.
Box Lid = cut a 7 1/2 x 7 1/2 inch. square of cardstock. Score all four sides at 3/4 in.
Dividers (partitions):
larger#1 divider = cut cardstock 5 7/8 x 7 7/8 in. Score at 1, 2 and 3 in. Fold.
smaller #2 divider = cut cardstock 1 x 8 in. Score at 3, 4 and 5 in. Fold.


Thanks for stopping by! Contact me if you have any questions!

Contact Info = bstampingbeehive@gmail.com 416-290-6099

9 June 2009

My Re-decorated Craft Room ......is 99% ready!!! Thanks to...


Ahhh...I now have a smart new craft room to saunter into.....and take my morning cup of coffee into tomorrow! I have it organized 'nearly' and its all mainly due to the help of my lovely, lovely, did I say lovely daughter, Alexandria! As you may know, I hurt my wrists earlier in April and that was the day we started to clear out the room - which was like a storage 'mess' - nay, horror...and we spread it out everywhere. Then ka-put! my wrists went, and all I had to do was think up instructions for my daughter [she likes lists - and I hate writing lists] - I could barely do anything constructive - so that was hard - on us both! But she was a real trooper - and did everything she could to make it happen for me. My wrists are slowly better now, and I can do a whole lot more which is a big help. But we couldn't do the heavy stuff, so thanks goes out to:

Special Mention goes to "Margaret M."- who came over at our request and helped Alex to put together the bookshelf!!! Yeah Margaret! She always helps us when we ask and is very gracious about it! She comes from a fabulous family and whose attitude is wonderful!
Thanks even to the furniture man from T & T Furniture Assembly, Lee, who put together the desk cheerfully - he is going to be in Criminal Psychology I believe, so I hope he makes it! Thanks to my friendly delivery UPS man who brought up all my furniture as I ordered it from the Office Depot {they sent one order in 3 parts - oh vie!} - he is always our best delivery guy!

Thanks to our neighbor, Bruce - who always comes and helps me with our 'handyman' jobs like today as he tightened bolts and explained some problem areas so we can fix them! He is a very nice man and has a lovely wife & family, Alijca, and daughter and son.

But once again - the biggest thanks goes to my daughter oxox
Now - what does it look like you ask? Its pink with orange! I originally took the basic premise from one of Stampin' Up!'s decorated rooms at their Riverton location - it has a border with various squares of chalkboard, corkboard, and so on....all painted in 3 different colors than that of the wall. But I chose a simplier plan with one border and it will have various accent colours when all is done. Very functional too! Anyways - we are having fun putting the finishing touches and I am sure there will be more as time goes on.

Sadly, I had to give up my desk - my vintage, solid, big desk!!!! Cry! It was the best - for ONE person! My plans to expand its top to allow for more people to have leg room went away as we found glitches too numerous to warrant that. But Alex hit the jackpot again, and found me a desk from a fella who kindly brought it to us - its solid and we can all sit around it this time. Isn't Kijiji great! You can find so many things!
So here is a peek at the girls working hard for me - pizza was their only reward! Well, maybe a hint of gratification at following instructions - and helping me! I am sure they loved seeing their finished project too - they did great!
And I will post pics soon after my first class in the new room - so as to not spoil the effect! Maybe I will show another hint, lol!
Sigh...feels great!

Another Cookie Cutter Card - Feminine


A counter-point to my masculine card, using a flower cookie cutter this time. Much simplier design too!
Same idea, trace and cut-out shape of cookie cutter, and use to embellish a card.
I also added a die-cut from my Big Shot - using Stampin' Up! "SPARKLE" die -
Best thing is for only a mere $5.95 for the die and you can make hundreds if you want - millions! 'K, maybe not millions but you get the idea. Its what I always tell people about the die-cutting machines - I used to buy die-cut shapes for practically the price of a die, and you'd get 5 or 6 and then your money is gone. But a die-cutting machine allows you to make your own dies to your heart's content - and eventually the intial cost is paid for, and its FUN too!

Masculine Card - using Cookie Cutter!


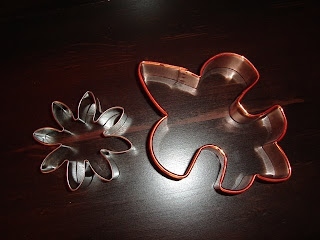
I have done this once before where I traced a copper cookie cutter I own, a fleur-de-lis design, and used it as a template for a card!

But this time around, I went with darker tones and a medieval theme. And I went 'big' using a full sheet of 8.5 x 11 - because someone I know {you know who you are! :)} is always after me to show them a 'BIG' card - so here it is!
Need: a cookie cutter of choice
stamp to co-ordinate with cookie cutter
ink & cardstock 8.5x11 in 2 colours of choice
wheel - Illuminations
ruler - to measure out diamond shapes, arch
How to: on one colour 8.5x11 cardstock {ie. black}, fold in half lengthwise and.....
a) begin by tracing out cookie cutter on 2nd colour cardstock to make a cookie cutter shape,
-cut outline of cookie cutter shape with scissors, ink edges for distressed look, and decorate with your stamp using the 'stamping off' technique to get the lighter 'background' images, set aside,
-take your main stamp {i.e. fleur-de-lis stamp}, stamp 3x onto a scrap of the same cardstock , cut each image out, set them aside,
-glue your cut-out stamped images on {I chose to glue mine inside a border I inked on with a 'line' stamp - but you can also create a border by using tape.} and/or use glue dots to attach them,
b) meanwhile, make a border using same cardstock as cookie cutter ,
-decorate your border and distress edge with slightly darker coloured ink {use a co-ordinating colour as cardstock or a greyish colour}, {use ruler to make diamond shapes, cut out}
add brads to border,
-glue border near bottom third of card
c)glue down cookie cutter cut-out shape
d) using an 'arch' shape mask {cut out large arch shape with scrap cardstock and tape or hold down over cookie cutter cut-out and some bordering area} and ink on a design to top corners with a large stamp, or wheel stamp {Illuminations wheel, Stampin' Up!}...also 'chalk' on an arch shape using ink along edges of arch mask and can decorate bottom edge with same wheel design.
Take your time - its not very hard, just a bit time consuming. Use with any cookie cutter too.
Note - all supplies by Stampin' Up! [black cardstock, green galore cardstock, black ink, silver brads, retired fleur-de-lis stamp, Illuminations stamp wheel]
The Illuminations Wheel is due to retire - so here's a chance to order one if you'd like!
Colors- cardstock, black, green galore......stamps - fleur-de-lis, Illuminations wheel....inks-white craft, black classic.....accessories-silver brads, .........all supplies Stampin' Up! Cookie cutter from personal baking collection.

Fabulous New IN COLORS !!!


i TOTALLY stumbled upon Heidi's Crafting Mecca and found that she has posted a great photo showing off the new fabby IN COLORS - so I thought I would share with you ....here are the new ribbons in the new colors! Are they not delicious?


My personal favourite - right off the top - is going to be Melon Mambo but Bermuda Bay and Rich Razzleberry will be right behind!


Anyways - I think that POLKA DOTS RULE - always have - always will! So I couldn't be happier to see polka dot ribbons! Oh I hope they decide to keep more polka dots forever!


Well...I can not wait to see my new supplies come in - and thanks to Heidi for her great pic! Check out her site too, click over her name above.

1 June 2009

A teary cheer!!

Well….it’s here!   That time as we are TICKLED PINK with EXCITEMENT!!!!….bee-cause the NEW CATALOG IS COMING AND JUNE IS SNEAK PEEEEEEEK TIME!  Whooo-hooo!

I waited till just past 2 am  our time here in the Eastern time zone– yup, bee-cause I wanted to bee-the first to see the new sneak peek {beyond the JUMBLE Alphabet, ‘k?}….but the site wasn’t ready – k’poooh, but I came back later aaaand – JUST SAW THE NEW IN COLORS!   OMGosh!  They are fab, just fab!

PLUS ……THE NEW STAMPS shown – and may I say it again - Oh-My-GOSH!       There is “pretty” …there is “fun”….there is “elegant, rustic…” …..and a cool set which I can’t  think on yet but I know I can do something with it beyond kids cards & projects!  

SO!  Before we get into all of that – we come to the “teary” part….because that means – our beautiful IN COLORS of ‘08/09 are going bye-bye! 

Kiwi….Tangerine…Pirouette….Pacific…Red….and who couldn’t be sad to see Baja Breeze go!  Bye!  Adieu! We salute you!!!

OK – you CAN still get them this month while supplies last.

Same with our DESIGNER SERIES PAPERS (pgs 158 – 165) – like one of the most popular papers, Raspberry Tart { really pretty colour combo} and Washington Apple  { so bright and cheerful } – you  should grab some while you can!  Take a look at these two examples, shown below here.

SU Raspberry Tart Papers Card

                                SU Washington Card

( images taken from SU Examples )

Next post……..new stuff!

Template by: